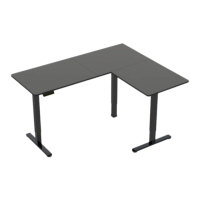
This document is an instruction manual for the VIVO Black 40" x 24" Electric Desk, SKU: DESK-EP40TB.
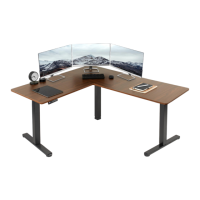
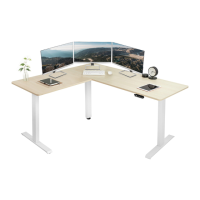
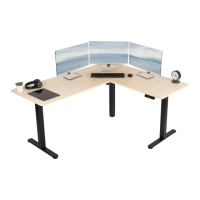
The VIVO Black 40" x 24" Electric Desk is a height-adjustable standing desk designed for home or office use. It features an electric motor for smooth and easy height adjustments, allowing users to switch between sitting and standing positions throughout the day. The desk is designed to improve ergonomics and promote a healthier work environment by reducing prolonged sitting.
Key Features and Specifications:
- Function: Electric height-adjustable desk.
- Dimensions: 40 inches (width) x 24 inches (depth).
- Weight Capacity: 154 lbs (70 kg). This is a critical technical specification, and exceeding this limit can lead to product damage or serious injury.
- Control Panel: The desk is operated via a controller with "UP ARROW" and "DOWN ARROW" buttons for height adjustment, and a "RESET PROCESS" function.
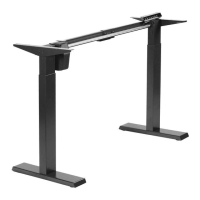
- Motorized Legs: The desk utilizes motorized legs (F) for electric height adjustment, connected via a sync rod (D) to ensure synchronized movement of both legs.
- Desktop: The main work surface (A) is a 40" x 24" desktop.
- Crossbar: A crossbar (B) provides structural support between the legs.
- Side Brackets: Side brackets (C) connect the desktop to the leg assembly.
- Foot: The feet (G) provide stability for the desk.
- Connecting Plate: A connecting plate (H) is used during assembly to secure the desktop.
- AC Adapter: An AC adapter (I) powers the desk's motor.
- Controller: The controller (K) is the interface for adjusting the desk's height.
- Headphone Hook: A headphone hook (L) is included for convenience, allowing users to hang headphones or other small items.
- Cable Clips: Cable clips (M) are provided for cable management, helping to keep the workspace tidy and prevent tangles.
- Rubber Pads: Rubber pads (N) are used to reduce vibration and protect surfaces.
- Tools Needed: A Phillips screwdriver is required for assembly, in addition to the included 5mm Allen wrench (T-B) and 2mm Allen wrench (T-A).
Usage Features:
- Height Adjustment:
- UP ARROW: Press and hold to raise the desk height. Release the button when the desired height is achieved.
- DOWN ARROW: Press and hold to lower the desk height. Release the button when the desired height is achieved.
- RESET PROCESS: Press and hold the DOWN ARROW for at least 5 seconds until the desk reaches the lowest height setting and then moves back up slightly. This process is used to reset the desk's height calibration.
- Ergonomic Benefits: The electric height adjustment allows users to easily switch between sitting and standing, promoting better posture, reducing back pain, and increasing energy levels throughout the workday.
- Cable Management: Integrated cable clips help organize power cords and other cables, maintaining a clean and organized workspace.
Maintenance and Safety Features:
- WARNING! ELECTRICAL SAFETY INSTRUCTIONS:
- The product is powered by electricity.
- Always ensure the power is disconnected before performing any maintenance or adjustments.
- Do not disassemble or replace components while power is connected.
- Never operate the system with a damaged cord or plug.
- Never operate the system in damp environments or if any electrical components have made contact with liquid.
- Alterations of the given power unit are not allowed.
- Outdoor use is prohibited.
- WARNING! CHOKING HAZARD: Small parts are not suitable for children under 3 years old. Adult supervision is required during assembly and use.
- CAUTION!
- Do not exceed desk weight limit: The desk has a maximum weight capacity of 154 lbs (70 kg). Overloading the desk can cause damage or injury.
- Keep area of vertical motion free of obstacles: Ensure there are no obstructions in the desk's path during height adjustments to prevent damage to the desk or other objects.
- Keep weight on desk balanced for correct operation and longer life of components: Distribute weight evenly on the desktop to prevent strain on the motor and other components.
- Leave enough slack in cables to allow for full range of vertical motion: Ensure all connected cables have sufficient slack to accommodate the full range of height adjustment without being pulled taut or damaged.
- Failure to follow these instructions may result in property damage and/or personal injury.
- Regular Checks: Users should periodically check all connections and fasteners to ensure they remain secure.
Assembly Steps Overview:
The manual provides detailed, step-by-step instructions for assembling the desk, including:
- Assembling the crossbar to the legs.
- Connecting the feet to the legs.
- Attaching the side brackets to the leg assembly.
- Installing and adjusting the sync rod, and applying anti-vibration pads.
- Placing wooden dowels, securing the desktop with connecting plates, and attaching the headphone hook.
- Connecting the controller to the desktop, and connecting all necessary cables (motorized leg to controller, AC adapter to controller) and securing them with cable clips.
- Customer Service Hours: Monday-Friday, 7:00am-7:00pm CST.
- Email: help@vivo-us.com
- Website: www.vivo-us.com (includes a live chat option)
- Phone: 309-278-5303
- QR Code: A QR code is provided for quick access to helpful videos and product specifications online.
- Social Media: Users are encouraged to share photos of their VIVO setup using @vivo_us.
- Response Times: The manual provides statistics on average resolution time (5M 4S via phone, < 15M via chat) and average response time (1HR 8M via email) for customer support.
This desk is designed for ease of assembly and use, providing a versatile and ergonomic solution for various work environments. Adherence to the provided safety warnings and instructions is crucial for safe operation and longevity of the product.