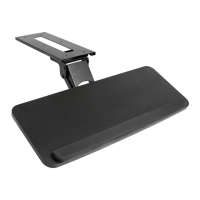
The VIVO White Clamp-on Small Keyboard Tray (SKU: MOUNT-KB05ES-W) is a desk accessory designed to provide an ergonomic and space-saving solution for keyboard placement. This instruction manual outlines the assembly process, important safety warnings, and usage features of the product.
Function Description:
The primary function of this device is to create an under-desk keyboard tray that can be clamped onto an existing desk surface. This helps to free up valuable desk space and can improve typing posture by allowing the keyboard to be positioned at a more comfortable height and distance. The tray is designed to slide forward and backward, providing flexibility in positioning for different users and tasks. It also includes a keyboard stop to prevent the keyboard from sliding off the tray.
Important Technical Specifications:
- SKU: MOUNT-KB05ES-W
- Weight Capacity: The keyboard tray has a maximum weight capacity of 11 lbs (5 kg). Exceeding this limit may result in serious injury or damage to the product.
- Materials: The components appear to be made of metal for the brackets and clamps, and a flat surface for the keyboard tray itself. Pads are included for the clamps to protect the desk surface.
- Dimensions (approximate, based on components):
- Keyboard Tray (E): One unit, forms the main surface for the keyboard.
- Connecting Plates (F): Two units, used to assemble the keyboard tray.
- Slider Brackets (G): Two units, allow the tray to slide.
- Clamps (H): Two units, secure the tray to the desk.
- Keyboard Stop (I): One unit, prevents the keyboard from sliding off the back.
- Hardware:
- M4x7 Screws (A): 6 pieces, used for attaching clamps to slider brackets.
- M5x12 Screws (B): 8 pieces, used for attaching slider brackets to the keyboard tray.
- M5x12 Flat Head Screws (C): 12 pieces, used for assembling the keyboard tray and attaching the keyboard stop.
- Pads (D): 2 pieces, for clamp protection.
- Note: 2 extra screws of each type are included.
- Tools Needed: A Phillips screwdriver is required for assembly.
Usage Features:
- Clamp-on Design: The tray attaches to the desk using clamps, eliminating the need for drilling or permanent modifications to the desk. This makes it suitable for various desk types and allows for easy installation and removal.
- Sliding Mechanism: The integrated slider brackets allow the keyboard tray to be pulled out when in use and pushed back under the desk for storage, optimizing desk space.
- Adjustable Clamp Offset: The clamps can be offset using extra holes in the slider brackets. This feature allows the tray to be pulled out an additional 1.2 inches (30mm) when in use, providing more clearance and flexibility in positioning relative to the desk edge.
- Keyboard Stop: A dedicated keyboard stop can be attached to the back of the tray to prevent the keyboard from sliding off, ensuring stability and safety during use.
- Desk Protection: Pads (D) are included to be placed on the underside of each clamp, protecting the desk surface from scratches and damage when the tray is installed.
- Clearance Adjustment: The manual provides a tip for increasing clearance if the keyboard tray is not sliding in completely. Removing the keyboard backstop can provide an extra 0.75 inches (19mm) of clearance. Further clearance can be achieved by changing the orientation of the desk if it has a sync rod, to avoid interference with crossbars and cable trays.
Maintenance Features:
- Regular Inspection: The manual emphasizes checking for missing or defective parts prior to installation and warns against improper installation, which can cause damage or serious injury. This suggests a need for periodic inspection of the assembled unit to ensure all components remain secure and functional.
- Weight Capacity Adherence: Strict adherence to the 11 lbs (5 kg) weight capacity is crucial for the longevity and safe operation of the tray. Overloading can lead to structural failure and potential injury.
- Clamp Tightness: The manual advises against over-tightening clamps to ensure the keyboard tray remains level. This implies that users should periodically check the tightness of the clamps to maintain stability without causing deformation or damage.
- Cleaning: While not explicitly stated, general maintenance would include keeping the tray surface clean to ensure smooth operation and hygiene.
Assembly Steps Overview:
- Step 1: Assemble the Keyboard Tray (E) using Connecting Plates (F) and M5x12 Flat Head Screws (C).
- Step 2: Attach the Keyboard Stop (I) to the back of the Keyboard Tray (E) using M5x12 Flat Head Screws (C).
- Step 3: Assemble Slider Brackets (G) to the Keyboard Tray (E) using M5x12 Screws (B).
- Step 4: Assemble Clamps (H) to the Slider Brackets (G) using M4x7 Screws (A).
- Step 5: Place Pads (D) on the underside of each clamp, position the assembled keyboard mount on the desk edge, and tighten the clamps. Then, slide the keyboard tray to the desired position.
Support and Warranty:
VIVO offers customer support Monday-Friday from 7:00 am to 7:00 pm CST. They provide assistance for damaged or defective parts and aim for quick resolution times. Contact options include email (help@vivo-us.com), phone (309-278-5303), and live chat on their website (www.vivo-us.com). The manual was last updated on 09/19/2022 (REV1).