This document is an instruction manual for the VIVO White Projector Ceiling Mount, SKU: MOUNT-VP01W. It provides detailed assembly steps, safety warnings, and contact information for customer support.
Function Description
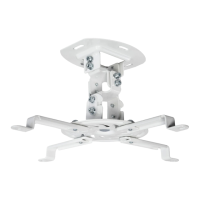
The VIVO White Projector Ceiling Mount is designed to securely attach a projector to a ceiling, allowing for optimal positioning and adjustment. It supports both wood and concrete ceiling installations and offers options for cable management, either hidden above the ceiling or routed below. The mount features adjustable arms to accommodate projectors with varying mounting hole patterns, including those with three mounting holes (by removing one arm). Once installed, the projector's angle and rotation can be adjusted to achieve the desired projection.
Important Technical Specifications
- SKU: MOUNT-VP01W
- Weight Capacity: Do not exceed 30 lbs (13.61 kg). Exceeding this limit can result in serious injury.
- Ceiling Compatibility:
- Wood Ceilings: Requires 4.5mm or 3/16" drill bit for 55mm (2.2") deep holes. Mounts with (W-A) screws and (W-C) washers.
- Concrete Ceilings: Requires 10mm or 3/8" drill bit for 60mm (2.4") deep holes. Mounts with (W-B) concrete anchors, (W-A) screws, and (W-C) washers.
- Mounting Hardware (Projector Attachment):
- Screws: M-A (M3x8), M-B (M4x10), M-C (M5x10), M-D (M6x10)
- Washers: M-E (D3), M-F (D4), M-G (D5), M-H (D6)
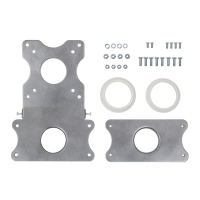
- Mounting Hardware (Mounting Plate to Ceiling Mount):
- Screws: M-I (M5x12)
- Washers: M-J (Metal), M-K (Plastic)
- Tool: M-L (Allen Wrench)
- Adjustability:
- Rotation: 360 degrees
- Tilt: +/- 15 degrees
Usage Features
- Cable Management Options:
- Hidden Cables: Cables can be routed through a large opening in the ceiling plate for a clean, concealed look, ideal when cables are to be hidden above the ceiling.
- Visible Cables: Cables can be routed through the side of the ceiling mount if they are located below the ceiling or if concealment is not required.
- Adjustable Projector Arms: The mounting plate (part B) features adjustable arms that can be aligned with the projector's mounting holes. For projectors with only three mounting holes, one arm can be easily removed.
- Easy Projector Attachment: Projectors are mounted to the bracket using a selection of screws (M-A, M-B, M-C, M-D) and washers (M-E, M-F, M-G, M-H) to ensure compatibility with various projector models.
- Quick Installation: The mounting plate with the projector is designed to hang over pre-installed screws on the ceiling mount, simplifying the final attachment step. Plastic oval washers are used between the plate and mount to ensure a secure fit.
- Angle and Rotation Adjustment: After installation, the projector's angle and rotation can be easily adjusted. The mount allows for a 360-degree rotation and a tilt of +/- 15 degrees, providing flexibility for precise image alignment.
- Comprehensive Hardware: The package includes a variety of screws, washers, anchors, and an Allen wrench to facilitate installation on different ceiling types and compatibility with various projectors. Note that not all included hardware will be used for every installation.
Maintenance Features
- Durable Construction: While specific materials are not detailed, the mount is designed for secure and long-term use, provided it is installed correctly and within its weight capacity.
- Clear Instructions: The manual provides step-by-step assembly instructions with clear diagrams, making installation and any necessary adjustments straightforward.
- Customer Support: VIVO offers dedicated customer support Monday-Friday from 7:00 am to 7:00 pm CST. They provide assistance for installation queries, missing or defective parts, and general product support via email (help@vivo-us.com), phone (309-278-5303), and live chat on their website (www.vivo-us.com).
- Online Resources: A QR code and URL (https://vivo-us.com/products/mount-vp01w) are provided for accessing helpful videos and detailed specifications, which can assist with troubleshooting or understanding product features.
- Safety Warnings: The manual includes explicit warnings regarding proper installation, weight capacity, and choking hazards (for small parts), emphasizing the importance of following instructions to prevent damage or injury. It also cautions against installing into drywall alone, stressing the need to verify ceiling construction and use wood studs, or appropriate anchors for brick and concrete.