56
ENGLISH
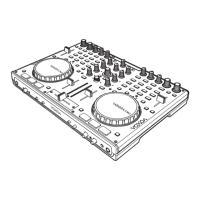
PART NAMES AND FUNCTIONS
19. Bank Pads 1,2,3,4
These buttons are used to store either four cue points or four loops. Each Bank Button can store either a loop
or a cue point. For Hot Cue the illumination is Orange. For Loops the illumination is Blue.
: While the Pad is flashing, it indicates that the Pad is active.
20. Clear button
Clears cue points and loops stored in the BANK PADS. Press CLEAR button, the button is lighted up, and then
select the BANK buttons (1 ~ 4) you would like to clear.
21. X Parameter (Time) and Decrease Beat Sync button
This button is used to adjust the parameter time value. You can push the X parameter (TIME) button, LED on,
and turn the JOG WHEEL to adjust the parameter time value. If the HOLD
function is selected any changes
to the effect parameters will be permanent . During hold function is selected the auto beat sync will be turned
off.In FX Auto Beat Sync mode, press this button to decrease beat sync.
22. Echo Effect button
This button is used to activate and deactivate the echo effect. The echo effect adds an echo to your output
signal.
23. Flanger Effect button
This button is used to activate and deactivate the flanger effect. The Flanger effect distorts the output signal and
creates an effect similar to the frequency phasing in and out of each other. This frequently applied effect is similar
to the Phase effect, but slightly more harmonious, emphasizes the upper pitch more and is reminiscent of a
flying aircraft.
To manually change the beat frequency of the effect, press the X Parameter (TIME) button
and regulate the
frequency value with the JOG WHEEL (from 0-9990 mSec.). To influence the intensity of the effect, press the Y
Parameter (DEPTH) button
and set the volume with the JOG WHEEL (from 0-255).
TIP : The Flanger effect is best when set to 4/1 beat with the Beat Link Button.
24. Hold and FX Auto Beat Sync Mode button
This button allows you to set and lock any new parameters you set to the effects. Otherwise, the effect
parameters always return to the original value. This button will glow when the hold function is activated.
Hold this button for 2 sec and the LED is flashing to active FX Auto Beat Sync mode. In the FX Auto Beat Sync
mode, you can press X button
to decrease beat sync or press Y button
to increase beat sync.
: The FX Auto Beat Sync function is based on BPM. Therefore, without correct BPM the
function can’t work. Before use the Auto Beat Sync function, please make sure the BPM
counter already count the correct BPM.