2
03.11
-
-
-
-
TOR.119.--.M.4L Rev. A1
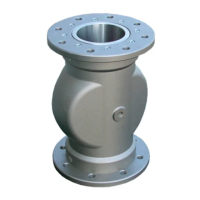
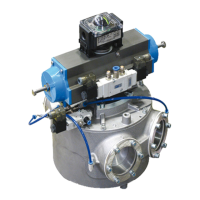
VAR
SEQUENZA DI UTILIZZO
• Come esempio supponiamo che la
direzione del flusso aria-prodotto de-
siderata sia quella della posizione di
uscita “I-X”.
• Basandosi sul segnale del micro
interruttore per segnalazione posi-
zione “I-X”, accertarsi che il tambu-
ro interno sia posizionato in modo
da far scorrere il prodotto nella dire-
zione scelta.
• Se il micro interruttore segnala la
giusta posizione, allora si può pro-
seguire come descritto di seguito,
altrimenti occorre azionare il tam-
buro interno per cambiare la linea e
portarlo nella giusta posizione come
descritto nel paragrafo “Cambio Li-
nea”.
Per proseguire occorre:
• Gonfiare le tenute interne alla pres-
sione precedentemente impostata
come da istruzioni descritte nel pa-
ragrafo Collegamenti Pneumatici ali-
mentando il solenoide per gonfiag-
gio tenute.
Controllare la giusta tensione.
• Aprire il flusso aria del trasporto
pneumatico
• Aprire il flusso prodotto del traspor-
to pneumatico
• A questo punto il deviatore VAR sta
direzionando il flusso aria-prodotto
verso la linea di trasporto desidera-
ta.
• Continuare il trasporto nella linea
per tutto il tempo necessario man-
tenendo la sola alimentazione del
solenoide per gonfiaggio tenute.
Questo ci garantisce che le tenute
siano gonfie.
• Qualora si verifichi la necessità di
cambiare la linea, procedere come
segue:
Cambio Linea
• Chiudere il flusso prodotto
• Lasciare aperto solo il flusso aria
per almeno 20-30secondi.
• Chiudere il flusso aria
• Questa procedura permette di puli-
re la linea e soprattutto la parte di
passaggio del tamburo interno del
deviatore
• Sgonfiare le tenute interne toglien-
do l’alimentazione al solenoide del
gonfiaggio tenute.
• Alimentare il Solenoide per posizio-
ne di uscita “I-O”
• Il tamburo del deviatore ruota di 150
gradi in modo da cambiare il pas-
saggio dalla bocca di uscita “I-X”
alla bocca di uscita “I-O”.
• Una volta raggiunto il posiziona-
mento, il micro interruttore per la
segnalazione posizione “I-O” invie-
rà il segnale del giusto posiziona-
mento.
• ATTENDERE ALMENO 10 SECON-
DI DAL MOMENTO CHE SI E’ RI-
CEVUTO IL SEGNALE DEL MICRO
INTERRUTTORE AL MOMENTO IN
CUI TOGLIERE TENSIONE AL
SOLENOIDE
27
START UP PROCEDURE – USE SEQUENCE
EINSCHALTVERFAHREN - BENUTZUNGSSEQUENZ
PROCÉDURE DE MISE EN MARCHE - SEQUENCE D’UTILISATION
PROCEDURA DI AVVIAMENTO - SEQUENZA DI UTILIZZO
USE SEQUENCE
• Suppose the direction of the air-
product flow required is that of the
“I-X” output position.
• On the basis of the micro switch
signal indicating the “I-X” position,
make sure the internal drum is po-
sitioned to allow the product to flow
in the required direction.
• If the micro switch indicates the
correct position, it is possible to
proceed as described below: other-
wise the internal drum must be ac-
tivated to change the line and bring
it to the correct position as de-
scribed in the “Line Change” para-
graph.
To proceed:
• Inflate the internal seals at the pres-
sure set earlier according to the in-
structions given in the Pneumatic
Connections paragraph, by power-
ing the seals inflation solenoid.
Check to ensure the correct volt-
age.
• Open the pneumatic conveyor air
flow
• Open the pneumatic conveyor prod-
uct flow
• At this point, the VAR diverter valve
directs the air-product flow towards
the required conveyor line.
• Continue conveying in the line for
the required time keeping only the
seals inflation solenoid powered.
This ensures that the seals are in-
flated.
• If it is found to be necessary to
switch lines, proceed as follows:
Line Change
• Close the product flow
• Leave only the air flow open for 20-
30 seconds.
• Close the air flow
• This procedure makes it possible to
clean the line, especially in the part
of the internal drum passage of the
diverter valve
• Deflate the internal seals by dis-
connecting the power supply to the
seals inflation solenoid.
• Power the Solenoid for the “I-O” out-
put position
• The diverter valve drum rotates
through 150 degrees to change the
passage from the “I-X” outlet spout
to the “I-O” outlet spout.
• Once the positioning is obtained,
the “I-O” position signalling micro
switch will send the signal indicat-
ing correct positioning.
• WAIT AT LEAST 10 SECONDS AF-
TER THE MICRO SWITCH SIGNAL
IS RECEIVED BEFORE DISCON-
NECTING THE POWER TO THE
SOLENOID VALVE.
BENUTZUNGSSEQUENZ
• Als Beispiel nehmen wir an, dass
die gewünschte Förderrichtung von
Luft-Produkt die ist, die der Aus-
laufposition „I-X” entspricht.
• Aufgrund des Signals des Mikro-
schalters für die Meldung der Posi-
tion „I-X” sicherstellen, dass die
Innentrommel so angeordnet ist,
dass das Produkt in der gewünsch-
ten Richtung strömt.
• Wenn der Mikroschalter die richtige
Position meldet, kann man weiter-
machen, wie weiter unten beschrie-
ben wird. Sonst muss man die
Innentrommel betätigen, um die
Leitung zu ändern und sie in die rich-
tige Position zu bringen, so wie es
im Abschnitt „Umschalten der Lei-
tung” beschrieben ist.
Um weiterzumachen, geht man
folgendermaßen vor:
• Die internen Dichtungen auf den
zuvor eingestellten Druck aufbla-
sen, so wie es im Abschnitt Pneu-
matische Anschlüsse beschrieben
ist, indem man die Solenoidspule
zum Aufblasen der Dichtungen
speist.
Auf die richtige Spannung prüfen.
• Den Luftstrom der pneumatischen
Fördervorrichtung öffnen.
• Den Produktstrom der pneumati-
schen Fördervorrichtung öffnen.
• Nun fördert die Rohrweiche VAR
den Luft-Produktstrom in der Rich-
tung auf die gewünschte Förderlei-
tung.
• Den Transport in der Leitung für die
ganze erforderliche Zeitdauer fort-
setzen, wobei nur die Speisung der
Solenoidspule zum Aufblasen der
Dichtungen beibehalten wird. Dies
gewährleistet, dass die Dichtungen
dabei prall gefüllt bleiben.
• Sollte es vorkommen, dass man die
Leitung ändern muss, geht man wie
folgt vor:
Leitungsänderung
• Den Produktfluss schließen.
• Nur den Luftstrom für mindestens
20-30 Sekunden offen halten.
• Den Luftfluss schließen.
• Dieses Verfahren gestattet es, die
Leitung zu reinigen und vor allem
den Teil, in dem das Produkt durch
die Innentrommel der Rohrweiche
läuft.
• Die Luft aus den internen Dichtun-
gen ablassen, indem man die
Stromversorgung der Solenoidspu-
le zum Aufblasen der Dichtungen
ausschaltet.
• Die Solenoidspule für die Auslauf-
position „I-O” speisen.
• Die Trommel der Rohrweiche dreht
sich um 150 Grad, um den Durch-
lauf des Produkt vom Auslauf „I-X”
auf den Auslauf „I-O” umzuschal-
ten.
• Wenn diese Positionierung ausge-
führt ist, sendet der Mikroschalter
für die Meldung der Position „I-O”
das Signal der korrekten Positionie-
rung.
• AB DEM ERHALTEN DES SIGNALS
DES MIKROSCHALTERS BIS ZU
DEM AUGENBLICK, IN DEM MAN
DIE SPANNUNG AN DER SOLE-
NOIDSPULE AUSSCHALTET,
MINDESTENS 10 SEKUNDEN AB-
WARTEN.
SEQUENCE D’UTILISATION
• Comme exemple supposons que la
direction du flux air-produit désiré
soit celui de la position de sortie “I-
X”.
• En se basant sur le signal du micro-
contact de signalisation de position
“I-X”, s’assurer que le tambour in-
terne est positionné de manière à
faire écouler le produit dans la di-
rection choisie.
• Si le micro-contact signale la bonne
position, on peut alors continuer
comme décrit ci-dessous, dans le
cas contraire il faut actionner le
tambour interne pour changer la li-
gne et le placer dans la bonne posi-
tion comme décrit dans le paragra-
phe “Changement de Ligne”.
Pour continuer il faut:
• Gonfler les joints internes à la pres-
sion déterminée suivant les instruc-
tions décrites dans le paragraphe
Raccordements Pneumatiques en
alimentant le solénoïde de gonfla-
ge des joints.
Contrôler que la tension est juste.
• Ouvrir le flux d’air du transport pneu-
matique
• Ouvrir le flux de produit du trans-
port pneumatique
• La vanne déviatrice VAR est main-
tenant en train de diriger le flux air/
produit vers la ligne de transport
désirée.
• Continuer le transport dans la ligne
tout le temps nécessaire en main-
tenant seulement l’alimentation du
solénoïde de gonflage des joints.
Ceci est une garantie que les joints
soient gonflés.
• S’il s’avère nécessaire de changer
la ligne, procéder de la manière sui-
vante :
Changement de Ligne
• Fermer le flux de produit
• Laisser ouvert seulement le flux
d’air pendant au moins 20 à 30 se-
condes.
• Fermer le flux d’air
• Cette procédure permet de nettoyer
la ligne et surtout la partie de pas-
sage du tambour interne de la van-
ne déviatrice.
• Dégonfler les joints internes en cou-
pant l’alimentation au solénoïde de
gonflage des joints.
• Alimenter le Solénoïde pour la posi-
tion de sortie “I-O”.
• Le tambour de la vanne déviatrice
tourne de 150 degrés de manière à
changer le passage de la bouche
de sortie “I-X” à la bouche de sortie
“I-O”.
• Une fois que le positionnement est
atteint, le micro-contact de signali-
sation position “I-O” enverra le si-
gnal de positionnement correct.
• ATTENDRE AU MOINS 10 SECON-
DES DU MOMENT DE LA RECEP-
TION DU SIGNAL DU MICRO-CON-
TACT AU MOMENT DE LA COU-
PURE DE TENSION AU SOLENOI-
DE.
 Loading...