Do you have a question about the Weider E8000 and is the answer not in the manual?
Details required for contacting customer support regarding missing or defective parts.
Guidance on where to find the unit's model number on the page.
Emphasizes reading all safety precautions and instructions before using the equipment.
Advice on required tools, unpacking, and organizing parts for efficient assembly.
Explanation of the assembly method and tips for pre-selecting hardware for each step.
Important notes on warnings, cautions, using washers, gluing plastic caps, and maintenance.
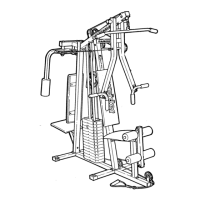
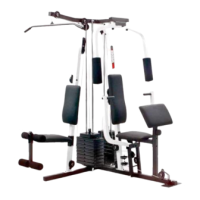
List of parts for the base frame, including mounting plates and uprights.
Parts related to the seat, arm press, stepper handles, and pedals.
Identification of pulleys, connectors, and cable trap brackets.
List of all bolts, nuts, washers, and screws used in assembly.
Identification of various plastic components and metal spacers.
Details on cables, ring retainers, and selector pins.
List of accessory items like Lat Bar, Ankle Strap, Dumbbell Handle, and manuals.
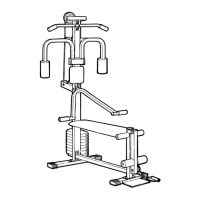
Instructions for attaching base frames and mounting arm press and stepper uprights.
Steps for attaching the seat frame and seat brace to the main frame structure.
Attaching the top frame to the stepper and arm press uprights using bolts and washers.
Instructions for applying decals and tightening all frame bolts from previous steps.
Procedure for stacking weight plates and inserting the weight selector tube.
Bolting guide rods and applying weight plate decals for identification.
Inserting the weight selector pin for future cable assembly.
Instructions for attaching the seat and backrest components to the frame.
Steps for assembling the leg extension tube, pad bars, and foam rollers.
Instructions for assembling the arm press pivot tube and associated components.
Steps for mounting the pec-deck arms, including bushings and securing hardware.
Securing the pec-deck arms in place using lock pins for proper function.
Instructions for attaching arm press handles and applying foam grips.
Routing the pec-deck cable and assembling cables for the monitor bracket.
Installing pulleys and spacers for the top cable system.
Instructions for attaching pulley brackets to the arm press frame and pec-deck arms.
Steps for installing pulleys and trapping cables into brackets.
Attaching the stepper brace, sensor bracket, and preparing the pedals.
Attaching the weight stack cable and assembling the U-bracket with magnet.
Assembling dual pulley systems and securing cables with trap brackets.
Connecting the leg extension cable to pulleys and the frame.
Ensuring proper cable tension and adjusting the cable stopper.
Assembling the resistance cylinder, support tube, and bushings.
Attaching resistance scale decals and foot pads to the pedals.
Adjusting resistance settings and aligning the magnetic pickup with the sensor.
Instructions for installing the stepper handlebar and foam grips.
Information on ordering replacement parts and contacting customer service.
Crucial advice to consult a physician and train with a partner for safety.