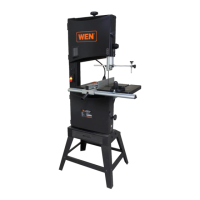
The WEN 10-Inch Band Saw with Stand, models 3962 and 3962T, is a power tool designed for cutting wood. It is engineered for dependability, ease of operation, and operator safety, aiming to provide years of rugged, trouble-free performance when properly cared for and used as intended.
Function Description
The primary function of the WEN band saw is to cut wood. It is suitable for various cutting operations, including straight-line cutting (cross-cutting, ripping, miter cutting, beveling, compound cutting, and resawing). While it can cut curves, it is not designed for the intricate work of a scroll saw and cannot perform the same kinds of cuts. Users are advised not to cut sharp corners but rather to saw around them. The tool features a stand for stable operation, and its design includes various adjustable components to accommodate different cutting needs and ensure precision.
Important Technical Specifications
- Model Numbers: 3962, 3962T
- Motor: 120V, 60 Hz, 3.5A
- Throat: 9-3/4 inches
- Maximum Workpiece Thickness: 6 inches
- Blade Speed: 1520 / 2620 FPM (Feet Per Minute)
- Blade Length: 72 inches
- Blade Width: 1/8 to 1/2 inch (a 3/8 inch blade is included)
- Work Table Bevel: 0 to 45°
- Work Table Dimensions: 14-1/8 inches x 12-1/2 inches
- Weight: 73.5 pounds
- Product Dimensions (w/ stand): 26.5 in. x 21 in. x 58.5 in.
The band saw is equipped with a power switch, a light on/off switch, a fence assembly with a locking lever, a miter gauge, upper and lower housing knobs, and various adjustment knobs for the blade guide, blade bearing, blade tension, and blade tracking. It also includes a work light, table bevel lock, dust port, and a motor tension release mechanism.
Usage Features
Assembly and Setup:
The band saw requires assembly of its stand and table. The stand is assembled using carriage bolts, flat washers, and hex nuts, with a 4x4 wood block recommended for support during initial assembly. The stand's levelness should be checked with a bubble level and adjusted as needed to prevent wobbling or tilting. The table is fastened to the mounting bracket with hex bolts and flat washers, ideally in the 0° position (perpendicular to the blade), though it can be beveled for easier access to bolts. The guide rail is installed by sliding its slots over threaded shafts and tightening lock knobs. The rip fence slides onto the guide rail and can be locked in position, with the option to reverse it for use on either side of the blade, especially for thin materials.
Adjustments for Precision and Safety:
- 0°/45° Stops: The positive stops for 0° and 45° table bevels can be adjusted by loosening nuts, turning the stops, and using a bubble level and combination square to ensure accuracy. The angle indicator on the bevel guide should also be calibrated.
- Blade Tracking: This adjustment ensures the blade rides smoothly and evenly on the wheels. It involves loosening a tracking lock knob, rotating the upper wheel, and slowly turning the tracking knob until the blade tooth gullets are centered over the tire. Small adjustments (e.g., 1/4 turn) are recommended for easier and proper tracking.
- Blade Tension: Proper blade tension is crucial to prevent breakage, slipping, stalling, or wandering during cuts. The blade tension knob is turned clockwise to increase tension and counterclockwise to decrease it. A gloved finger test (pressing the blade gently to the left) should show no more than 1/8-inch movement for proper tension.
- Upper Blade Guide: The height of the upper blade guide should be adjusted before every cut, positioned as close as possible to the workpiece's upper face (no more than 1/8 inch/3mm away) by loosening and tightening an adjustment locking knob.
- Upper and Lower Guide Bearings: These bearings must be adjusted after every blade change and tracking adjustment to prolong blade life and prevent "blade drift." This involves loosening socket-head cap screws and positioning the roller bearings about 1-2mm (1/10 inch) behind the tooth gullets, and the thrust bearing as close as possible to the blade's spine without touching it. The blade should be rotated a few times to confirm no contact with the bearings.
- Cutting Speed: The band saw offers two speeds (1520 FPM and 2620 FPM). The higher speed is generally for softwoods, and the lower for hardwoods. Speed adjustment involves loosening a socket-head cap screw on the motor-mounting flange, moving the motor to relieve belt tension, adjusting the belt position on the pulleys, and then returning the motor to its original position to re-tension the belt.
Operation:
- Power Switch: The saw is turned ON/OFF using the power switch, which includes a yellow safety key to prevent unauthorized use. The LED work light can be turned ON/OFF independently of the saw's operation.
- General Cutting Guidelines: Always make test cuts on scrap wood to familiarize with settings. All adjustments should be made with the saw OFF and unplugged. A push stick should be used for intricate or narrow workpieces. The workpiece should not be forced against the blade; the tool should do the work to prevent excess friction and burning. Dust collection is highly recommended, utilizing the dust port on the back of the saw.
- Miter Gauge: The miter gauge fits into a T-slot on the work table and allows for setting miter angles between 0° and 60°.
Maintenance Features
Routine Inspection:
Before each use, a general inspection of the tool is recommended. This includes checking for loose hardware, misalignment or binding of moving parts, damaged cords/electrical wiring, cracked or broken parts, and any other condition that might affect safe operation. Any issues found should be repaired before use. The V-belt tension and wear should be checked monthly.
Cleaning & Storage:
- Ventilation: Keep ventilation openings free from dust and debris to prevent motor overheating. A dust collection system is essential to prevent sawdust buildup.
- Surfaces: Wipe tool surfaces clean with a damp cloth, avoiding water entry into the tool. Remove any pitch, sap, or resin from the table, blade guide, and bearings.
- Internal Cleaning: At least once a month, open the doors and vacuum out accumulated dust and shavings. Remove the blade and clean built-up sawdust from the wheels and tires with a stiff brush.
- Solvents: Avoid using commercial solvents, gasoline, carbon tetrachloride, chlorinated cleaning solvents, and ammonia-containing household detergents, as they can damage plastic parts.
- Storage: Store the tool in a clean, dry place, out of reach of children, and within temperatures of 41° to 86°F. Cover the band saw to protect it from dust and moisture.
- Blade Tension Release: If the band saw will not be used for over a week, release tension on the blade to prolong blade life.
Lubrication:
- Table: Apply a light coat of good-quality paste wax to the table as needed for smooth workpiece gliding.
- Table Bevel Brackets: Apply a light coat of dry lubricant (PTFE works well) to the space between the table bevel brackets and the base bracket to ensure easy beveling.
- Bearings: The band saw's bearings are permanently sealed and lubricated, requiring no additional lubrication.
Blade Changes:
Changing blades involves turning off and unplugging the saw, opening the upper and lower doors, loosening guide rail lock knobs, sliding off the guide rail, relieving blade tension with the tension knob, and carefully removing the old blade. The new blade is guided through the table slot (spine first, teeth pointing down), placed on the wheels, and then tensioned. Blade tracking and bearing guides must be re-adjusted after a blade change. A test cut on scrap wood is recommended after changing blades.
Safety:
The manual emphasizes reading all safety warnings and instructions. Key safety practices include wearing personal protective equipment (eye protection, hearing protection, respiratory mask), keeping the work area clean and well-lit, avoiding explosive atmospheres, keeping children and bystanders away, ensuring electrical safety (proper plugs, extension cords, GFCI protection), preventing unintentional starting, removing adjusting keys/wrenches before operation, maintaining proper footing and balance, dressing properly (no loose clothing or jewelry), using dust extraction, not forcing the power tool, disconnecting power before adjustments, storing idle tools safely, maintaining tools, keeping cutting tools sharp, using clamps for workpieces, and keeping guards in place. During cutting, users should stand to one side, keep hands away from the blade, feed work against blade rotation, complete cuts before looking up, hold tools by insulated gripping surfaces, and allow the blade to stop naturally before moving workpieces or making adjustments.