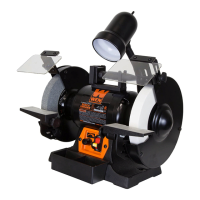
WORKLIGHT
The bench grinder provided has a flexible work light to maximize visibility during operation. A light bulb for the
flexible work light is not included. Use a 120 Volt, 40 watt or less track light bult (type R20, medium base) for the
onboard lamp. Make sure the bulb does not protrude past the rim of the light’s housing.
The flexible work light can be positioned in whatever direction you choose. Using the switch located on the top of
the housing will turn the light on and off.
ASSEMBLY & ADJUSTMENTS
WARNING! The light’s housing will remain hot for a few minutes after operation. Make sure to not touch
either the bulb or the housing during or directly after use.
PERMANENT MOUNTING
Firmly attach the grinder to a reliable work surface using the mounting pads and the included holes along the base
of the grinder (mounting hardware not included). This will prevent the possibility of vibration, walking or tipping
during operation.
WARNING! Do not operate this machine without first attaching the base to a reliable surface.
1. Turn the variable speed knob to its lowest setting before turning on the bench grinder.
2. To operate the bench grinder, always wear safety glasses and turn the tool on while standing to the side of the
grinder (as opposed to in front). Allow it to reach full speed before grinding.
3. Once the grinder is up and running, set the grinder to your desired speed. The lowest speed setting should be
used for light grinding, sharpening, and paint/rust removal. The highest speed should be used for deburring, mate-
rial removal and other heavier grinding tasks.
4. Hold the work piece firmly against the tool rest. Hold very small pieces with pliers or other suitable clamps.
5. Feed the work piece smoothly and evenly into the grinding wheel. Move it back and forth as to not burn any one
area of the surface and also to make for even grinding.
6. Move the work piece slowly and avoid jamming the work piece against the wheel. If the wheel tends to slow down
from excessive force, you should occasionally release the pressure to let the wheel return to full speed.
7. Grind only on the face of the grinding wheel; never the side of it
8. Place the hot end of the workpiece into the quenching tray to cool it off if you so choose.
9. Once grinding operations are complete, return the variable speed knob to its lowest setting. Once the wheels have
reached their new low speed, turn the bench grinder off and unplug it. Avoid contact with the bench grinder’s hous-
ing until it has cooled down completely.
OPERATION
12