13
ASSEMBLY & ADJUSTMENTS
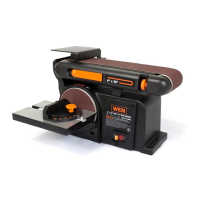
SQUARING THE MITER GAUGE
The miter gauge included with your sander attaches onto the work table to provide support for your workpiece and
help you sand at the desired miter angle. It is recommended to use the miter gauge to support small workpieces.
The miter gauge can be set anywhere from 0° to 60° (right or left). To check and adjust the squaring of the miter
gauge:
1. Loosen the miter lock knob, and set the miter gauge to 0° (indicated on the miter scale).
2. Place a square against the sanding disc and the flat face of the miter gauge. Check if the miter gauge face is 90° to
the sanding surface.
3. If adjustment is needed, loosen the miter lock knob and slide the miter gauge so that it is perpendicular to the
sanding disc. Tighten the miter lock knob.
4. Using a Phillips head screw driver, loosen the screw securing the miter point and adjust it to point to 0° on the
miter scale. Tighten the Phillips head screw.
5. Recheck the square.

 Loading...