are flashing” on this page in the left column.
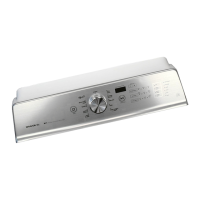
Jumper Board Coin Slide Switch -
PAGE 16
FOR SERVICE TECHNICIAN’S USE ONLY
DO NOT REMOVE OR DESTROY
If the capacitor is either shorted or open, replace capacitor,
calibrate the washer, and repeat step 1.
16.
If the preceding steps did not correct the motor problem,
replace the main control.
a.
Unplug washer or disconnect power.
b.
Replace the main control.
c.
Reassemble all parts and panels.
d.
Plug in washer or reconnect power. Calibrate washer
and perform Quick Overview Test on page 8 to verify repair
.
TEST #4: Console and Indicators
Console and Indicators Check:
This test is performed when any of the following situations
occurs during “UI Test Mode” on page 4.
3
None of the LEDs light up
3
One or more Status LEDs are flashing
3
Turning rotary switch does not toggle LED
None of the LEDs light up:
1.
Unplug washer or disconnect power.
2. Access the main control and visually check that ALL
connectors are inserted all the way into their respective
headers.
3.
Visually check that the main control assembly is properly
inserted in the console.
4.
If both visual checks pass, follow procedure under TEST #1,
“Main Control” on page 12 to verify supply voltages.
5.
To verify repair, activate the Service Diagnostic Mode, and
then perform UI Test Mode on page 4.
One or more Status LEDs are flashing:
If one or more of the status LEDs are flashing (on and off in
0.5 second intervals), refer to the following notes to identify the
switch(es) in question. Reference the wiring diagram on page 20
when performing the following procedures.
a.
Verify the switch connector is inserted all the way into the
main control.
b.
Check the harness between the switch and main control
for continuity. Check for shorts.
c.
Replace the switch.
d. Replace the main control.
NOTE 3: Each switch and the cycle selector knob is represented
by the following status LEDs:
•
-
toggles(1)SensingLoadLED
• -toggles(2)Soak/WashLED
• - toggles (3) Rinse LED
• toggles(4)FinalSpinLED
•CycleSelectKnob-toggles(5)DoneLED
NOTE 4: Status LED names may vary between makes and
models. Use LED # identification.
Turning rotary switch does not toggle LED:
Perform the procedures under “One or more Status LEDs
TEST #5: Temperature Thermistor
This test checks valves, main control, temperature thermistor,
and wiring.
1.
Check the cold valve by performing Cold Valve test under
Manual Overview Test Mode on page 9.
If cold water is being dispensed, proceed to step 2.
If hot water is being dispensed, verify proper hose
connection.
2.
Check the hot valve by performing Hot Valve test
under Manual Overview Test Mode on page 9.
If hot water is being dispensed, proceed to step 3.
If cold water is being dispensed, ensure that household
hot water is present.
3.
Unplug washer or disconnect power.
4. Remove console to access main control.
5. Remove connector J3 from the main control. With an
ohmmeter, measure the resistance of the temperature
thermistor between pins J3-9 and J3-10. V
erify that the
approximate resistance, shown in the following table,
is within ambient temperature range.
(1)Sensing
(2)Soak/ (4)Final
Load Wash
(3)Rinse
Spin (5)Done
Jumper Board J3 & J4
Jumper Board J3
Jumper Board J2
 Loading...