Installing Your Furnace
The following steps are needed for proper installation and safe
operation of your furnace. If you have any doubts as to any
requirements, always consult your local Heating or Plumbing
lnspector, Building Department or Gas Utility Company regarding
regulations, codes, or ordinances which apply to the installation of
a vented wall furnace. Obtain professional help where needed.
The CHECK AND ADJUSTMENTS on page 21 are vital to
the proper and safe operation of the furnace. Be sure they
are done.
IMPORTANT
For satisfactory and trouble-free operation, be sure to:
1. Locate the furnace properly within the space to be heated.
2. Install the furnace in accordance with local codes or
ordinances and instructions provided. In the absence of local
codes or ordinances, install the furnace to conform with the
current edition of the National Fuel Gas Code, NFPA 54, ANSI
Z223.1/Canadian Installation Code, CAN/CGA B149.
3. Maintain minimum clearance: Floor 0 inches or ceiling 4
inches, side wall 4 inches. For exception to minimum side wall
clearance, as shown on Page 8, Figs. 4, 5, 6 & 7.
4. Provide for adequate combustion air around vent cap on
outside, see Fig. 2 and adequate air circulation around cabinet
inside the open room.
Locating Wall Furnace & Thermostat
Consider the following points before attempting to install the
furnace:
1. This is a direct-vent wall furnace. It must be installed on an
OUTSIDE WALL for proper venting of flue gases (Fig. 2).
a. Wall furnace can be surface mounted on an outside wall.
(Surface Mount)
b. Ideally, the wall should be on the least windy side of the
dwelling, as strong gusts may extinguish the pilot.
c. Furnace may be installed flush against a wall or recessed up
to 10" maximum. Wall thickness from back surface of furnace
to outside of wall can be 3/4" minimum to 8 ½" maximum.
See Page 8, Fig. 3.
With standard furnace discharge outlet, do not install closer than
4" to intersecting wall. See Page 8, Fig. 4.
Studs must be spaced on 16-inch centers or stud space will have
to be framed in. See Page 9 and 10, Recessed Mounting.
2. The top of the furnace must be at least 4-inches from the
ceiling.
3. Check the clearances needed from the furnace and vent
(Page 7, Fig. 2 and Page 8, Fig. 4). You must place the
furnace where you will have no less than the clearances
shown. See Page 8, Fig. 5, 6 & 7.
4. When using optional kits 6703 or 6704, maintain the
clearances as shown on Page 8, Fig. 5, 6 & 7.
5. When using optional kit 6701, maintain clearance as shown
on Page 8, Fig. 4. Use only optional outlet and grille kits
available from manufacturer.
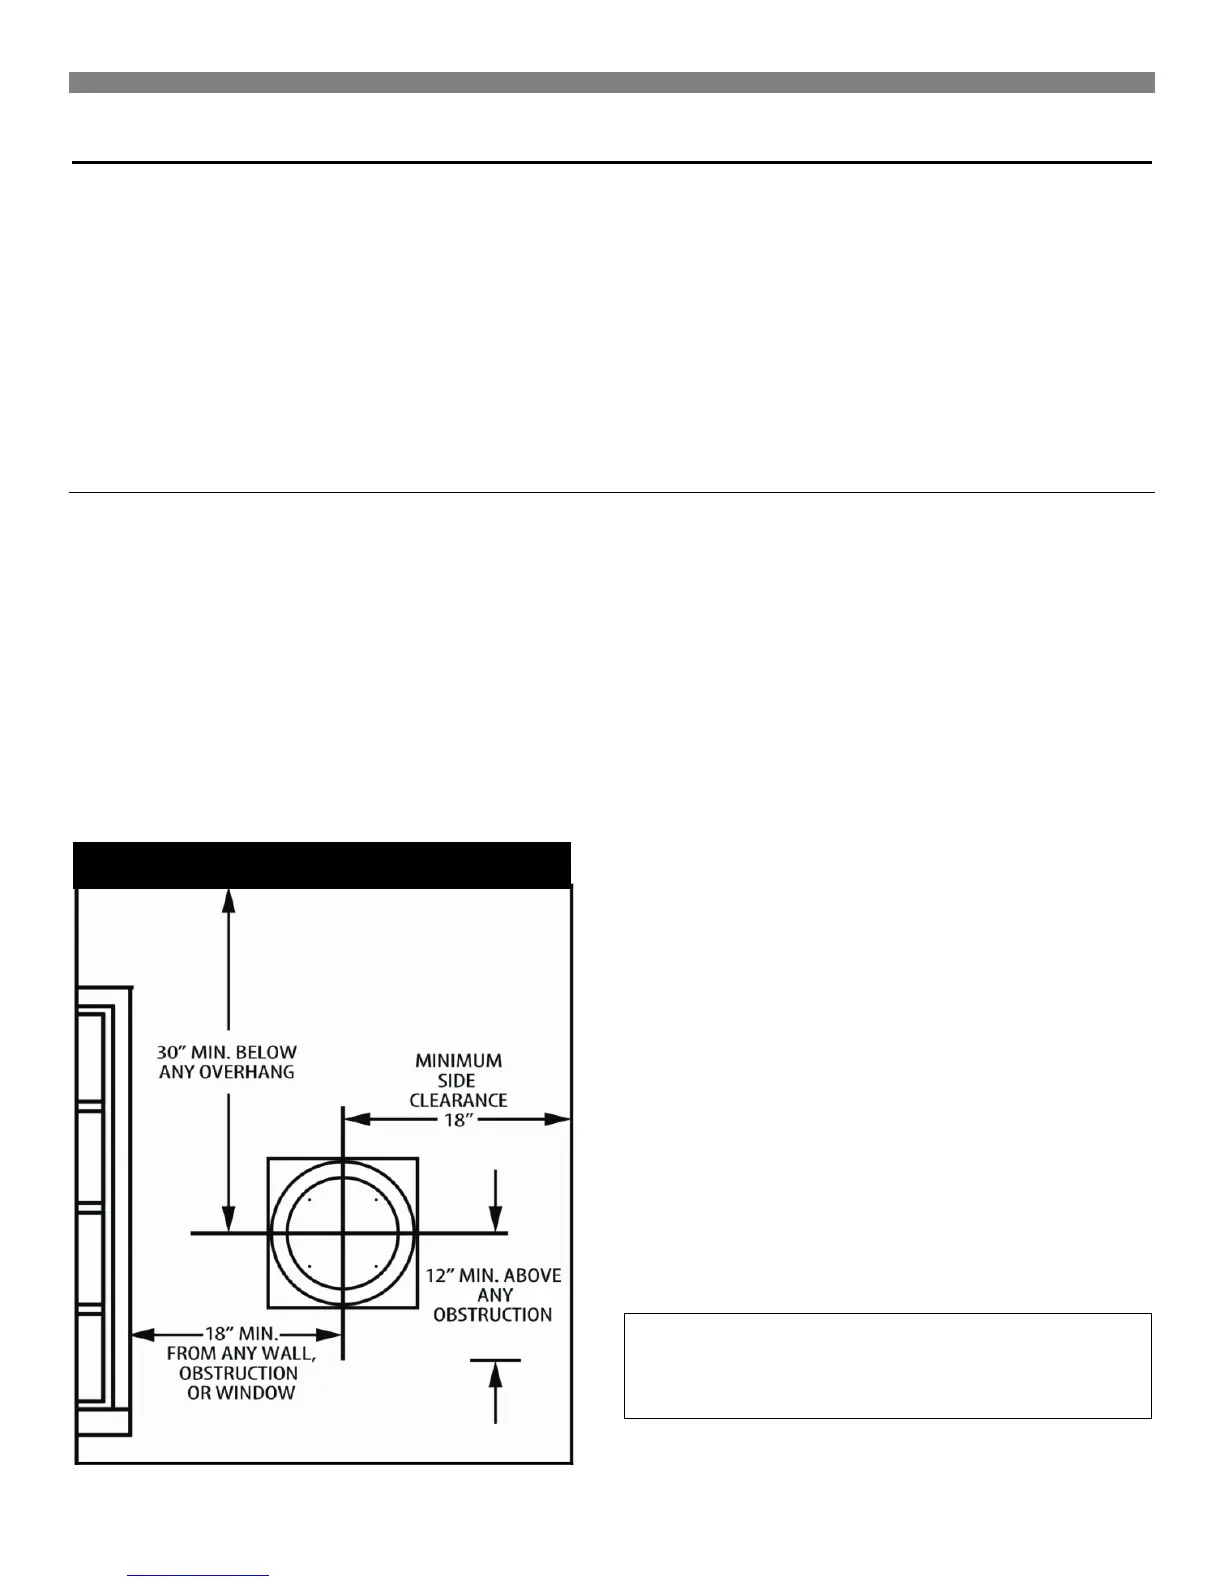
6. The outside vent cap must be at least 18-inches away from
any window or other building opening (Fig. 2).
7. The furnace will not work if anything stops free entry of fresh
air into the vent, or free flow of flue gases from it. Be sure the
center of the vent cap is at least 18-inches above ground level
or shrubs are as shown in Fig. 2. Make sure shrubs are kept
trimmed. It must also be at least 18 inches from any overhang,
wall, or other blockage.
8. Try to place the furnace near the center of the space to be
heated for good air circulation. Do not put it behind a door or
draperies. Do not put in a closet, alcove, hallway or other
confined space.
9. Be sure that gas piping and electrical wiring can be brought to
the furnace. See sections on gas piping and electrical wiring
for your type of furnace mounting.
10. The bottom of the furnace must rest directly on a wood or
concrete floor. If the floor is other than wood or concrete, such
as carpet or sheet vinyl flooring, there must be a piece of
wood or sheet metal under the furnace that is at least the
same size as the bottom of the furnace.
WARNING: If vinyl siding is used on exterior wall
surface, heat from the vent cap could cause
distortion/discoloration. Shield to protect the siding.
Check with manufacturer for additional options.
FIGURE 2 Minimum Clearances