en
12 Installation and operating instructions • Isar BOOST5 • Ed.06/2024-05
4.3 Storage
CAUTION
Damage to property due to incorrect storage!
Moisture and certain temperatures can damage the product.
• Protect the product against moisture and mechanical damage.
• Avoid temperatures outside the range of -10°C to +60°C.
5 Installation and electrical con-
nection
5.1 Installation location
• The installation site must be dry, well-ventilated and protected from frost. The product
is not designed for outdoor installation.
• Observe ambient temperatures, see technical data.
• Select installation location according to product dimensions.
• Connections must be freely accessible.
• Avoid vibrations or mechanical loads from the connected piping.
5.2 Hydraulic connection
WARNING
Risk of injury due to improper installation.
• Installation should only be carried out by qualified personnel.
• Comply with accident prevention regulations.
• Observe local regulations.
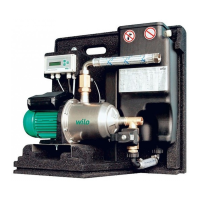
Fig.5: Hydraulic connection
✓ Use a pressure-resistant connection pipe.
✓ Avoid excessive bends in the connection pipes.
1. Align the product horizontally using the adjustable feet.
2. Remove the covers on the holders of the discharge and suction ports.
3. Remove the handle grip on the discharge and suction ports.
4. Connect the pressure-resistant connection pipes to the hydraulic connections (in-
cluded in scope of delivery). Inside diameter of connection pipe: G1"
5. Insert suction and discharge port with gasket.
6. Fit the handle grip on the discharge and suction ports.
7. Fit the covers on the holders of the discharge and suction ports.