en Installation and electrical connection
14 WILO SE 2019-02
3. Place a suitable tank to collect the operating fluid.
4. Drain the operating fluid: Rotate the pump until the
opening points downwards.
5. Check the operating fluid:
⇒ If the operating fluid is clear, reuse operating fluid.
⇒ If the operating fluid is contaminated (black), fill
with new operating fluid. Dispose of operating fluid
in accordance with the local regulations!
⇒ Notify customer service if an operating fluid con-
tains metal chips!
6. Pour in operating fluid: Rotate the pump until the open-
ing points upwards. Fill-in the operating fluid into the
opening.
⇒ Comply with the specifications for operating fluid
locations and quantity! When recycling the operat-
ing fluid, check the quantity and if required adjust
it!
7. Clean the screw plug, replace the seal ring and screw it
back in. Max. tightening torque: 8Nm (5.9ftlb)!
6.4.2 Portable wet well installation
WARNING
Risk of burns from hot surfaces!
Motor housing can become hot during operation. It
may cause burns. Allow the pump to cool down at
ambient temperature after switching it off!
WARNING
Separation of pressure hose!
Separation or movement of the pressure hose can
lead to (serious) injuries. Securely attach the pressure
hose to the outlet! Prevent buckling of the pressure
hose.
NOTICE
Pumping problems due to water level being
too low
The hydraulics are self-venting. Smaller air cushions
are resorbed during pumping. If the fluid is lowered
too much, separation of the volume flow may occur.
The minimum permissible water level must reach the
upper edge of the hydraulics housing!
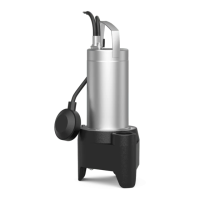
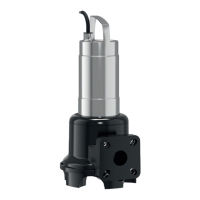
For portable installation, the pump is equipped with a strainer.
The strainer filters coarse solids out of the fluid and enables se-
cure standing if placed on a solid load bearing surface. This allows
the pump to be installed anywhere in the operating space/install-
ation location. To prevent sinking in, a hard base must be used at
the installation location in case of soft load bearing surfaces. A
pressure hose or pipework is connected on the pressure side.
CAUTION!If the motor emerges during operation, observe the
operating mode for non-immersed operation (S2-15, S3
10%*)!
* Operating mode S325% is permitted if the necessary motor
cooling is guaranteed before the motor is switched on again! To
ensure the required cooling, the motor must be completely im-
mersed for at least 1min.
Work steps
Fig.4: Wet well installation, portable
1 Pump with integrated pump support foot
2 Hose connection
3
Storz pipe coupling and Storz hose coupling (available as
accessories)
4 Pressure hose or pressure pipe
5 Attachment point
6 Lifting equipment
‡ Pressure connection prepared: Hose connection or Storz
coupling fitted.
1. Use a shackle to attach the hoisting gear to the attach-
ment point of the pump.
2. Lift and align the pump at the installation location.
3. Place the pump on a solid load bearing surface. CAU-
TION!Prevent the pump sinking in!
4. Lay the pressure hose and fasten it to a certain point
(e.g. drainage). DANGER!Separation or movement of
the pressure hose can lead to (serious) injuries! Secure
the pressure hose at the outlet.
5. Lay the connection cable properly. CAUTION!Do not
damage the connection cable!