Do you have a question about the Wimius H7 and is the answer not in the manual?
Important safety and usage instructions for the trail camera.
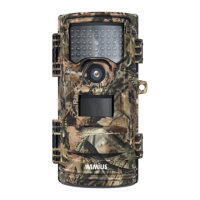
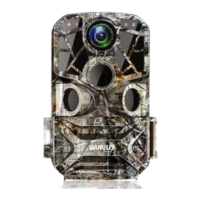
Identifies and labels the different parts of the trail camera.
Instructions for powering the camera using batteries or AC adapter.
Details on memory card requirements, insertion, and formatting.
How to turn the camera on and off, and status indicators.
Navigating and adjusting system settings using the menu.
Description of Photo, Video, and PhotoVideo shooting modes.
Instructions for formatting the memory card for proper use.
Configuring photo capture count and video recording duration.
Adjusting PIR sensitivity and setting operational time intervals.
Setting power-on password and configuring time-lapse photography.
Steps to find the best detection angle and range for the PIR detector.
How the camera operates in Live Mode, triggered by motion or time.
Information on IR LEDs for night vision and recording limitations.
How to enter playback mode and navigate through recorded photos and videos.
Instructions for mounting the camera using the provided bracket.
Steps to connect the camera to a TV or external display.
Methods for transferring photos and videos to a computer.
Troubleshooting steps for when the camera fails to boot.
Solutions for the camera unexpectedly shutting down.
Resolving issues with SD card saving or reading files.
Addressing problems like black images at night or lens issues.
Tips to reduce rapid battery drain.
Identifying and fixing causes of water leakage into the camera.
Solutions for incorrect password entries or forgotten passwords.
Addressing small issues when the machine boots but has problems.
The WiMiUS H7 Invisible Trail Camera is a specialized device designed for recording and observing wildlife. It offers a range of features to ensure optimal performance and ease of use in outdoor environments.
The primary function of the WiMiUS H7 is to capture photos and videos of wildlife, triggered either by motion detection or at set time intervals. It operates in three distinct modes: Photo, Video, and PhotoVideo. In PhotoVideo mode, the camera first captures a still image and then proceeds to record a video, providing a comprehensive record of the detected activity. The camera is equipped with infrared LEDs, enabling night recording at a distance of up to 70ft. These LEDs automatically illuminate during nighttime conditions to provide sufficient light for capturing clear black and white images and videos. The device also features a PIR (Passive Infrared) detector to sense movement, with an adjustable sensitivity to suit different environments, from indoor settings with low interference to outdoor conditions.
A unique feature of the WiMiUS H7 is its Time Lapse function. This allows the camera to automatically take photos at selected time intervals, which can then be compiled into a consistent video. This is particularly useful for observing slow processes such as the blooming of plants or the behavior of cold-blooded animals over an extended period. The camera also includes a security code feature, allowing users to set a 4-digit password for power-on, enhancing the security of the device.
The WiMiUS H7 is designed for straightforward operation. To power on the camera, the mode switch needs to be set to "TEST" or "ON." In "ON" mode, the LCD screen will turn off after 5 seconds, and the camera will enter standby mode, indicated by a brief flash of a red light. In "TEST" mode, the screen remains on, allowing users to access and adjust settings. The camera's menu system is navigated using the Menu, Up, Down, and OK buttons, providing intuitive control over various settings.
Before initial use, it is crucial to insert 4 or 8 original 1.5V AA batteries, ensuring correct polarity. When using only 4 batteries, they must all be placed in the same battery case to avoid damage. The camera can also be powered by an AC adapter (not included), in which case all internal batteries must be removed. The device requires a Micro SD/TF card (up to 32GB) for data storage, as it does not have built-in memory. Formatting the memory card before use is recommended to improve shutter speed and battery life.
Aligning the camera for optimal detection is facilitated by the "TEST" mode. By attaching the camera about 1-2 meters from the ground and slowly moving to trace the detection area, users can observe the blue LED indicator, which lights up when the PIR detects an object. This helps in finding the best position for the camera, ensuring the detection angle of approximately 90° and a recording field of around 58° are effectively utilized. To prevent incorrect triggers, the camera should not be placed in sunny areas, and branches should be cleared from the detector's active area.
In Live Mode, the camera automatically enters standby after a few seconds, with the red LED turning off. It then activates upon detecting movement within the side sensor zone, capturing photos or videos as animals move into the PIR range. Once the object leaves the detection range, the camera returns to standby.
Playback of captured media is simple: long-pressing the OK button in "TEST" mode enters playback. Users can navigate through photos and videos using the Up and Down buttons. During video playback, the OK button starts/pauses, and the Up/Down buttons enable fast forward/backward. The Menu button exits playback.
The camera can be connected to an external monitor (e.g., TV) via an AV cable. After connecting and switching the TV to AV mode, powering on the camera in "TEST" mode will display the camera's media on the TV screen, with the camera's own screen automatically closing. Files can be downloaded to a computer either by inserting the Micro SD card into a card reader or by connecting the camera directly via a mini USB cable.
Proper maintenance is essential for the longevity and optimal performance of the WiMiUS H7. The camera is designed with an IP66 waterproof rating, meaning it is protected against dust and strong jets of water. However, it is strictly forbidden to immerse the device in water. To maintain its waterproof integrity, the waterproof ring and ribs must be kept clean, intact, and flat. Users should avoid disassembling these components. If the camera has been flooded, it should be immediately powered off and thoroughly dried before attempting to restart it.
To prevent damage, the camera should not be placed near high-temperature objects, and it should be protected from knocking, falling, or puncturing. When using DC power outdoors, the power line connection point should be positioned vertically downwards by at least 30cm to prevent rainwater from flowing into the device. Before the camera enters working state, ensure the waterproof ring is clean and dust-free, all buckles are fastened, and all rubber plugs are installed.
Regular checks of the battery and memory card are important. The camera should always use adequate power, either from fresh AA batteries or a stable external power supply. If the camera fails to boot, troubleshooting steps include checking battery installation, ensuring correct external supply voltage, and verifying that the working temperature is within the appropriate range. SD card issues, such as damage or improper formatting, can be resolved by replacing with qualified cards (Class 10 or above) and formatting them before use.
If photos or videos appear black at night, potential causes include a smeared lens (which should be cleaned with gauze), haze weather (where use is not recommended), or vapor infiltration into the lens (requiring professional cleaning and ensuring the lens is dry before closing). A damaged lens due to a drop would require contacting customer support.
For issues related to fast power consumption, users should consider extending the PIR interval, reducing PIR sensitivity, shortening video length, or setting a smaller number of captures, as frequent animal activity or long recordings can significantly drain power. If the sealing ring is ejected or damaged, it should be cleaned or replaced to prevent water leakage. All shell buckles must be fastened, and the camera should always be kept in a vertical position to avoid inversion.
In cases where the machine boots normally but exhibits minor issues, solutions include ensuring sufficient power, replacing the SD card with a high-speed, qualified one and formatting it, or performing a factory reset. For any problems not resolved by these methods, users are encouraged to contact customer support.
| Photo Resolution | 20MP |
|---|---|
| Video Resolution | 1080P |
| Trigger Speed | 0.2s |
| Waterproof | IP66 |
| Megapixels | 20MP |
| Night Vision | Yes |
| Viewing Angle | 120° |
| IR Flash Range | 20m |
| Detection Distance | 20m |
| Operating Temperature | -20°C to 60°C |