22
8. Combustion settings
In principle, it is not necessary to adjust the gas valve
shortly after commissioning the air heater. When the
control does have to be adjusted after a period of use
or after installing a new heater, this must be done by a
qualified person using calibrated equipment.
DANGER! A poor adjustment can lead to overheating of
the air heater and/or production of toxic carbon monoxide.
CAUTION! Always adjust the burner settings of the heater
using the manual test mode (see §7.2.2.). Do not use the
thermostat to adjust the burner settings.
8.1. Adjusting the burner settings
The flow of gas to the burner is controlled with a gas valve.
This valve must be set to the high and a low power settings
of the heater. When adjusting, the CO
2
or O
2
in flue gas has
to be monitored with a calibrated analyser.
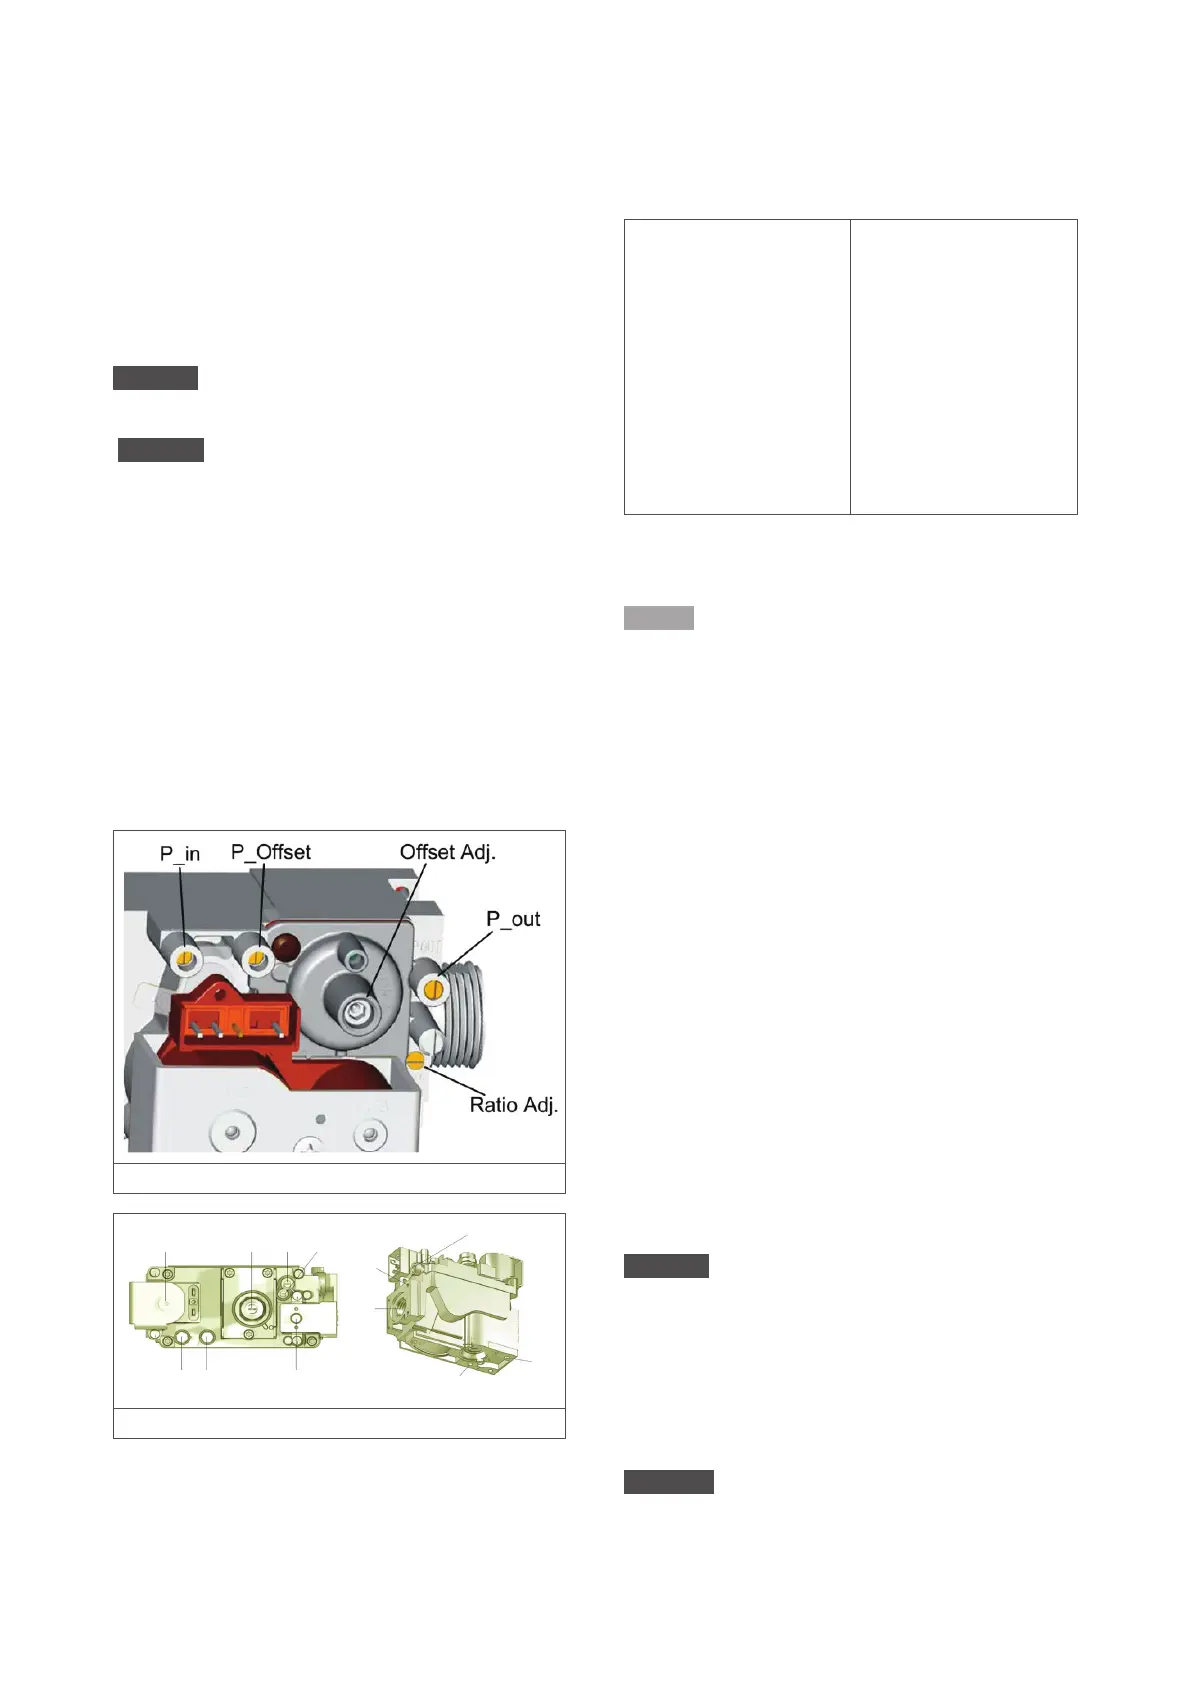
The gas valve is adjusted with two screws (figure 27):
– The Oset adjuster screw for Low fire.
– The Gas/air adjuster screw for High fire.
Figure 26 - Main parts of the gas valve XR10+ - XR60+
1 2 3 4
10
11
12
11
9
5 6 7
Figure 27 - Main parts of the gas valve XR80+ - XR120+
1. Shut-o solenoid
valve (EV1)
2. Oset adjuster
screw
3. Pilot gas flow
restrictor
4. Gas/air adjuster
screw
5. Inlet pressure test
point
6. Outlet pressure test
point*
7. Shut-o solenoid
valve (EV2)
8. Pilot outlet
9. Main gas outlet
10. Holes for fixing
flanges (M5)
11. Supplementary
valve body fixing
points
12. Air in signal
The air heater must first be commissioned at High fire.
NOTICE If the air heater does not ignite while sparking,
close the air-openings of the gas-air mixer during ignition.
Use your forefinger. The gas mixture will become richer
and will ignite more easily.
Look for the correct CO
2
value for the air heater in §3.2.
Adjust the CO
2
value if the dierence is more then 0,2%.
O
2
value ± 0,3%.
1. Check the CO
2
value in High fire (Hi).
2. Turn the Ratio adjuster screw to the right to de-
crease the CO
2
value
.
3. Turn the Ratio adjuster screw to the left to increase
the CO
2
value.
4. Check the CO
2
value in Low fire (Lo). The CO2 value
in Low fire should be lower than in High fire.
5. Turn the Oset adjuster screw to the left to de-
crease the CO
2
value.
6. Turn the Oset adjust screw to the right to increase
the CO
2
value.
7. Return to High fire (Hi) and readjust the CO
2
value
with the Ratio adjust screw.
8. Return to Low fire (Lo) and readjust the CO
2
value
with the Oset adjuster screw.
9. Repeat the steps above until both CO
2
values are
ok.
DANGER! Always measure the air heater’s CO
production. Too much CO usually means the gas mixture
is too rich. Adjust this if necessary with the two adjusters
(figure 27). The concentration of CO should always be
below 100 ppm.
8.2. Converting to another gas type
CAUTION! The air heater’s gas type may only be
converted by the manufacturer or its representative.
Contact your supplier for more information.
 Loading...