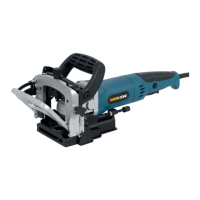
• Place the adjustment plate on the angle stop (4).
• Take care for setting the height, the groove for the biscuit dowel must be in the middle of
the workpiece. For workpieces thinner than 16mm it is not possible to make the groove
for the biscuit dowel in the middle of the workpiece without the aid of the adjustment
plate.
Sawing grooves
• Move the motor base backward.
• Place the machine near the workpiece.
• Position the machine (see positioning of the machine)
• Hold the machine with both hands and switch the machine on.
• Push the motor base carefully forward as far as possible.
• Move the motor base backward and switch the machine off.
Move the machine in the same direction as the direction of rotation. See arrow on top
of the machine.
Joining the workpieces
When the grooves in both workpieces have been made the workpieces can be joined
together.
• Put glue in both grooves.
• Place the biscuit dowel in the groove of one workpiece.
• Place the other workpiece on the biscuit dowel.
• Fasten the workpieces and wait till the glue is dry.
User tip for connecting two workpieces
Fig. H
• Saw a groove as big as one biscuit into the first workpiece
• Place the biscuit with good glue (according the material) into the groove
• Saw a longer groove into the other workpiece
• Now both workpieces can be positioned easily towards each other (clearance to correct)
• Fasten the workpieces and wait till the glue is dry
Checking the cutting depth
Fig. G
Always check the cutting depth after mounting a saw blade.
• Disconnect the plug from the socket.
• Move the motor base as far as possible backwards.
• Set the cutting depth in the maximum position by turning the depth adjustment knob
(6).
• Move the motor base forwards till the pin will fall in the notch of the adjustment knob (7).
Turn the saw blade till one tooth of the saw blade is in the front position.
• Measure the distance from the side of the base plate to the tooth of the saw blade
BJM6003 Ma EN-IRL 1202-22.indd 16 2/22/12 4:26 PM