B
brittany42Jul 27, 2025
What to do if Worx WG119E doesn't cut?
- RRandy EricksonJul 27, 2025
If your Worx Trimmer isn't cutting, the line might be broken, so replace it. Also, check for grass entangled around the cutting head and remove it.
What to do if Worx WG119E doesn't cut?
If your Worx Trimmer isn't cutting, the line might be broken, so replace it. Also, check for grass entangled around the cutting head and remove it.
What to do if the auto feed doesn't work on my Worx WG119E Trimmer?
If your Worx Trimmer's auto feed isn't working, it might be due to the cutting line not being wound correctly. Try manually feeding the line. If that doesn't work, remove the spool and rewind the line. Another cause may be that the line is tangled or used up, in that case replace it with a new spool of line.
What to do if auto feed doesn't work on Worx WG119E Trimmer?
If the auto feed on your Worx Trimmer isn't working, manually feed the line; if it still doesn't feed, remove the spool and rewind the line. If the line is tangled or used up, replace it with a new spool.
Why my Worx Trimmer does not cut?
If your Worx Trimmer isn't cutting, it could be due to a few reasons. The line might be broken, so try replacing it. Also, grass might be entangled around the cutting head; remove any grass you find. Contact a service agent if the motor is broken, which could cause the speed to be too low.
How to troubleshoot a Worx WG119E that fails to operate?
If your Worx Trimmer fails to operate, start by checking the power source. Ensure it's properly connected. If the power socket is faulty, try using another one. If the issue persists, the motor or internal wiring might be damaged, and you should contact a service agent.
Why is my Worx Trimmer making excessive noise and vibrations?
If your Worx Trimmer is producing excessive vibrations or noise, it could be due to a defective machine, in which case you should contact a service agent. Alternatively, the line spool might not be wound well. Try rewinding the line.
What causes a Worx WG119E Trimmer to run intermittently?
If your Worx Trimmer runs intermittently, the motor might be broken, or the on/off switch could be defective. In both cases, contact a service agent.
Guidelines for safe operation, covering training, preparation, and usage.
Instructions on how to safely use the trimmer during operation.
Visual guides for performing trimming and edging tasks with the tool.
Illustrations for manually feeding the trimmer line.
Visual examples of correctly and incorrectly winding the trimmer line onto the spool.
Table summarizing actions like assembly, operation, trimming, edging, and line feeding.
Instructions for manually feeding the trimmer line using the feed button.
Table listing problems like failure to operate, intermittent running, and their corrective actions.
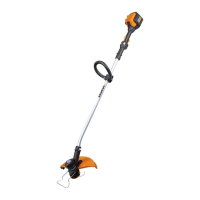
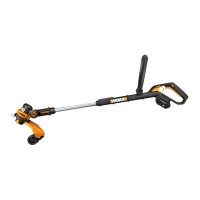
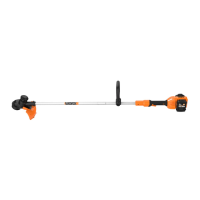
This document provides the safety and operating manual for the WORX WG119E 2-in-1 Grass Trimmer/Edger. It is designed for cutting grass and similar soft vegetation, as well as trimming grass edges in private and hobby garden areas that are not accessible with a lawnmower. The device is not intended for use in public gardens, parks, sports centers, roadsides, agriculture, or forestry. It should not be used for cutting or chopping hedges, shrubs, bushes, flowers, or for composting, as this could lead to injury.
The WORX WG119E is a versatile 2-in-1 tool that functions as both a grass trimmer and an edger. It is equipped with an ON/OFF switch, an auxiliary handle, and a handle rotation locking mechanism for ergonomic use. The height adjustment locking mechanism allows users to adjust the telescope tube to a comfortable working height. The cutting head adjustment button facilitates switching between trimming and edging modes. The motor housing contains the power unit, while the cutting head is protected by a safety guard and features a flower guard to prevent damage to delicate plants. The tool uses a line cutter to maintain the optimal line length.
The device incorporates an automatic line feed system. When the trimmer is initially switched on, a small length of line is fed out. A "clattering" noise indicates that the line is being cut to the correct length by the line cutter. Once the line is at the proper length, the noise stops, and the motor runs at full speed. To feed more line, the user needs to stop the trimmer completely, then restart it, allowing the motor to reach full speed. This process can be repeated until the "clattering" noise of the line cutting is heard again, but it should not be repeated more than six times.
Manual line feeding is also possible by pressing and releasing the line feed button (13) and gently pulling out the lines until they reach the line cutter. If too much line is fed out, the cutting head cover can be removed, and the spool rotated anti-clockwise until the line is at the desired length.
Before operation, users must read the instructions carefully and familiarize themselves with the controls and proper use of the machine. It is crucial to check the supply and extension cord for any signs of damage or aging. If the cord becomes damaged during use, it must be disconnected immediately, and the cord should not be touched before disconnection. The appliance should not be used if the cord is damaged or worn.
Safety precautions are paramount. The machine should never be operated while people, especially children, or pets are nearby. Users must wear eye protection and stout shoes at all times. The machine should only be used in daylight or good artificial light. It must never be operated with damaged guards or shields, or without them in place. The motor should only be switched on when hands and feet are away from the cutting means.
The machine must always be disconnected from the power supply (by removing the plug or disabling device) when left unattended, before clearing a blockage, before checking, cleaning, or working on the machine, after striking a foreign object, or whenever the machine starts vibrating abnormally. Care must be taken to avoid injury to feet and hands from the cutting means. Ventilation openings must always be kept clear of debris.
For trimming, the height and auxiliary handle can be adjusted for comfort and control. The trimmer head can also be adjusted. The flower guard can be used to protect plants during trimming.
For edging, the tool can be changed into edging mode by adjusting the shaft 180 degrees. The trimmer head will rotate in one direction during edging.
Maintenance should only be performed after disconnecting the machine from the power supply. There are no user-serviceable parts in the lawn trimmer. The machine should not be cleaned with water or chemical cleaners; instead, it should be wiped clean with a dry cloth.
The lawn trimmer should be stored in a secure, dry place, out of reach of children. The motor ventilation slots must be kept clean, and all working controls should be free of dust. If sparks are observed in the ventilation slots, this is normal and does not indicate damage to the lawn trimmer. No other objects should be placed on the product. If the supply cord is damaged, it must be replaced by the manufacturer, its service agent, or similarly qualified persons to avoid a hazard.
Replacing the line spool involves removing the cap by pressing and holding the two latches (15) and pulling the cutting head cover away from the cutting head. The cap and spool holder should be kept clean from debris. To replace the cap, it should be pressed firmly towards the spool holder, ensuring it is correctly connected by attempting to remove it without depressing the latches. When changing the line spool, the old spool is removed, and a new spool is placed into the cutting head. One line is fed through the eyelet, then the process is repeated for the second line. The line is released from the cleat on the spool, and the cap is reattached.
The trimmer is designed to use nylon line with a maximum diameter of 1.65mm. When manually winding the line, approximately 5m of line should be used, with 15mm inserted into one of the holes in the upper section of the spool. The line should be wound in the direction of the arrows on the top of the spool. Approximately 100mm of line should be left unwound and placed into the cleat. This process is repeated for the lower section of the spool. Care must be taken to ensure the line is neatly coiled on the spool, as failure to do so will impair the efficiency of the automatic line feed.
| Power source | - |
|---|---|
| Product color | Orange |
| Plant protector | Yes |
| Cutting diameter (max) | 300 mm |