18
Cordless Chainsaw
EN
4. TO REMOVE OR INSTALL BATTERY PACK
(See Fig. I)
Depress the battery pack release button to remove the
2 battery packs from your tool. After recharging, insert
the 2 battery packs into the battery ports. A simple
push and slight pressure will be sufficient until a click
is heard. Check to see if the battery is fully secured.
Note:
• When removing the battery pack, hold it
firmly to avoid dropping and injury.
• This machine will only run when 2 batteries
are installed. It is recommended to use the
same two batteries and charge the two
batteries at the same time.
• When you use two batteries with different
power, the machine will only run to the
lower common denominator.
5. POWER INDICATOR LIGHT (See Fig. J)
IMPORTANT:
When only one light is illuminated, your battery
is overly discharged, even though the machine
may still be capable to work. Continuing to
operate your machine with the battery in this
discharged condition may reduce the life and
performance of your battery.
When no light are illuminated, at least one
battery is not fully installed or battery may be
defective, please double check the batteries are
fully seated into position.
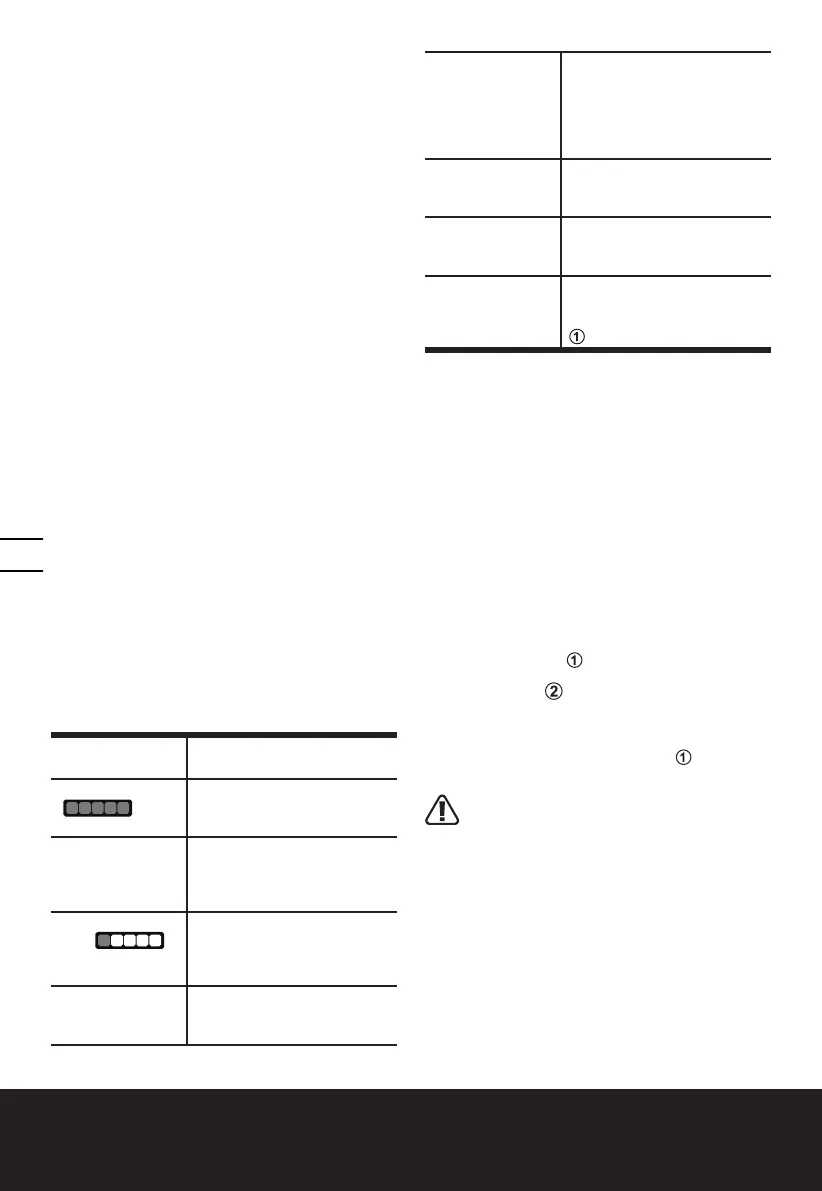
BATTERY STATUS
• Before starting or after use, press the button
beside the power indicator light on the machine to
check the battery capacity.
• During operation, the battery capacity will be
indicated automatically by the battery power
indicator. The indicator constantly senses and
displays the battery condition as follows.
• For the machine with 2 battery packs with different
power, the power indicator light displays the
battery condition with the lower one of the two
batteries.
Battery indicator
light status
Battery condition
Five green lights
( ) are
illuminated.
The two batteries are in a
highly charged condition.
Two, three or four
green lights are
illuminated.
The two batteries have a
remaining charge. The more
lights are illuminated, the
more battery capacity.
Only one green
light ( )
is illuminated.
The battery level of at least
one battery pack is very low.
Please check and charge the
battery pack.
No light is
illuminated.
At least one battery is not fully
installed or battery may be
defective.
Only one light is
flashing twice per
cycle.
At least one battery is over
discharged (please refer to
the battery charge condition),
please recharge the two
batteries at once before use
again or storage.
Only one light
is flashing three
times per cycle.
At least one battery is hot,
wait for them cool down
before start again.
Only one light is
flashing four times
per cycle.
The machine is over load.
Remove tool from cutting area
and try again.
Only one light is
flashing five times
per cycle.
Chain brake lever is activated.
Pull the front hand guard
towards the operator (position
) to deactivate chain brake.
6. SWITCHING ON AND OFF (SEE FIG. K)
ATTENTION: Check the battery packs before
using your cordless tool. Only use the battery
pack listed in the accessories section.
For switching on the tool, press the lock-out button,
then fully press the on/off switch and hold in this
position. The lock-out button can now be released.
For switching off, release the on/off switch.
NOTE: The chain brake must be activated in order for
the saw to be switched on.
7. CHAIN BRAKE LEVER (See Fig. L)
The chain brake lever is a safety mechanism activated
through the front hand guard, when kickback occurs.
Chain stops immediately.
The following function check should be carried out at
regular intervals. Pull the front hand guard towards
the operator (position ) to deactivate chain brake.
To activate the chain brake, push front hand guard
forwards (position ).
NOTE: If the saw is unable to start, even though it is
assembled properly and working with fully charged
battery packs, then you should check if the chain brake
lever is in the correct position (position ).
8. CUTTING
IMPORTANT: Is the oil tank filled? Check
the Oil Level Window prior to starting and
regularly during operation (See Fig. M). Refill
oil when oil level is low. A full oil tank will last
approx. 12 minutes of cutting depending on
sawing intensity and stops.
Check recent replaced chain tension about
every 10 minutes during operation.
(1) Installing the battery pack into the machine.
(2) Make sure section of log to be cut is not laying on
the ground. This will keep the chain from touching
the ground as it cuts through the log.
Touching the ground while the chain is moving is
dangerous and will dull the chain.
(3) Use both hands to grip saw. Always use left hand
to grip front handle and right hand to grip rear
handle. Use a firm grip. Thumbs and fingers must

 Loading...