40V Cordless Lawn Mower EN
16
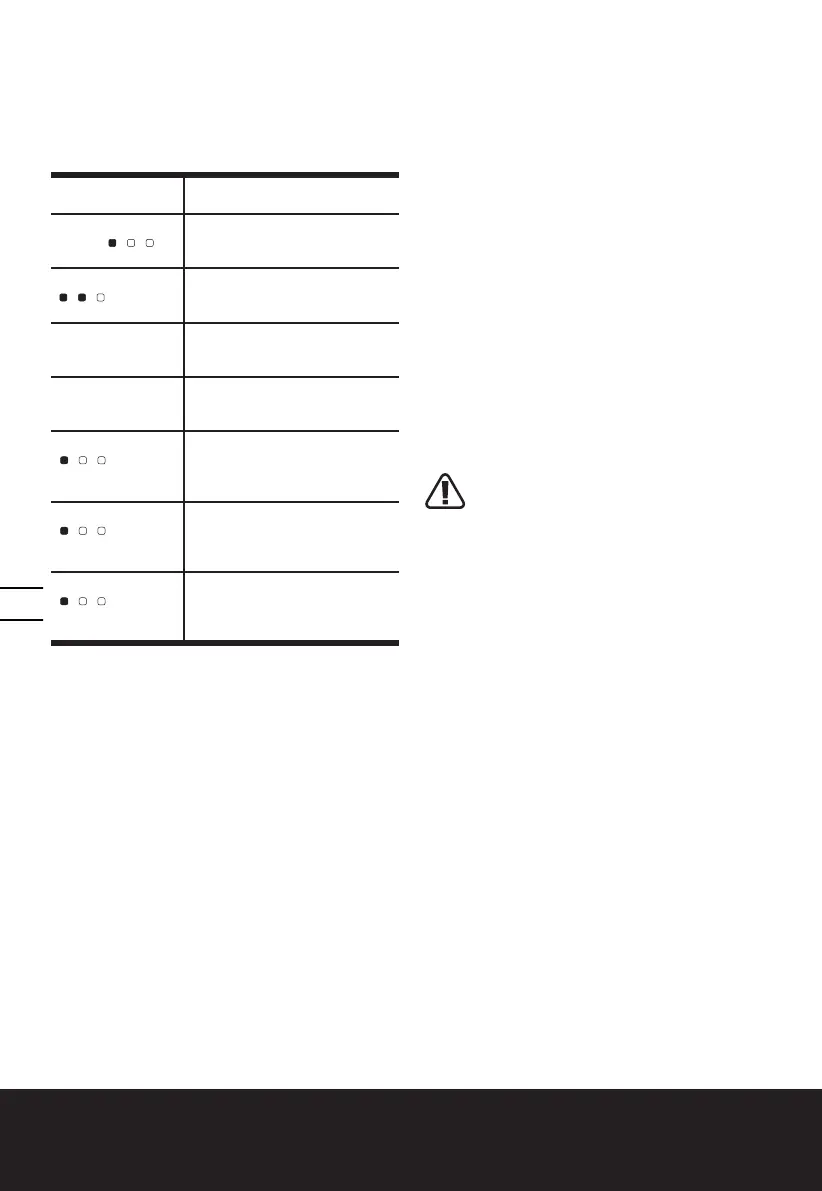
BATTERY STATUS (See Fig. G)
Before starting or after use, press the button
“POWERTEST” on the machine to check the battery
capacity. During operation, the battery capacity will
be indicated automatically by the battery power
indicator. The indicator constantly senses and
displays the battery condition as follows:
Battery power
indicator status
Battery condition
Only one green
light (
)
is illuminated.
At least one battery is deplet-
ed and needs to be charged.
Two green lights
( )
are
illuminated.
The two batteries are in a
moderately charged condition.
Three green
lights are
illuminated.
The two batteries are in a
highly charged condition.
No light is
illuminated.
At least one battery is not
fully installed or battery is
defective.
Only one light
(
) is
flashing twice
per cycle.
At least one battery is over
discharged, please recharge
the two batteries at once be-
fore use again or storage.
Only one light
(
) is
flashing three
times per cycle.
At least one battery is hot,
wait for them cool down
before start again.
Only one light
(
) is
flashing four
times per cycle.
The machine is over load.
Raise the cutting height or
push slowly.
MULCHING MOWING TIPS
When using the mulching plug, your new mower
is designed to cut the grass clippings into small
pieces and distribute them back into the lawn, using
mulching fins located inside the mower deck.
Under normal conditions, the mulched grass will
biodegrade quickly to provide nutrients to the lawn.
Please review the following recommendations for
optimum mulching performance,
1) Avoid mowing when the grass is wet from rain
or dew. Wet grass may form clumps which
interfere with the mulching action and reduce
runtime. The best time to mow grass is in the
late afternoon when the grass is dry and the
newly cut area will not be exposed to direct
sunlight.
2) For best mulching performance, set the cutting
height to remove about one third of the grass
blade length. If the lawn is overgrown, it
may be necessary to increase the cut height
to reduce the pushing effort and prevent
overloading the motor. For extremely heavy
mulching, it is advisable to first cut at a high
cut height setting, and then re-cut to the final
cut height. Otherwise, make narrower cuts and
mow slowly.
3) For best performance, keep the mower housing
free of built-up grass. From time to time turn
off mower and wait for the blade to come to a
complete stop. Then unplug the Safety Key (1)
and turn mower on its side. Using an object
such as a stick, wipe out any accumulation of
grass in the blade area. Be careful of the sharp
edges of the blade. Clean often in wet, new
grass, and always after every use.
4) Certain types of grass or grass conditions may
require that an area be mulched a second time
to fully disperse the grass throughout the lawn.
If cutting a second time, it is advisable to cut
perpendicular (across) the first cut pattern. DO
NOT CHANGE CUT PATTERN IN ANY WAY THAT
WOULD CAUSE MOWING DOWN A HILL.
5) Change your cutting pattern from week to
week. This will help prevent matting and
graining of the lawn.
MAINTENANCE
WARNING: Stop the mower and remove
the safety key before removing the
grass bag.
Note: To ensure long and reliable service, perform
the following maintenance procedures regularly.
Check for obvious defects such as a loose,
dislodged or a damaged blade, loose fittings,
and worn or damaged components. Check that
the covers and guards are all undamaged and
are correctly attached to mower. Carry out any
necessary maintenance or repairs before operating
mower. If the mower should happen to fail despite
regular maintenance, please call our customer
helpline for advice.
BLADE SHARPENING
KEEP BLADE SHARP FOR BEST MOWER
PERFORMANCE.
WEAR PROPER EYE PROTECTION WHILE
REMOVING, SHARPENING, AND INSTALLING
BLADE. ENSURE THAT SAFETY KEY IS REMOVED.
Sharpening the blade twice during a mowing
season is usually sufficient under normal
circumstances. Sand causes the blade to dull
quickly. If your lawn has sandy soil, more frequent
sharpening may be required.
REPLACE BENT OR DAMAGED BLADE
IMMEDIATELY.
WHEN SHARPENING THE BLADE:
1. Make sure blade remains balanced.
2. Sharpen blade at the original cutting angle.
3. Sharpen cutting edges on both ends of blade,
removing equal amounts of material from both
ends.

 Loading...