6 www.xilinx.com VC7203 IBERT Getting Started Guide
UG847 (v3.0) July 10, 2013
Chapter 1: VC7203 IBERT Getting Started Guide
Requirements
The hardware and software required to run the GTX IBERT demonstrations are:
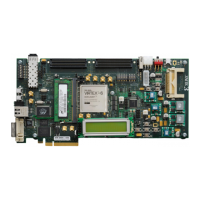
• VC7203 Virtex-7 FPGA GTX Transceiver Characterization Board including:
• One SD card containing the IBERT demonstration designs
•One Samtec BullsEye cable
• Eight SMA female-to-female (F-F) adapters
•Six 50Ω SMA terminators
• GTX transceiver power supply module (installed on board)
• SuperClock-2 module, Rev 1.0 (installed on board)
• 12V DC power adapter
•USB cable, standard-A plug to Micro-B plug
• Host PC with:
• SD card reader
•USB ports
• Xilinx Vivado Design Suite software, version 2013.2 or higher
The hardware and software required to rebuild the IBERT demonstration designs are:
• Xilinx Vivado Design Suite version 2013.2 or higher
• PC with a version of the Windows operating system supported by Xilinx Vivado
Design Suite
Setting Up the VC7203 Board
This section describes how to set up the VC7203 board.
Caution!
The VC7203 board can be damaged by electrostatic discharge (ESD). Follow standard
ESD prevention measures when handling the board.
When the VC7203 board ships from the factory, it is configured for the GTX IBERT
demonstrations described in this document. If the board has been re-configured it must be
returned to the default set-up before running the IBERT demonstrations.
1. Move all jumpers and switches to their default positions. The default jumper and
switch positions are listed in VC7203 Virtex-7 FPGA GTX Transceiver Characterization
Board User Guide (UG957
).
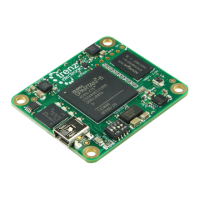
2. Install the GTX transceiver power module by plugging it into connectors J66 and J97.
3. Install the SuperClock-2 module:
a. Align the three metal standoffs on the bottom side of the module with the three
mounting holes in the SUPERCLOCK-2 MODULE interface of the VC7203 board.
b. Using three 4-40 x 0.25 inch screws, firmly screw down the module from the
bottom of the VC7203 board.
c. On the SuperClock-2 module, place a jumper across pins 2–3 (2V5) of the
CONTROL VOLTAGE header, J18, and place another jumper across Si570 INH
header J11.
d. Screw down a 50Ω SMA terminator onto each of the six unused Si5368 clock
output SMA connectors: J7, J8, J12, J15, J16 and J17.
 Loading...