VC7203 IBERT Getting Started Guide www.xilinx.com 11
UG847 (v3.0) July 10, 2013
Running the GTX IBERT Demonstration
• CLK1_N coax cable → SMA connector J6 (CLKOUT1_N) on the SuperClock-2
module
Note:
Any one of the five differential outputs from the SuperClock-2 module can be used to source
the GTX reference clock. CLKOUT1_P and CLKOUT1_N are used here as an example.
GTX TX/RX Loopback Connections
See Figure 1-2, page 9 to identify the P and N coax cables that are connected to the four
receivers (RX0, RX1, RX2 and RX3) and the four transmitters (TX0, TX1, TX2 and TX3). Use
eight SMA female-to-female (F-F) adapters (Figure 1-6), to connect the transmit and
receive cables as shown in Figure 1-7 and detailed here:
•TX0_P→ SMA F-F Adapter → RX0_P
•TX0_N→ SMA F-F Adapter → RX0_N
•TX1_P→ SMA F-F Adapter → RX1_P
•TX1_N→ SMA F-F Adapter → RX1_N
•TX2_P→ SMA F-F Adapter → RX2_P
•TX2_N→ SMA F-F Adapter → RX2_N
•TX3_P→ SMA F-F Adapter → RX3_P
•TX3_N→ SMA F-F Adapter → RX3_N
Note:
To ensure good connectivity, it is recommended that the adapters be secured with a wrench;
however, do not over tighten the SMAs.
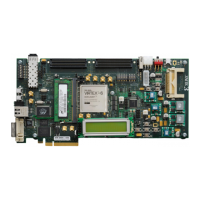
Figure 1-8 shows the VC7203 board with the cable connections required for the Quad 115
GTX IBERT demonstration.
X-Ref Target - Figure 1-6
Figure 1-6: SMA F-F Adapter
X-Ref Target - Figure 1-7
Figure 1-7: TX-To-RX Loopback Connection Example
RX Coax
TX Coax
SMA F-F Adapter
UG847_c1_07_103112
 Loading...