EasyManua.ls Logo

Yale 3000 Series

Yale 3000 Series
6 pages
To Next Page IconTo Next Page
Loading...
80-9303-2207-010 Rev 2 (09-17)
An ASSA ABLOY Group brand
Hold Open Arm Models
Sized
(Sizes 2,3,4,5,6)
3110
3310
3510
Adjustable
(Sizes 1 thru 6)
3311
3511
3/16"
#7
1/4-20
Self Drilling Screws
Wood and Metal
Machine Screws
#7 Drill, 1/4-20 Tap
Sleeve Nut and Bolt
Thru Bolt and Grommet Nut
Drill 9/32 thru from Closer Side
3/8 Drill other side
Drill 9/32 thru from Closer Side
3/8 Drill other Side
(Optional)
Metal
Wood
588 Soffit Plate
Used with Parallel
Arm Closers Only
Soffit Adapter Plate
Main Arm
Set
Screw
Arm
Assembly
NOTE: For special applications a separate door
and frame preparation template is packed with
these instructions. Use this instruction sheet for
installation sequence and closer adjustments only.
Doors should be hung on ball bearing or anti-
friction hinges.
A separate door stop is recommended.
Door and frame must be properly reinforced.
Adjust closing time speed between 3 and 7
seconds from 90° to 0°. Greater closing times may
be required for elderly or handicapped.
These door closers should NOT be installed on the
exposed side (weather side) of exterior doors.
Right Hand Door - RH
Left Hand Reverse - LHR
Right Hand Door - RH
Left Hand Reverse - LHR
Right Hand Door - RH
Left Hand Reverse - LHR
Top Jamb
Installation
See Page 5
Regular Arm
Installation
See Page 2
Parallel Arm
Installation
See Pages
3 & 4
"DL suffix (Delayed Action) is an optional feature.
Optional 3510
Architectural Metal Cover
Cover Screw
Cover Screws
Standoffs
Standard 3310 Narrow Cover
Pinion Cap
Screw Pack
Optional 3510
Architectural Plastic Cover
Insert Cutouts
Cover
Insert
Standoff
Standoff
Backcheck Valve
Power Adjustment Shaft
Latch Valve
Sweep Valve
Closer Body
Cover
Insert
Standard 3510 Full Cover
Insert Cutouts
For Wood drill 3/16 hole
!
NOTE: Architectural Cover CAN
NOT be used for doors swinging
over 120° using parallel mount
Left Hand Door - LH
Right Hand Reverse - RHR
Left Hand Door - LH
Right Hand Reverse - RHR
Left Hand Door - LH
Right Hand Reverse - RHR
Top Jamb
Installation
See Page 5
Regular Arm
Installation
See Page 2
Parallel Arm
Installation
See Pages
3 & 4
Cover Clips
Cover Screw
Cover Screws
Optional 3500M
Series Metal Cover
3000 Series Tri-Packed
Non Handed Door Closer
Installation Instructions
CAUTION
An Incorrectly installed or improperly adjusted door closer can cause
property damage or personal injury. These installation instructions should
be followed to avoid the possibility of misapplication or misadjustment.
Question and Answer IconNeed help?

Do you have a question about the Yale 3000 Series and is the answer not in the manual?

Yale 3000 Series Specifications

General IconGeneral
KeypadYes
Backlit KeypadYes
One-Touch LockingYes
Low Battery IndicatorYes
HandingReversible
Door Thickness1-3/8" to 1-3/4"
Deadbolt Throw1"
Auto-LockYes
Battery4 AA
FinishSatin Nickel
Backset2-3/8" or 2-3/4"
ANSI Grade2

Summary

Regular Arm Installation Guide

Hold Open Arm Models Overview

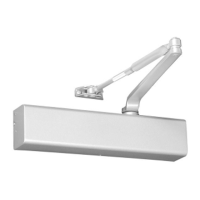
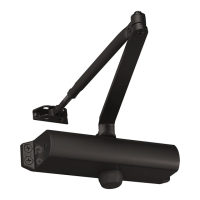
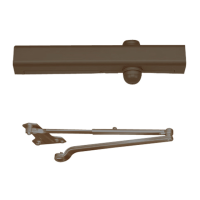
Details different models and their sizes for hold open arms.

General Installation Notes and Cautions

Provides important safety cautions, recommendations, and notes for installation.

Regular Arm Installation Steps

Mark and Drill Holes Procedure

Specifies dimensions and procedures for drilling holes on the door and frame.

Installation Sequence and Adjustments

Guides assembly and adjustment of Sweep, Latch, Backcheck valves, and Hold Open.

Pinion Cap and Cover Installation

Details the final steps of installing the pinion cap or optional cover.

Parallel Arm Installation Guide

Mark and Drill Holes for Parallel Arm

Details hole marking and drilling dimensions for parallel arm mounting.

Installation Sequence for Parallel Arm

Outlines the step-by-step process for parallel arm installation.

Closer and Bracket Installation

Instructions for installing the closer body and mounting bracket.

Preload and Assemble Arm

Steps for preloading the closer and assembling the arm components.

Parallel Arm Adjustment and Final Steps

Arm Installation and Valve Operation

Details arm attachment, opening valves, and initial adjustments.

Sweep, Latch, and Backcheck Adjustments

Guides the adjustment of Sweep, Latch, and Backcheck valves.

Set Hold Open and Install Pinion Cap

Instructions for setting hold open functionality and installing the pinion cap.

Top Jamb Arm Installation Guide

Mark and Drill Holes for Top Jamb

Specifies dimensions and procedures for drilling holes for top jamb mounting.

Installation Sequence for Top Jamb

Outlines the step-by-step process for top jamb arm installation.

Valves, Adjustments, and Hold Open

Guides adjustment of Sweep, Latch, Backcheck valves and setting hold open.

Pinion Cap or Optional Cover Installation

Details the final steps of installing the pinion cap or optional cover.

Spring Power Adjustments and Model Identification

Spring Power Adjustment Procedure

Instructions on how to adjust the spring power of the door closer.

Adjustment Chart for Door Sizes

Provides a chart detailing required turns for different door sizes and installation types.

Model Identification Guide

Explains how to identify the closer model based on size codes.

Setting Hold Open Angle

Instructions on how to set the desired hold open angle for the door.

Related product manuals