T
Teresa SchroederSep 13, 2025
What to do if the Wireless LAN icon is not shown on my Yamaha Musical Instrument?
- JJuan ScottSep 13, 2025
Disconnect the USB wireless LAN adaptor and connect it again.
What to do if the Wireless LAN icon is not shown on my Yamaha Musical Instrument?
Disconnect the USB wireless LAN adaptor and connect it again.
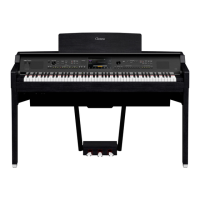
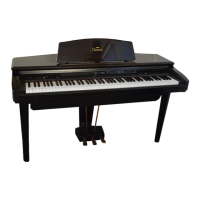
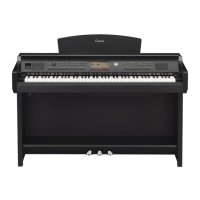
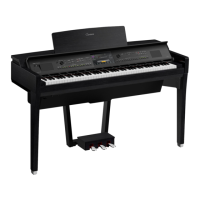
| Polyphony | 256 notes |
|---|---|
| Power Consumption | 60 W |
| Sound Generation | Yamaha CFX, Bösendorfer Imperial |
| Voices | 1, 605 Voices + 58 Drum/SFX Kits |
| Styles | 675 |
| Display | 9-inch color TFT LCD |
| Speakers | 16 cm x 2 + 5 cm x 2 |
| Keytops | Synthetic ebony and ivory keytops |
| Touch Sensitivity | Soft, Medium, Hard, Fixed |
| Pedals | Damper, Sostenuto, Soft |
| Effects | Reverb, Chorus, DSP, Master EQ |
| Recording | 16-track recording |
| USB Audio Recorder | WAV recording and playback |
| Bluetooth | Yes (Audio) |
| Connectivity | Headphones, MIDI, AUX IN, AUX OUT, USB to Host, USB to Device |
| Included Accessories | Owner's Manual |
Explains safety symbols on the product and their meanings.
Covers safety testing, unauthorized modifications, and warranty implications.
Warns against unauthorized modifications affecting FCC compliance.
Details the meaning of warning symbols used in the manual for safety.
Advises against exposing the instrument to water or moisture.
Warns against placing flammable items on the unit to prevent fire hazards.
Steps to take immediately in case of instrument malfunction.
Reinforces safe power cord handling and connection procedures.
Stresses the importance of following assembly steps carefully.
Advises on placing the instrument safely to prevent accidents.
Guidelines for safely connecting electronic components.
General warnings for safe operation and handling of the instrument.
Precautions on instrument handling to prevent dust, vibration, or finish damage.
Instructions for cleaning the instrument using appropriate materials.
Importance of saving data and procedures for backup.
Describes the instrument's realistic touch and sound technologies.
Explains the automatic power-off feature to save energy.
Overview of the instrument's display layout and navigation.
Interface for selecting data like Voices, Styles, and Songs.
The primary screen showing current Voices, Styles, and Songs.
How to interact with the touch-sensitive display.
Step-by-step guide to saving created data to the instrument or USB.
Functionality of the sustain pedal, including half-pedaling.
How the sustain length varies with pedal pressure.
Operation of the sostenuto pedal.
Function of the soft pedal.
Selecting response profiles for playing dynamics.
Setting a constant velocity regardless of playing strength.
How to load backed-up data to restore settings.
Basic operation within the Piano Room function.
Managing recorded performances within the Piano Room.
Selecting and using the instrument's built-in sounds.
Technology simulating acoustic piano resonance for realistic sound.
Voices with enhanced articulation for realistic expression.
Advanced articulation for wind and string instruments.
Using accompaniment patterns for rhythm and backing.
Basic playback control for Styles.
Starting Style playback when a chord is played.
Stopping Style playback using keyboard input.
Chord input using one or two fingers for accompaniment.
Automatic detection of fingering for chord input.
Standard chord fingering method.
Fingered chord input with emphasis on bass notes.
Chord detection across the entire keyboard.
Playing back MIDI and Audio songs.
Performance data, editable for practice.
Recorded audio files, playable like external devices.
Temporarily stopping and resuming Song playback.
Navigating within a Song during playback.
Looping a specific segment of a song for practice.
Recording performance data as MIDI files for editing.
Recording performance as audio files for playback.
Initial steps for recording different parts separately.
Choosing which part to record first.
Initiating the recording process.
Preparation for recording specific parts to channels.
Assigning parts to specific MIDI channels.
Initiating the conversion process to audio format.
Executing the conversion process from MIDI to audio.
How to connect a microphone to the instrument's input jack.
Different modes for applying vocal harmonies.
Saving and recalling panel settings to memory buttons.
Creating custom performance lists for managing repertoire.
The process of saving panel settings to memory buttons.
Linking Registration Memory files to a playlist for performance lists.
Overview of mixer operations for adjusting levels and balance.
Overview of all input/output ports on the instrument.
Important safety and operational guidelines for USB devices.
Saving and loading data to/from USB drives.
How to format USB drives for the instrument.
Using write-protect features to prevent data erasure.
Using the instrument as an audio interface for computers.
Enhancing enjoyment with compatible smart device applications.
Connecting external audio players via an audio cable.
Managing custom performance lists.
Initializing or backing up instrument data.
General problems and their solutions.
Troubleshooting low volume or no sound issues.
Identifying and fixing sound distortion.