MOX6/MOX8 Owner’s Manual
Control and Functions
12
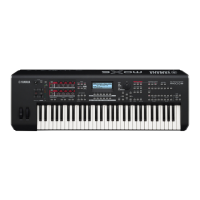
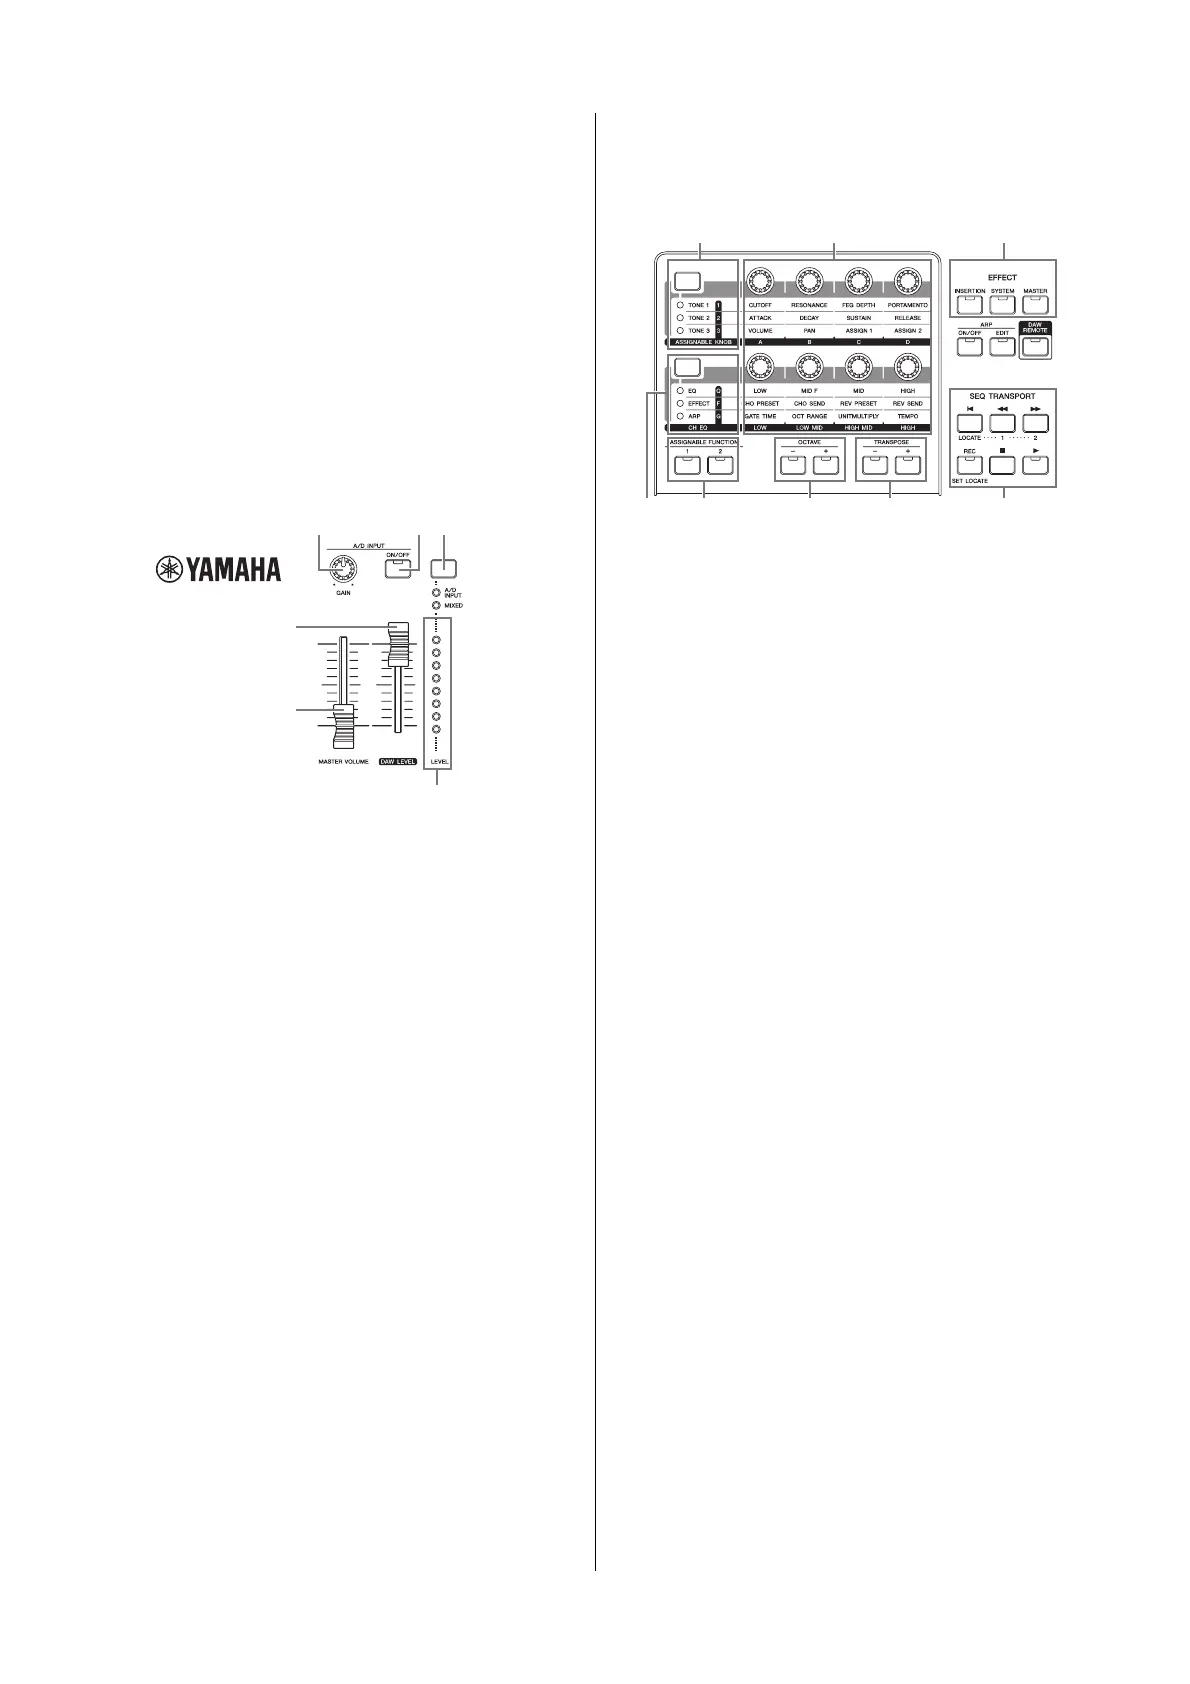
1 Keyboard
The MOX8 features an 88-key keyboard, while the MOX6 has
61 keys. All are equipped with a touch response feature,
initial touch. With initial touch, the instrument senses how
strongly or softly you play the keys, and uses that playing
strength to affect the sound in various ways, depending on
the selected Voice.
2 Pitch Bend wheel
Controls the pitch bend effect. You can also assign other
functions to this controller.
3 Modulation wheel
Controls the modulation effect. You can also assign other
functions to this controller.
4 [MASTER VOLUME] slider (page 18)
Adjusts the volume of the overall sound. Move the slider
upwards to raise the output level from the OUTPUT [L/MONO]/
[R] jacks and the [PHONES] jack.
5 [DAW LEVEL] slider
Adjusts the volume of the audio signal input from the USB
[TO HOST] terminal.
6 A/D INPUT [GAIN] knob
Use this to adjust the input gain of the audio signals at the A/
D INPUT [L]/[R] jacks. Depending on the connected
microphone, you may need to adjust this for optimum level.
The volume level is increased as the knob is rotated to the
right and decreased as it is rotated to the left.
NOTE Depending on the output level of the equipment connected to
the A/D INPUT [L]/[R] jacks, you should change the value of the
Mic/Line parameter in the [F1] GENERAL display of the Utility
mode. When the output level of the connected equipment (such
as a microphone, guitar, bass) is low, set this parameter to “mic.”
When the output level of the connected equipment (such as a
synthesizer keyboard, CD player) is high, set this parameter to
“line.”
7 A/D INPUT [ON/OFF] button
Switches whether or not this instrument accepts the audio
signal input via the A/D INPUT [L]/[R] jack.
8 [LEVEL] meter button
Selects the destination signal controlled via the [LEVEL]
meter, input signal via the A/D INPUT [L]/[R] jacks or output
signal via the OUTPUT [L/MONO]/[R] jack.
9 [LEVEL] meter
Indicates the level of the signal specified via the [LEVEL]
meter switch button.
) Knob Function 1 button
Pressing this button changes the functions assigned to Knobs
1 – 4 (on the upper row). The lamp next to the currently active
parameters will light. In the Voice mode, the function of each
knob is applied to the current Voice; in the Performance/Mixing
mode, the function of each knob is applied only to the currently
selected Part or to all Parts (depending on the setting via the
[COMMON] and [PART SELECT] buttons).
NOTE When you press the Knob Function 1 button while holding the
[SHIFT] button, the lamp next to the [TONE 1] button will light
and the TONE 1 parameters are assigned to Knobs 1 – 4.
! Knob Function 2 button
Pressing this button changes the functions assigned to
Knobs 5 – 8 (on the lower row). The lamp next to the currently
active parameters will light.
NOTE When you press the Knob Function 2 button while holding the
[SHIFT] button, the lamp next to the [EQ] button will light and the
EQ parameters are assigned to Knobs 5 – 8.
@ Knobs 1 – 8 (page 27)
These eight highly versatile knobs let you adjust various
aspects or parameters of the current Voice. In this manual,
the knobs on the upper row are called “Knob 1” – “Knob 4”
and the knobs on the lower row are called “Knob 5” – “Knob
8.” Pressing the Knob Function 1 button will change the
functions of Knobs 1 – 4 while pressing the Knob Function 2
button will change the functions of Knobs 5 – 8.
# ASSIGNABLE FUNCTION [1]/[2] buttons
Depending on the XA (Expanded Articulation) settings in the
Voice Element Edit mode, you can call up the specific
Element of the selected Voice by pressing each of these
buttons during your keyboard performance. In addition, you
can assign other functions to these buttons.
$ OCTAVE [-] and [+] buttons (page 26)
Use these buttons to change the note range of the keyboard.
To restore the normal octave setting, press both buttons
simultaneously.
4
5
9
6
7
8
^
&*(
A
$%
) @
!
#
 Loading...