MOX6/MOX8 Owner’s Manual
Quick Guide
39
Creating a Drum part via Step
Recording
Now, try creating a Song.
First, record a 4-measure drum phrase as shown below to
Track 1 by using Step Recording.
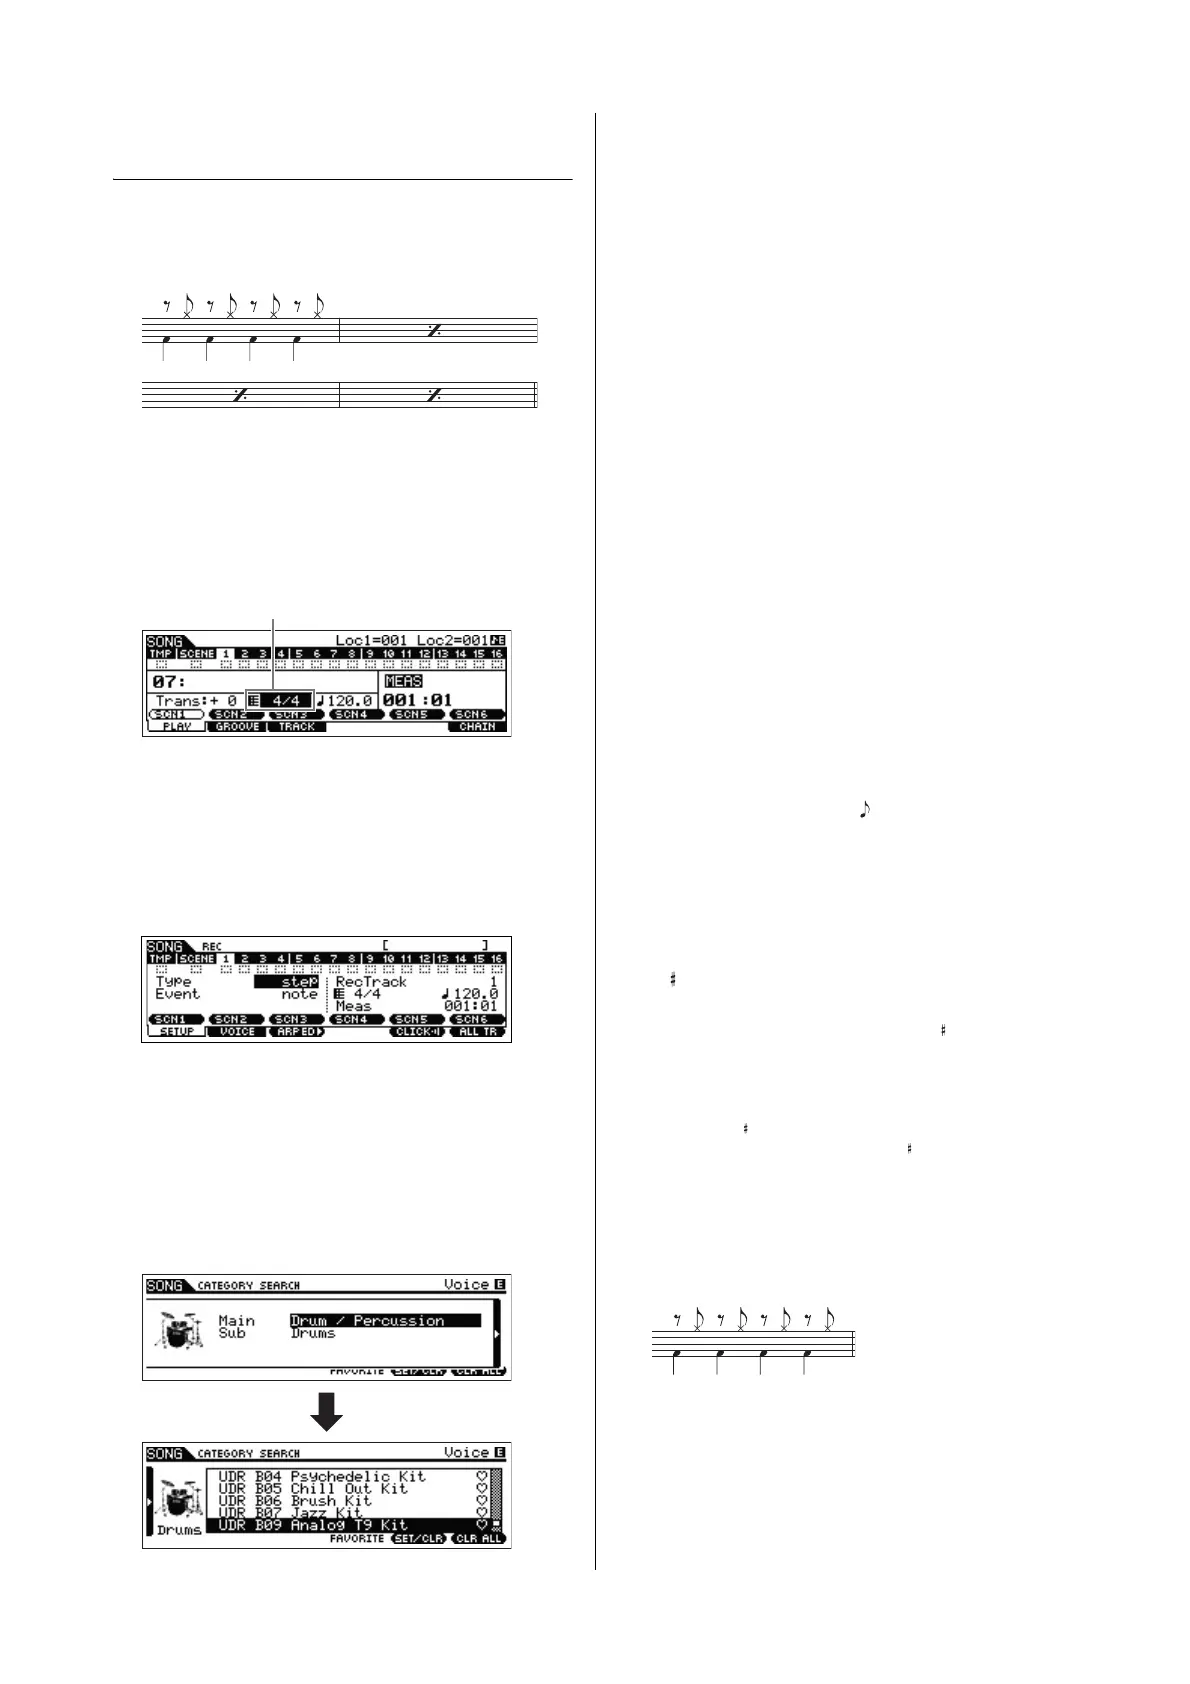
1 Press the [SONG] button to call up the Song Play
display then select an empty Song.
2 On the [F1] PLAY display, set the time signature to
“4/4.”
3 Press the [REC] button, followed by the [F1]
SETUP button, then set the parameters as below.
• Type = step
• Event = note
• Rec Track = 1
If necessary, set the tempo to the desired value.
4
Press the [F2] VOICE button, followed by the
[CATEGORY SEARCH] button, then select the
Drum Voice.
Set the Main Category to “Drum/Percussion” then set the Sub
Category to “Drums.” Move the Cursor [>] button to call up
the Drum Voice List. From this list, select “PDR B09 Analog”
then press the [ENTER] button.
5
Press the [
F
] (Play) button to enter the Step Record
mode.
The [F] button lamp lights and the Step Record display
appears.
6 Set the “Step Time” to “480.”
The “Step Time” parameter determines to what position the
pointer will advance after a note has been entered. Here,
the pointer will advance in quarter-note steps.
7 Press the [P] (Top) button to return to the top of
the Song, then press the B0 key four times.
The Bass Drum Kick sound (assigned to the B0 key) is
recorded to the timing of each beat.
NOTE
If you are using the MOX6, use the [OCTAVE] buttons to
make sure that the Bass Drum Kick sounds when you play
the B0 key. This is necessary since the MOX6 has a shorter
keyboard and doesn’t have a B0 key.
8 Press the [J] (Stop) button to stop recording.
This returns to the Song Play display.
9 To record another percussion sound, press the
[REC] button then the [F] (Play) button to enter
the Step Record mode again.
The [F] button lamp lights and the Step Record display
appears.
10 Set the “Step Time” to “ 240.”
The Step Time parameter determines to what position the
pointer will advance after a note has been entered. Here,
the pointer will advance in eighth-note steps.
11 Press the [
P
] (Top) button to return to the top of
the Song, then press the [F3] REST button and
G 1 key four times.
An eighth-note rest is recorded to each down beat and the
Hi-Hat Cymbal sound (assigned to the G 1 key) is recorded
to each up beat.
NOTE
If you are using the MOX6, use the [OCTAVE] buttons to
make sure that the Hi-Hat Cymbal sounds when you play
the G 1 key. This is necessary since the MOX6 has a shorter
keyboard and doesn’t have a G 1 key.
12 Press the [J] (Stop) button to stop recording.
This returns to the Song Play display.
After executing the above operations (steps 1 – 12), you
should now have a 1-measure drum phrase as shown below.
13
Press the [
P
] (Top) button, then press the [
F
]
(Play)
button to hear the recorded data.
To stop playback, press the [J] (Stop) button.
 Loading...