Do you have a question about the Yamaha S90XS and is the answer not in the manual?
Connect the microphone, press the MIC ON/OFF button, and adjust the INPUT GAIN knob for vocoder input.
Explains how the vocoder works using DSP and how to route the A/D input to the vocoder in VOICE mode.
Configure the A/D input output select and parameters for use in PERFORMANCE mode.
Assign a vocoder voice to PART 1 of a PERFORMANCE and set up other parts.
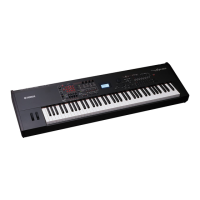
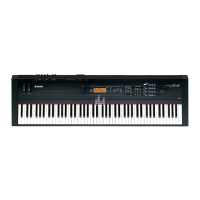
The Yamaha S70XS/S90XS is a music production and performance workstation that integrates a vocoder function, allowing users to manipulate synthesizer sounds with vocal input. This device is designed for musicians and producers who want to add unique vocal textures and effects to their music.
At its core, the S70XS/S90XS combines a powerful synthesizer with an analog-to-digital (A/D) input, which serves as the gateway for the vocoder. The vocoder itself is not an effect applied directly to the microphone input; rather, it uses characteristics extracted from the microphone signal to alter the synthesizer sound. This means that the vocal input acts as a modulator, shaping the timbre and articulation of the synth voice.
The A/D input, accessible via a combo jack (XLR and 1/4") on the rear panel, is a mono microphone input. It features an ON/OFF button and a Gain Control knob on the front panel, providing immediate access for adjusting the input level. Additionally, a row of dedicated knobs allows for further customization of the MIC input, including VOLUME, PAN, CHORUS SEND, and REVERB SEND. These controls enable users to fine-tune the microphone signal before it interacts with the vocoder, ensuring optimal results.
The vocoder function is derived from the device's Digital Signal Processing (DSP) muscle, specifically utilizing a pair of XS Insertion Effects. These effects are combined to create a "large" effect processor dedicated to the vocoder. The richer the synth voice is in harmonics and noise components, the more intelligible the vocoder's output will be. Human speech, composed of vowels, consonants, pitched tones, and un-pitched noise components, is analyzed by the vocoder. The microphone input applies certain components of speech to the synth sound, with sustained vowel sounds and consonant "noises" being particularly important for intelligibility. The pitch of the vocoded sound is determined by the keys played on the keyboard, while the intelligibility comes from the consonant sounds picked up and filtered by the vocoder.
The S70XS/S90XS supports the vocoder in various modes. In VOICE mode, the vocoder can be applied to any of the Voices, and the synthesizer includes four pre-configured Voices specifically designed for vocoder use. In MULTI mode and PERFORMANCE mode, the vocoder can only be applied to Part 1. This limitation is due to the specific hardware routing of the microphone input.
To use the vocoder, the first step is to connect a microphone to the MIC INPUT jack and ensure the [MIC ON/OFF] button is pressed so its lamp illuminates. The INPUT GAIN knob should then be adjusted so that the PEAK lamp flashes briefly on loud peaks, indicating an appropriate input level. For best results, a dynamic microphone is recommended, as the keyboard does not supply the +48V phantom power required by some condenser microphones. If a phantom-powered microphone is desired, it must be connected to an external mixer or device that can supply this voltage before connecting to the S70XS/S90XS.
Once the microphone input is set up, the user needs to select "MIC" using the Knob Function buttons and adjust the volume with the assigned knob. The vocoder setup takes place within a VOICE. Users must choose a synth Voice to which the Insertion Effect will be applied.
The process for setting up the vocoder begins in [VOICE] mode:
It is crucial to remember that the vocoder requires simultaneous playing of the keyboard and vocal input into the microphone. The vocal input modifies the synth sound; it is not an effect for the vocal itself.
The A/D input settings are global for VOICE mode but can be customized per Performance and per Multi. While the MIC ON/OFF button is always active, users can customize A/D PART settings within a PERFORMANCE or MULTI program. This allows for scenarios where the microphone input can be active with specific effects or entirely inactive, depending on the program recalled.
To assign the A/D input (microphone) to a PERFORMANCE:
For real-time access to these parameters, the left front panel features four knobs and five rows of quick-access parameters. The "Mic" row, accessible by pressing the buttons next to the LEDs, includes VOLUME, PAN, CHORUS SEND, and REVERB SEND. These correspond to the parameters found in the EDIT screen. The display shows both the current value and the originally stored value, facilitating on-the-fly adjustments while allowing users to revert to the original setting without guesswork.
When building a PERFORMANCE around a VOCODER Voice as PART 1, it's essential to note that the VOCODER must always be assigned to PART 1. If adding a vocoder sound to an existing PERFORMANCE, users may need to rearrange existing Voices to meet this requirement.
To set up a PERFORMANCE with a VOCODER Voice as PART 1:
The manual does not explicitly detail maintenance features in terms of cleaning or servicing. However, the design implies a robust system for managing and integrating external audio. The clear instructions for connecting microphones and adjusting input levels suggest that proper setup and use are key to maintaining optimal performance. The emphasis on using a dynamic microphone or providing external phantom power for condenser microphones highlights the importance of understanding the device's power requirements to prevent damage or suboptimal operation. The ability to initialize Performance locations and customize settings on a per-Performance basis also contributes to a flexible and manageable workflow, allowing users to reset configurations if issues arise from incorrect settings.
| Type | Synthesizer |
|---|---|
| Sound Engine | AWM2 |
| Polyphony | 128 notes |
| Arpeggiator | Yes |
| Wave ROM | 456 MB |
| Keyboard | 88-key |
| Preset Voices | 64 Drum Kits |
| User Voices | 128 |
| Effects | Reverb, Chorus, Insertion Effects |
| Display | 320 x 240 backlit LCD |
| Connectivity | MIDI In/Out/Thru, USB |