EasyManua.ls Logo

Zephyr AK2000 - User Manual

Zephyr AK2000
21 pages
Print Icon
To Next Page IconTo Next Page
Loading...
2EADALL)NSTRUCTIONSBEFORE)NSTALLINGANDOPERATINGTHISAPPLIANCE
-/$%,AK2000,AK6000,AK9800
)MPORTANT3AFETY.OTICE
5SE#AREAND)NSTALLATION'UIDE
:$51,1*
725('8&(7+(5,6.2)),5(25(/(&75,&6+2&.'212786(7+,6
)$1:,7+$1<62/,'67$7(&21752/'(9,&(
:$51,1*
725('8&(7+(5,6.2)),5((/(&75,&6+2&.25,1-85<72
3(562162%6(59(7+()2//2:,1*
D8VHWKLVXQLWRQO\LQWKHPDQQHULQWHQGHGE\WKHPDQXIDFWXUHULI\RXKDYHTXHVWLRQV
FRQWDFWWKHPDQXIDFWXUHU
E%HIRUHVHUYLFLQJRUFOHDQLQJXQLWVZLWFKSRZHURIIDWVHUYLFHSDQHODQGORFNSDQHO
WRSUHYHQWSRZHUIURPEHLQJVZLWFKHGRQDFFLGHQWDOO\:KHQWKHVHUYLFHGLVFRQQHFWLQJ
PHDQVFDQQRWEHORFNHGVHFXUHO\IDVWHQDSURPLQHQWZDUQLQJGHYLFHVXFKDVDWDJ
WRWKHVHUYLFHSDQHO
&$87,21
)RUJHQHUDOYHQWLODWLQJXVHRQO\'RQRWXVHWRH[KDXVWKD]DUGRXVRUH[SORVLYHPDWHULDOV
DQGYDSRUV7DNHFDUHZKHQXVLQJFOHDQLQJDJHQWVRUGHWHUJHQWV
6XLWDEOHIRUXVHLQKRXVHKROGFRRNLQJDUHD
:$51,1*
725('8&(7+(5,6.2)5$1*(723*5($6(),5(
D1HYHUOHDYHVXUIDFHXQLWVXQDWWHQGHGDWKLJKVHWWLQJV%RLORYHUVFDXVHVPRNLQJ
DQGJUHDV\VSLOORYHUVWKDWPD\LJQLWH+HDWRLOVVORZO\RQORZRUPHGLXPVHWWLQJV
E$OZD\VWXUQKRRG21ZKHQFRRNLQJDWKLJKKHDWRUZKHQIODPLQJIRRG
F&OHDQYHQWLODWLQJIDQVIUHTXHQWO
\
*UHDVHVKRXOGQRWEHDOORZHGWRDFFXPXODWH
RQIDQRUILOWHU
G8VHSURSHUSDQVL]H$OZD\VXVHFRRNZDUHDSSURSULDWHIRUWKHVL]HRIWKHVXUIDFH
HOHPHQW
H.HHSIDQILOWHUVDQGJUHDVHODGHQVXUIDFHVFOHDQ
I8VHKLJKVHWWLQJRQKRRGRQO\ZKHQQHFHVVDU\
J'RQ¶WOHDYHKRRGXQDWWHQGHGZKHQFRRNLQJ
K$OZD\VXVHFRRNZDUHDQGXWHQVLOVDSSURSULDWHIRUWKHW\SHRIDQGDPRXQWRIIRRG
EHLQJSUHSDUHG
:$51,1*
725('8&(7+(5,6.2),1-85<723(56216,17+((9(172)$5$1*(723
),5(2%6(59(7+()2//2:,1*
D 6027+(5)/$0(6ZLWKDFORVHILWWLQJOLGFRRNLHVKHHWRUPHWDOWUD\WKHQ
WXUQRIIWKHEXUQHU%(&$5()8/7235(9(17%8516,IWKHIODPHVGRQRWJRRXW
LPPHGLDWHO\(9$&8$7($1'&$//7+(),5('(3$570(17
E 1(9(53,&.83$)/$0,1*3$1±<RXPD\EHEXUQHG
F '212786(:$7(5LQFOXGLQJZHWGLVKFORWKVRUWRZHOV±DYLROHQWVWHDP
H[SORVLRQZLOOUHVXOW
5HY ZZZ]HSK\URQOLQHFRP
2%!$!.$3!6%4(%3%).3425#4)/.3

Questions and Answers

Summary

Important Safety Notice

General Safety Precautions

Essential safety guidelines for using the appliance, observing warnings and cautions.

Range Top Grease Fire Prevention

Steps to minimize the risk of range top grease fires and safe cooking practices.

Range Top Fire Safety Procedures

Actions to take in case of a range top fire, including smothering flames.

Electrical and Installation Safety

Safety rules for installation, electrical connections, and qualified personnel.

Ductwork and Ventilation Safety

Guidelines for proper ductwork, venting to outdoors, and avoiding hazardous materials.

Operation Safety

Safety measures during appliance operation, like keeping grills and filters in place.

Product Overview

Hurricane Series Overview

Overview of the Hurricane Series, its model numbers and key features.

Cyclone Series Overview

Overview of the Cyclone Series, its model numbers and key features.

Whirlwind Series Overview

Overview of the Whirlwind Series, its model numbers and key features.

Controls

Hurricane Series Controls Overview

Detailed explanation of buttons and display for Hurricane series controls.

Setting the Clock

Step-by-step guide to set the clock time on the appliance.

Light On-Off Function

How to turn the appliance light on and off using the control button.

Blower Controls Operation

How to operate blowers, select speeds (Hi/Lo), and turn them on/off individually.

Timed Delay Off Function

Setting a countdown timer for the appliance to turn off automatically.

Setting Timer with Alarm

How to set a timer with an audible alarm upon completion.

Cyclone & Whirlwind Rocker Controls

Operation of independent rocker switches for blowers and light on specific models.

Maintenance

Self Clean Feature Explanation

How the self-cleaning feature liquefies and collects grease.

Cleaning Frequency and Detergent

Recommended schedule for cleaning and suitable detergents.

Safety Grill Cleaning Instructions

Procedure for removing and cleaning the safety grills.

Self Clean Procedure

Steps to activate the self-cleaning cycle for the blowers.

QuattroVent Channels Cleaning

Instructions for cleaning the QuattroVent air-curtain channels.

Surface Maintenance and Polishing

How to clean and polish the appliance's exterior surfaces.

Replacing Light Bulbs

Guide on how to safely replace the appliance's light bulbs.

Installation

Installation Requirements and Tools

List of tools and requirements for installing the appliance.

Included Accessories for Installation

List of accessories provided with the range hood for installation.

Duct Opening Specifications

Required cut-out sizes for duct openings for different models.

Clearances Above Range

Recommended minimum and maximum clearances above the cooking surface.

Convertible Duct Discharge Options

How to adapt the unit for different duct discharge types.

3-1;4 x 10 Vertical Discharge Installation

Specific steps for converting to a 3-1/4 x 10" vertical discharge.

3-1;4 x 10 Rear Discharge Installation

Specific steps for converting to a 3-1/4 x 10" rear discharge.

Installation Notes

Damper and Starting Collar Installation

Guidance on installing dampers and starting collars for proper venting.

Hood Installation Leveling

Proper methods for leveling the hood during installation to prevent grease backflow.

Electrical Wiring Connector Recommendation

Recommendation for using an electrical connector for wiring safety.

Trouble Shooting

Troubleshooting Installation Issues

Common problems encountered after installation and their solutions.

Troubleshooting Blower and Noise

Diagnosing issues with blower operation, scraping, and noise levels.

Troubleshooting Light and Grease Collection

Resolving problems related to the light not working or grease collection.

Troubleshooting Airflow and Fumes

Addressing issues with cooking fumes dissipating before reaching the blower.

Warranty Information

Obtaining Warranty Service

Procedures for obtaining service and questions under warranty.

Warranty Coverage and Limitations

Details on covered repairs, parts, and warranty duration.

Conditions Voiding Warranty

Situations and actions that will void the product warranty.

Exclusions from Warranty

List of parts, services, and damages not covered by the warranty.

Overview

This document describes the Zephyr Hurricane, Cyclone, and Whirlwind series range hoods (models AK2000, AK6000, AK9800), providing detailed instructions for their use, care, and installation. These range hoods are designed for household cooking areas and are equipped with features to ensure efficient ventilation and ease of maintenance.

Function Description

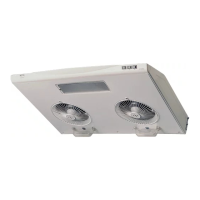
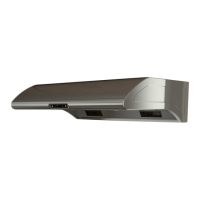
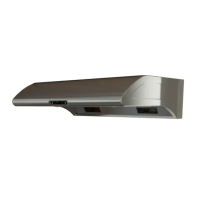
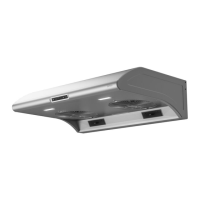
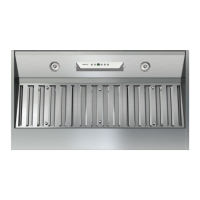
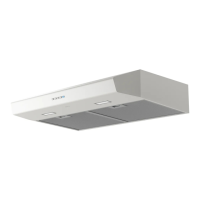
The Zephyr range hoods are designed to ventilate cooking fumes, smoke, and odors from the kitchen. They feature centrifugal blower systems that automatically liquefy grease, collecting it in dishwasher-safe grease containers. The Hurricane series (AK2000, 2036) includes a QuattroVent Air Curtain, dual "Thrust-Fore" self-clean blowers, digital touch pad controls, a clock, timer, and a 3-stage delay shutoff. The Cyclone series (AK6000, 6036, 6042, 6048) also features dual "Thrust-Fore" self-clean blowers, independent rocker controls with high and low speeds, and a 3-way convertible ducting option. The Whirlwind series (AK9800) has dual self-clean blowers, independent rocker controls with high and low speeds, and a slim-line design.

The primary function of these range hoods is to extract air from the cooking area, preventing the accumulation of grease and odors in the kitchen. They are suitable for general ventilating use and should not be used to exhaust hazardous or explosive materials and vapors. Proper installation and maintenance are crucial for their effective and safe operation.

Usage Features

The range hoods offer various controls for operation. For the Hurricane series, the digital touch pad controls allow users to set the time, activate the timed delay shutoff, and control the lights and blowers. The "On/Off" button can simultaneously turn on the light and both blowers at high speed. Individual blowers can be controlled for speed (Hi/Lo) using the "Fan-L" and "Fan-R" buttons. The timed delay off function allows the unit to run for 3, 5, or 10 minutes before automatically shutting off, with the light turning off and blowers decelerating to low speed during this period. A timer (alarm) function can also be set, which will sound beeps when the countdown reaches zero. This timer function cannot be operated simultaneously with the "Delay Off" function.

For the Cyclone and Whirlwind series, independent rocker controls are used. A dedicated switch turns the light on or off. Separate rocker switches control the right and left blowers, allowing users to select low speed (rock switch up to 'I'), high speed (rock switch up to 'II'), or turn them off (center position).

It is important to always leave safety grills and filters in place during operation to prevent hair, fingers, or loose clothing from getting caught in the blowers. When cooking at high heat or with flaming food, the hood should always be turned on.

Maintenance Features

The Zephyr range hoods are designed with a self-clean feature, eliminating the need for traditional filters. The centrifugal blower system automatically liquefies accumulated grease, which is then collected in dishwasher-safe grease containers. Running the self-clean function periodically flushes out grease from the internal housing. Cleaning should be performed approximately once a month under normal use.

For self-cleaning, both blowers should be turned on at low speed. For the Hurricane series, the Timed Delay Off can be set to 5 minutes for this purpose. A grease-cutting detergent, such as '409' or its equivalent, is recommended. The detergent should be squirted directly onto the blower blades 30-35 times with the nozzle on 'spray' setting, repeating for the second blower. After the cleaning cycle, water can be sprayed to rinse off the detergent.

The residue containers, which collect the liquefied grease, can be gently slid out with both hands and cleaned in a dishwasher under a normal wash cycle. To prevent grease from drying and tacking onto the cup surface, it is recommended to fill the residue containers ¼ full with water before cleaning or during regular use.

The safety grills can be removed for cleaning by loosening Philips screws and are dishwasher safe. However, extreme caution is advised when the safety grills are removed, as the blowers are exposed, posing a risk to hair, fingers, and loose clothing. Children should never be left unattended during this process.

For the Hurricane series, the light shield can be removed by turning it counter-clockwise for cleaning in a dishwasher. For the Whirlwind series, the light shield is removed by unscrewing a Philips screw. When removing light shields, users should be careful of exposed edges on the stainless steel surface and are advised to wear latex cleaning gloves.

The QuattroVent Air-Curtain channels (Hurricane series) share the same internal housing as the main blowers, so no further cleaning is required after the self-clean function. Residue around the channel surface can be cleaned regularly with '409' and a cotton cloth.

Surface maintenance involves cleaning all surface residue with '409' or mild detergent and wiping with a cotton cloth. Stainless steel surfaces can be polished with any stainless steel polish or glass cleaner.

Light bulbs are 40W appliance bulbs and can be replaced with 60W bulbs for brighter illumination. Instructions for removing the light shield (as described for cleaning) should be followed when replacing bulbs, again with caution due to exposed edges.

Zephyr AK2000 Specifications

General IconGeneral
MaterialStainless Steel
Sones6.5 sones
LightingLED lighting
FiltersBaffle filters
Noise Level6.5 sones
Voltage120V
Filter TypeBaffle Filter

Related product manuals