EasyManua.ls Logo

Zippity BELLA ZP19070 - User Manual

Zippity BELLA ZP19070
14 pages
Print Icon
To Next Page IconTo Next Page
Loading...
WWW.ZIPPITY-OUTDOOR.COM
1
ASSEMBLY
INSTRUCTIONS
ZP19070
WWW.ZIPPITY-OUTDOOR.COM
VER. 020821
ZP19070
ASSEMBLY
INSTRUCTIONS
60 MIN
Approximate assembly me
Want to see a video on how to
assemble this product?
Scan the QR code
BELLA
PUPPY AND GARDEN
VINYL GATE KIT

Question and Answer IconNeed help?

Do you have a question about the Zippity BELLA ZP19070 and is the answer not in the manual?

Summary

General Information and Support

Important Assembly Tips

Critical assembly tips and precautions for safe and proper installation.

Missing or Damaged Parts

Procedures for reporting and ordering replacement parts for faulty components.

Assembly Assistance

Contact details and support channels for assistance during assembly.

Product Return Process

Guidelines and process for returning the product if necessary.

Step 1: Lay Out Materials

Step 2: Assemble the Gate Frame

Step 2.1: Assemble Frame Rails and Posts

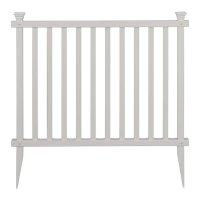
Connecting the top and bottom rails to the posts using screws.

Step 2.2: Insert Pickets

Inserting the vertical pickets into the assembled gate frame.

Step 2.3: Attach Hinges

Attaching the small hinge assemblies to the gate frame rails.

Step 2.4: Install Latch Assembly

Installing the latch assembly onto the gate frame top rail.

Step 3: Assemble the Gate Wings

Step 3.1: Assemble Wing Frame

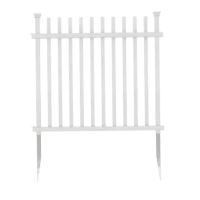
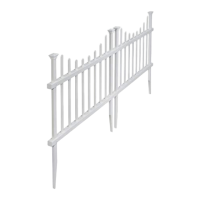
Connecting wing top and bottom rails to wing posts.

Step 3.2: Secure Wing Rails and Pickets

Securing wing rails with screws and inserting pickets.

Step 3.3: Assemble Second Wing

Repeating steps 3.1 and 3.2 for the second gate wing.

Step 4: Install Gate Wings into Ground

Step 4.1: Spacing Gate Wings

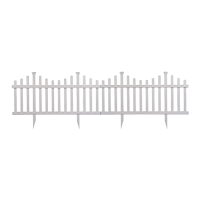
Positioning gate wings at specified distances apart.

Step 4.2: Installing Wing Posts

Pushing or hammering wing posts into the ground.

Step 4.3: Hard Ground Installation Option

Optional method for hard ground using an auger bit and water.

Step 4.4: Leveling and Backfilling

Leveling the gate unit and securing posts with backfill.

Step 5: Install Gate Hardware

Step 5.1: Attach Hinges to Wings

Aligning and fastening hinges to the gate wing rails.

Step 5.2: Attach Latch Catch

Aligning and fastening the latch catch to the gate wing.

Step 5.3: Connect Gate Wings

Connecting gate wings to fence panels using joiner clips.

Step 6: Install Post Caps

Step 6.1: Place Post Caps

Inserting the post caps over the tops of the gate and panel posts.

Overview

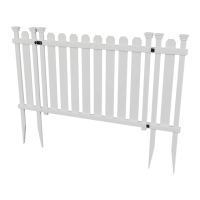
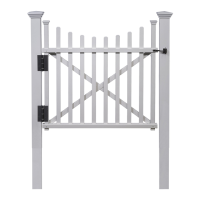
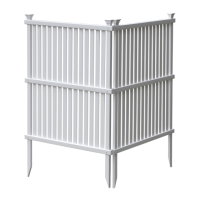
The Zippity Bella Puppy and Garden Vinyl Gate Kit (ZP19070) is a DIY assembly product designed to provide a functional and aesthetically pleasing gate for puppies and gardens. This manual outlines the assembly process, technical specifications, and important usage and maintenance information.

Function Description

The Zippity Bella gate serves as a barrier for small pets like puppies and to define garden spaces. It is designed for easy installation into the ground, with options for both soft and hard soil conditions. The gate features a latch and hinge system for operational functionality and can be connected to existing fence panels using joiner clips.

Important Technical Specifications

  • Overall Dimensions: 30.5 inches (height) x 55.5 inches (width).
  • Gate Frame Dimensions: 37.1 inches (width) with 1.2 inches spacing between pickets.
  • Ground Clearance: The bottom wing rails should be approximately 2 inches above the ground after installation.
  • Wing Post Depth: Wing posts should be pushed into the ground about 12-16 inches deep.
  • Material: Vinyl construction for durability and low maintenance.
  • Assembly Time: Approximately 60 minutes.
  • Components:
    • Post Cap (A): 6 pieces
    • Wing Top Rail (B): 2 pieces, 1½" x 1½" x 9⅛"
    • Wing Bottom Rail (C): 2 pieces, 1½" x 1½" x 9⅛"
    • Top Rail (D): 1 piece, 1½" x 1½" x 37"
    • Bottom Rail (E): 1 piece, 1½" x 1½" x 37"
    • Wing Post (F): 4 pieces, ⅞" x 1½" x 42"
    • Post (G): 2 pieces, ⅞" x 1½" x 28⅞"
    • Picket (H): 10 pieces, ⅜" x 2¾" x 27"
    • Small Latch Assembly (I): 1 piece
    • Small Hinge Assembly (J): 2 pieces
    • ½" Black Self-Tapping Steel Screw (K): 14 pieces
    • ¾" Self-Tapping Stainless Steel Screw (L): 24 pieces
    • ⅛" Drill Bit (M): 1 piece
  • Required Tools (not included): Claw hammer or similar tool (for loosening hard ground), block of wood (for protecting wing posts during hammering), 1½" diameter auger bit (optional, for hard ground).

Usage Features

  • Easy Assembly: The product is designed for straightforward assembly, with an estimated time of 60 minutes. A video tutorial is available via QR code for visual guidance.
  • Versatile Installation: Can be installed in various ground conditions. For hard ground, options include loosening the soil with a claw hammer, adding water, or using a 1½" diameter auger bit to pre-drill holes.
  • Adjustable Operation: Hinges can be installed on either the right or left side of the gate panel to allow for left-hand or right-hand operation, respectively.
  • Secure Latching: Includes a small latch assembly for secure closure of the gate.
  • Expandable System: The gate wings can be connected to existing fence panels using joiner clips and ¾" self-tapping stainless steel screws, allowing for integration into a larger fencing system.
  • Aesthetic Design: Features post caps (A) that are inserted over the tops of the gate wing and gate panel posts for a finished look.
  • Sturdy Construction: Once assembled and installed, backfilling and compacting dirt around the base of each wing post strengthens the unit.

Maintenance Features

  • Durable Vinyl Material: The vinyl construction is inherently low-maintenance, resistant to rot, rust, and insect damage, and does not require painting or staining.
  • Replacement Parts: In case of missing, damaged, or defective parts, customers can visit the Zippity Outdoor website to order replacements. Customer service is available via phone and email for further assistance.
  • Cleaning: Regular cleaning with soap and water is typically sufficient to maintain the appearance of the vinyl gate.

Assembly Steps Overview:

  1. Lay Out Materials: Identify and organize all components listed in the manual.
  2. Assemble the Gate Frame:
    • Insert the Top Rail (D) and Bottom Rail (E) over the Posts (G), aligning pre-drilled holes.
    • Secure with ¾" Self-Tapping Steel Screws (L).
    • Insert Pickets (H) through the top and bottom rails, ensuring tabs lock into the bottom rail.
    • Install Small Hinge Assembly (J) on one side, pre-drilling holes with the ⅛" Drill Bit (M) and securing with ½" Black Self-Tapping Steel Screws (K).
    • Install Small Latch Assembly (I) on the opposite side, pre-drilling holes and securing with ½" Black Self-Tapping Steel Screws.
  3. Assemble the Gate Wings:
    • Slide Wing Top Rail (B) and Wing Bottom Rail (C) over Wing Posts (F), aligning pre-drilled holes.
    • Secure with ¾" Self-Tapping Stainless Steel Screws.
    • Insert one Picket (H) into the routed holes of the top and bottom rail until tabs lock.
    • Repeat for the second gate wing.
  4. Install Gate Wings into the Ground:
    • Space gate wings 37½" apart (38½" from outside of wing post to outside of wing post).
    • Push wing posts into the ground. For hard ground, loosen soil, add water, or use an auger bit to pre-drill holes.
    • Hammer wing posts into the ground until bottom wing rails are approximately 2" above ground, using a block of wood to protect the posts.
    • Level the assembled unit and backfill/compact dirt around the base of each wing post.
  5. Install Gate Hardware:
    • Align hinges against the gate wing rails, mark and pre-drill two holes for each hinge, and fasten with ½" black self-tapping steel screws.
    • Align the latch catch with the latch finger on the gate wing, pre-drill two holes, and fasten with ½" black self-tapping steel screws.
    • Connect gate wings to fence panels using joiner clips and ¾" self-tapping stainless steel screws (if applicable).
  6. Install Post Caps: Insert Post Caps (A) over the tops of all gate wing and gate panel posts.

Important Notes:

  • Always check the inside of larger pieces for other materials packed inside.
  • Assemble components on a non-abrasive surface (e.g., shipping box) to prevent scratching.
  • An assembly area of approximately 5'x 8' is recommended for unobstructed work.
  • Avoid using excessive force during assembly.
  • When contacting customer service, have the item number ZP19070 and specific part names ready. Providing the batch lot number (stamped inside the box) is also helpful.
  • If returning the product, contact the original company of purchase after attempting to resolve issues with Zippity Outdoor customer service.

Zippity BELLA ZP19070 Specifications

General IconGeneral
BrandZippity
ModelBELLA ZP19070
CategoryFencing & Gates
LanguageEnglish

Related product manuals