EasyManua.ls Logo

Zippity BURBANK User Manual

Zippity BURBANK
12 pages
To Next Page IconTo Next Page
Page #1 background imageLoading...
Page #1 background image
WWW.ZIPPITY-OUTDOOR.COM
1
ASSEMBLY
INSTRUCTIONS
ZP19057
WWW.ZIPPITY-OUTDOOR.COM
VER. 081121
ASSEMBLY
INSTRUCTIONS
ZP19057
BURBANK
VINYL PICKET


45 MIN
Approximate assembly me for 2 panels
Want to see a video on how to
assemble this product?
Scan the QR code
Question and Answer IconNeed help?

Do you have a question about the Zippity BURBANK and is the answer not in the manual?

Zippity BURBANK Specifications

General IconGeneral
BrandZippity
ModelBURBANK
CategoryFencing & Gates
LanguageEnglish

Summary

General Information and Support

Important Assembly Tips

Key assembly considerations for scratch prevention and workspace.

Missing or Damaged Parts Support

Guidance for ordering replacement parts and contacting customer service.

Assembly and Installation Help

Contact information for assistance with product assembly and installation.

Product Return Process

Information on initiating product returns through the original vendor.

Product Dimensions and Specifications

Step 1: Lay Out Materials

Step 2: Assemble Fence Frame

Step 2.1: Attach Rail End Caps

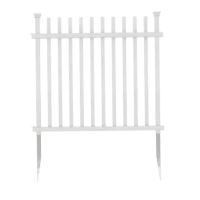
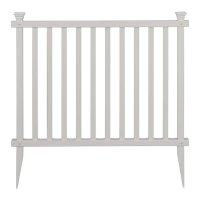
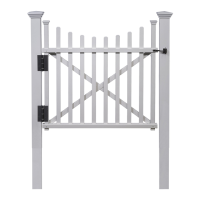
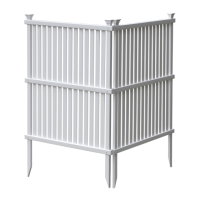
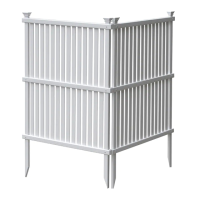
Securely fit rail end caps onto the top and bottom rails for fence frame assembly.

Step 2.2: Connect Top Rail to Posts

Join the top rail to fence posts using screws after aligning pre-drilled holes.

Step 3: Insert Fence Picket

Step 3.1: Install Pickets into Rails

Insert pickets into the fence rails, ensuring they lock into the bottom rail.

Step 4: Assemble Second Fence Panel

Step 4.1: Repeat Frame Assembly

Replicate steps 2 and 3 to construct the second fence panel.

Step 5: Install Fence into Ground

Step 5.1: Push Fence into Ground

Move fence to location and attempt to push posts into ground.

Step 5.2: Hammering into Hard Ground

Hammer posts into hard ground after loosening/watering soil with block of wood.

Step 5.3: Digging for Hard Ground

Dig a hole to accommodate posts when ground is too hard for other methods.

Step 5.4: Leveling and Backfilling

Level the fence panel and backfill the area with excavated dirt.

Step 6: Connect the Fence Panels

Step 6.1: Fasten Panels with Joiner Clips

Use joiner clips and screws to connect fence panels in straight or corner applications.

Step 7: Install Post Caps

Step 7.1: Attach Post Caps

Push post caps down over the fence posts to secure them in place.

Related product manuals