EasyManua.ls Logo

Zoeller 1052Q User Manual

Zoeller 1052Q
2 pages
To Next Page IconTo Next Page
Page #1 background imageLoading...
Page #1 background image
18 in.
10 in.
1-1/2-in
Discharge
pipe
Check valve
Additional
3/16-in
Vent hole
Vent hole
located in
the pump
housing
GFCI outlet
Basin cover
Fill with
water
1. Place pump in a sump basin that is at least 10 in wide
and 18 in deep.
2. Install rigid 1-1/2 in discharge pipe, union, check
valve according to code.
3. Drill a 3/16 in hole in the discharge pipe, level with the
top of pump. Pumps have a vent located in the pump,
but an additional vent hole is recommeded. Connect
remaining discharge pipe into main discharge line.
4. Connect pump power supply to a GFCI-protected
receptacle.
5. Fill the basin with water to check operation. Install a
basin cover and gasket on top of the basin.
SW1311Q A
QUICK REFERENCE GUIDE.
SEE INSTRUCTION MANUAL
FOR COMPLETE DETAILS.
WARNING:
FOR YOUR PROTECTION, ALWAYS DISCONNECT
PUMP FROM POWER SOURCE BEFORE HANDLING.
SUBMERSIBLE
SUMP PUMP
MODEL #
1052Q, 1096Q
Zoeller
®
is a registered trademark of Zoeller Co.
All Rights Reserved.
English Toll Free Help Line
1-800-584-8089
ZoellerAtHome.com
Question and Answer IconNeed help?

Do you have a question about the Zoeller 1052Q and is the answer not in the manual?

Zoeller 1052Q Specifications

General IconGeneral
BrandZoeller
Model1052Q
CategoryWater Pump
LanguageEnglish

Summary

Submersible Sump Pump

Step 1: Place Pump in Sump Basin

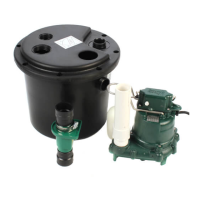
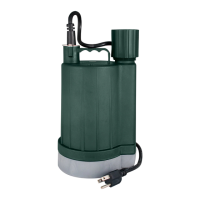
Position the submersible sump pump in a sump basin that is at least 10 inches wide and 18 inches deep.

Step 2: Install Discharge Pipe and Check Valve

Install a rigid 1-1/2 inch discharge pipe, union, and check valve according to code.

Step 3: Drill Vent Hole and Connect Pipe

Drill a 3/16-inch vent hole level with the pump top; connect remaining discharge pipe into the main discharge line.

Step 4: Connect Power Supply

Connect the pump power supply to a GFCI-protected receptacle.

Step 5: Fill Basin and Install Cover

Fill the basin with water to check operation and install the basin cover and gasket.

Related product manuals