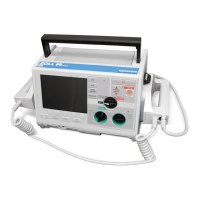
R Series ALS/ Plus In-service Script
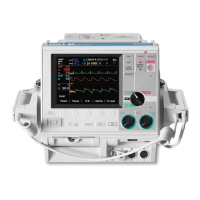
Device
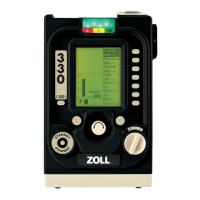
-Color Coded Operating System: Start with the dial. Three different colored
coded areas. RED for Defib, GREEN for Pacing, GREY for monitoring.
-Setup on Code Cart
-An Adult OneStep CPR Electrode should ALWAYS be connected to the therapy
cable.
-This allows “Code-Readiness” and allows the device to pass its Automated
Daily Test.
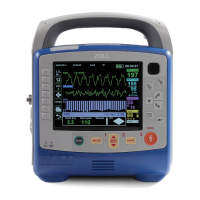
-Power LED lights
1. Battery Indicator: GREEN=Charged, AMBER=Charging
FLASHING=Problem (Battery Check)
2. A/C Power Indicator GREEN=Device is plugged in
3. No lights=Not plugged
in
-Code Readiness Indicator:
GREEN Check mark= Code Ready RED “X”= Not Code
Ready
-Self Test- Every
24 hours, the device will do a 100 point test and will display a if the
device
is ready for use, or if it failed a part of the test.
-Failed Test- The device will display “Readiness Test Failed” on the screen and will
highlight what needs to be fixed.
-These are usually easily fixable problems (No pads plugged in, no battery, no A/C power, etc)
-If the device reads “DEFIB FAILURE”, call BioMed.
-Battery- Indicator lights show 30 min. incriminates for total of 4 hours of runtime.
- If orange light appears on “?” section of battery, call BioMed
-Recorder Tray
Press button to open door, insert the paper with the black arrow facing towards the back of the
device. Pull a strip or two forward and let paper drop. Then close the door on top of the strip.
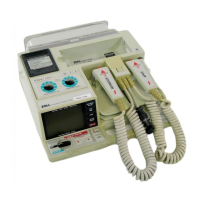
-Cables/Caps
1. Electrotherapy Cable- (Is bolted down)
2. SpO2 (Blue/If Applicable)
3. 3 Lead EKG/One-Step Cable
4. EtCO2 (Yellow/If Applicable)
5. NIBP- Non-Invasive Blood Pressure (Black/If Applicable)
6. Cable Compartment for all cables attached.
One-Step Cable: Comes out the side and is 8 feet in length.