
S
SlavaAug 19, 2025
дисплей работает но! не включаются настройки
дисплей работает но! не включаются настройки
Covers safe operation, keeping away from children, adult supervision, electrical safety, and proper ventilation during use.
Warns about high temperatures of the hotend and hotbed, even when the printer is stopped.
Ensures the AC power select switch is set correctly before powering on the printer.
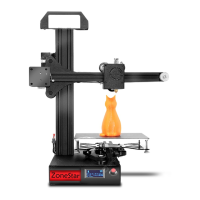
The primary structural component of the 3D printer.
Components responsible for feeding filament into the hotend.
Modules containing motors for controlling the vertical movement of the printer.
Includes lead screws for Z-axis movement and aluminum profiles forming the printer frame.
The assembly holding the hotend and nozzle, attached to the print head bracket.
The left-side carrier component for the Z-axis assembly.
The right-side carrier component for the Z-axis assembly.
The user interface for operating and controlling the 3D printer.
Includes screws, fix blocks, ENDSTOPs, fittings, PTFE tubes, belts, and cable ties.
Component used to hold the filament spool during printing.
Contains essential cables like USB, tools for assembly, SD card, and power cord.
Details the structure and hole configurations of Z-axis aluminum profiles.
Describes the top aluminum profile and its mounting points.
Provides specifications and features of the X-axis aluminum profile.
Illustrates various screws, belt idlers, ENDSTOPs, PTFE tubes, and timing belts.
Step-by-step guide for attaching the Z-axis profiles to the printer base.
Instructions for securing the Z-axis motor modules onto the Z profiles.
Procedure for installing the Z ENDSTOP modules onto the Z profiles.
Guidance on fitting the Z carrier onto the Z-axis rails for smooth movement.
Steps for properly installing the lead screws into the Z-axis system.
Instructions for securing the top profile to complete the Z-axis structure.
Details on mounting the X belt idler and the X profile onto the Z carrier.
Procedure for attaching the X profile to the Z carrier assembly.
Ensuring correct height and alignment of the X profile before fixing.
Instructions for sliding and connecting the hotend assembly onto the X axis.
Guidance on correctly threading and installing the X-axis timing belt.
Steps for adjusting the X belt tension for optimal performance.
Instructions for installing the LCD screen onto the printer.
Steps for mounting the filament extrusion feeders to the printer frame.
Procedure for installing the bracket that holds the filament spool.
Guidance on connecting feeders to the print head using PTFE tubes.
Emphasizes electrical shock hazards, correct voltage selection, and proper wiring connections.
Advises on stopping immediately for motor issues and ensuring the hotend fan is operational.
Guidance on routing motor wires neatly within profile grooves and securing loose wires.
Identifies X, Y, and Z motors, their corresponding switches, and the DC power button.
Locates the bed leveling sensor, hotend fan, extruder fan, and optional filament runout sensor.
Details the AC power switch, connector, control board fan, and voltage selection switch.
Illustrates the wiring connections for X, Y, Z motors and the hotend assembly.
Shows how limit switches (ZSW) are connected to the control board.
Depicts the wiring for the LCD display and the main power input.
Shows how to route cables from the bottom view of the printer, including motor wires.
Illustrates cable routing from the back view, detailing hotend and X motor cables.
Verifies secure attachment of timing pulleys, couplings, and lead screws.
Tests limit switch functionality and manual movement for smoothness.
Confirms drive belt installation, screw tightness, and Z-axis limit switch reliability.
Step-by-step guide for safely powering on the 3D printer.
Instructions for properly shutting down the 3D printer.
Explains the function of the title bar and the main menu bar on the LCD screen.
Describes the status bar information and control handle usage for printer operation.
Guides the user through auto-homing and setting the initial nozzle-to-bed gap.
Details adjusting bed nuts at each corner to achieve a level surface.
Recommends repeating the leveling process to ensure consistent bed height.
Ensures correct hotend channel use and preheating the nozzle for PLA.
Covers cutting filament and pushing it into the extruder and filament guide.
Describes rotating the extruder gear to feed filament into the hotend until extrusion occurs.
Instructions for inserting the SD card and selecting a print file to begin printing.
Explains using Babysteps to adjust the nozzle-to-bed distance for optimal first layer adhesion.
Guides on waiting for the hotbed to cool and safely removing the printed object.
Defines slicing and its role in converting 3D models into printer instructions.
Details on downloading and installing slicing software like Cura.
Outlines the steps involved in the slicing process, from loading files to saving to SD.
Describes the bed auto leveling sensor and its function for correcting bed unevenness.
Explains features for preventing stringing and pausing prints when filament runs out.
Details features that resume prints after power interruption and automatically shut down the printer.
Information on printing custom parts to enhance the printer's performance or functionality.
| Build Volume | 300 x 300 x 400 mm |
|---|---|
| Filament Diameter | 1.75 mm |
| Display | 4.3 inch LCD |
| Technology | FDM |
| Nozzle Diameter | 0.4 mm |
| Supported Materials | PLA, ABS, TPU, PETG |
| Frame Material | Aluminum alloy |
| Connectivity | USB, SD Card |
| Bed Leveling | Automatic |
| Extruder Type | Direct Drive |