OPERATING THE RESPIRATOR
28
4 Follow the appropriate instructions to replace your air cylinder:
• “Replacing a CGA Cylinder” on page 28
• “Replacing a Snap-Change Cylinder” on page 29
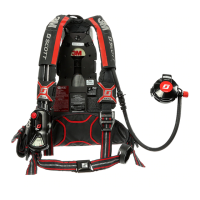
Replacing a CGA Cylinder
To replace a CGA cylinder
1 Unthread the pressure reducer hose coupling from the cylinder valve by rotating counterclockwise.
2 Disengage the cylinder retention strap by gripping the latch plate as shown in picture A in Figure 3-15 and lifting
on the end of the latch.
3 Grasp the cylinder below the retention strap, push the locking tab below the valve, then lift the cylinder free from
the bottom hook and remove. See picture B in Figure 3-15.
Figure 3-15 A) Gripping the latch plate on the cylinder retention strap. B) Pushing the locking tab.
4 Replace with a fully charged cylinder and valve assembly of the same pressure rating. Slide the top of the cylinder
upward under the retention strap.
5 Engage the cylinder hanger in the hook at the bottom of the backframe.
6 Secure the cylinder in place by pushing the latch toward the backframe to lock the cylinder latch.
7 Inspect the high pressure coupling and verify that the gasket
seal is present and undamaged. See Figure 3-16. If the gasket is
present and undamaged, align the high pressure coupling with
the outlet of the cylinder valve and tighten the hose coupling to
the cylinder valve by hand.
Figure 3-16 High-pressure gasket seal
8 Continue use of the respirator.
If you terminate use of the respirator, clean and inspect it as described in “Chapter 4: Cleaning & Storing the Res-
pirator” on page 37 and “Chapter 2: Inspecting the Respirator” on page 5.
NOTE
Do not use tools to tighten the hose coupling. Over-tightening the hose coupling may damage the gasket
seal.
A B
Locking tab
Latch plate
High-pressure gasket seal
P/N 595373-01 Rev C 202004
 Loading...