Do you have a question about the ABB XSeriesG4 and is the answer not in the manual?
General instructions for safe installation and operation of the flow computer.
Explains the meaning of various safety symbols used in the manual.
Outlines potential hazards related to pressurized gas and electrical equipment.
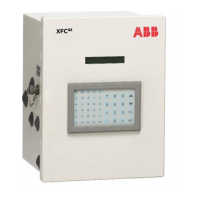
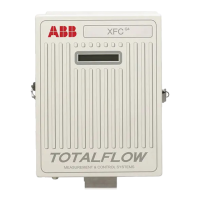
Introduces the XSeriesG4 flow computers and their applications in oil and gas systems.
Describes the hardware components and enclosures of the XFCG4 models.
Details the system's data collection, trending, and measurement capabilities.
Details the XFCG4 board's input/output points and interfaces.
Describes the CPU engine card, its processor, memory, and lithium backup battery.
Explains the compartment for mounting communication devices like radios and modems.
Explains the optional RTD for measuring flowing gas temperature.
Lists features like security, clock, charging sources, and LCD programmability.
Describes the two onboard communication ports for local and remote communication.
Details the two digital/pulse inputs for monitoring external equipment.
Explains the two digital (12 Vdc) outputs used to control external equipment.
Lists the types of flow and operational records the computer logs.
Details calculations and data recording capabilities like AGA-3 and AGA-8.
Lists features like no-flow cutoff, security, RTD calibration, and power sources.
Details how credits are managed on a USB credit key and transferred.
Describes the use of PCCU32 software for programming the flow computer.
Explains methods for establishing local communication (RS-232, USB).
Details the specifications and loading capacities of TFIO modules.
Describes the I/O module hardware packaging and features.
Instructions for unpacking and inspecting the flow computer and its components.
Overview of installation procedures applicable to all XSeries flow computers.
Step-by-step instructions for mounting the flow computer onto a pipe.
Lists optionally supplied materials for wall mounting.
Lists materials not supplied for wall mounting.
Provides step-by-step instructions for performing a wall mount installation.
Instructions for installing manifold input lines connecting to the flow computer.
Provides step-by-step instructions for direct mounting to a pulse meter.
Describes the static pressure input line connection to the flow computer.
Provides steps to install the static pressure input line.
Step-by-step instructions for installing the flow computer's battery pack.
Step-by-step instructions for installing the solar panel.
Provides steps for installing the RTD probe into the meter run.
Step-by-step instructions for installing the AC charging unit.
Details communication wiring for onboard ports and modules.
Explains the 21-pin communication modules for RS-232, RS-422, or RS-485.
Briefly describes configurable points on the main electronic board.
Outlines the chapter's focus on getting the flow computer up and running.
Instructions for installing and setting up the PCCU32 software.
Describes methods for establishing local communication (RS-232, USB).
Procedure to enable Ethernet for temporary local connection.
Configuring Ethernet for network connection using static or dynamic IP addressing.
Procedure to establish a network connection using the default TCP port.
How to set a unique station identifier code for the flow computer.
How to set a unique identifier for each tube/application on the device.
Describes data and configuration security across flow meter, PCCU32, and WinCCU32.
Instructions for installing the USB credit key driver.
How to access and view credit key information using PCCU32.
How to transfer application credits from the credit key to the G4 controller.
How to program the flow computer to begin the contract day.
Setting the specified length of time for writing accumulated volume records.
Setting the time between volume calculations, must divide Log Period.
Setting the calculation method (e.g., AGA-3, AGA-7) and toggling factors.
Setting alarm limits for parameters to control output or send signals.
Procedures for resetting the volume accumulator and its effects.
Instructions for putting the flow computer online, including valve operations.
Options for setting temperature calculations (Fixed, RTD, or both).
How volume calculations are affected by changes and the use of Reset Volume.
Default displays and how to change display items, units, and formats.
Importance of preserving data (measurement, logs, config, calibration) before maintenance.
Steps to collect measurement data, alarms, and event codes using PCCU.
Procedure for backing up configuration and calibration data to a laptop.
Steps for performing a hardware warm boot using the reset button or power cycling.
Steps for performing a software warm boot using the 32-Bit Loader.
Steps for performing a hardware cold boot by disabling memory backup.
Steps for performing a software cold boot using the loader or terminal.
How clock changes not crossing an hour boundary affect records.
How forward clock changes crossing an hour boundary affect records.
How backward clock changes crossing an hour boundary affect records.
Lists the test equipment needed to calibrate the XFCG4 XIMV.
Explains the Hold mode used during calibration to ignore live values.
How to check static pressure calibration and log pressure marker points.
Explains the Hold mode for I/O calibration, ignoring live values.
Steps for calibrating the onboard analog inputs.
Procedure for calibrating pulse inputs and setting the K-Factor.
Procedure for changing orifice plate when meter run is out of service.
Procedure for changing orifice plate while meter run is in service.
Steps to zero the static pressure (SP) transducer.
Steps to zero the differential pressure (DP) transducer.
Information on contacting Totalflow Service Department for assistance.
Explains how LCD annunciators indicate status, errors, and alarm conditions.
Assists in determining the cause of visual indicators (alarms/codes).
Guidance for addressing the Low Lithium alarm, suggesting battery replacement.
Steps to troubleshoot the Low Charger alarm, related to battery charging voltage.
Troubleshooting steps for Analog to Digital converter failure alarms.
Focuses on determining the cause of power loss, often related to the power supply.
Steps to perform a power supply test, checking voltage, current, and connections.
How to test the solar panel charging system for proper voltage output.
Isolating auxiliary equipment to find power drain issues.
Isolating TFIO modules to check battery pack output voltage consistency.
Explains the SLEEP mode and how to wake the unit.
Clearing RAM and resetting variables to factory defaults.
Hardware steps for performing a cold start.
Software steps for performing a cold start via PCCU.
Hardware steps for performing a warm start.
Explains SLEEP mode, voltage triggers, and wake-up functions.
Overview of troubleshooting procedures for RS-232, RS-485, and RS-422 communications.
Notes for setting up communication equipment and verifying wiring.
Verifying the transceiver receives the manufacturer's suggested voltage.
How to perform a 12V communication supply voltage test.
Steps for performing an RS-485 communication test.
Information on warranty requirements for equipment under warranty.
| Display | LCD |
|---|---|
| Power supply | 100 to 240 V AC, 24 V DC |
| Enclosure protection | IP66 |
| Measurement principle | Electrochemical |
| Communication | HART, Modbus |
| Operating temperature | -20°C to +50°C |
| Measurement Range | Depends on sensor type |
| Weight | Depends on configuration |
| Input Impedance | Not applicable |