Do you have a question about the ACHI IR6500 and is the answer not in the manual?
Compares probe-type sensor (IR6000) with Soft OMEGA Thermocouple Wire (IR6500) for accuracy.
Compares nets bareness (IR6000) vs closed panel (IR6500) for safety and cleanability.
Contrasts common button switch (IR6000) with safe air-break switch (IR6500) for protection.
Compares RS232 (IR6000) with USB (IR6500) for improved convenience and compatibility.
Compares CH6 controller (IR6000) with 8000 controller (IR6500) for accuracy and ease of use.
Compares standard jig (IR6000) with jig plus 4 abnormity poles (IR6500) for better fixture.
Guidelines for safe electrical use, voltage checks, and power disconnection procedures.
Precautions for safe operation, including stable platform use and avoiding hazards.
Specifies optimal operational and conservation environment conditions for temperature and humidity.
Covers heating type, dimension, weight, and total weight of the rework station.
Details power supply, heating types, sizes, consumption, and general power.
Describes control modes for upper and bottom heating, including precision and alarms.
Outlines suitability for various devices and specifies chip/PCB size limits.
Details on the Upside Heater and Bottom Heater (Pre-Heater).
Covers temperature controllers, sensors, and the USB interface.
Includes start/stop switches, lifting regulator, and PCB table.
Steps for installing the necessary USB driver for computer connection.
Configuration steps for COM port settings in the device manager.
Steps for installing the IRsoft software for controlling the rework station.
Overview of the programmable controller's functions and segment structure.
Explains the functions of various buttons and indicators on the controller interface.
Details on setting ramp rate, target setpoints, and dwell periods for temperature profiles.
A comprehensive list of programmable parameters with their adjustable ranges.
Illustrative diagrams showing different temperature curve profiles.
Step to secure the motherboard onto the PCB table.
Positioning the temperature sensor close to the BGA chip.
Adjusting the heating head height relative to the BGA chip.
Initiating the heating process by selecting a program and pressing start.
Final steps after heating, including cooling and power off.
Critical warnings regarding cooling and touching the heating module.
Advises on platform, air mobility, and capacitor protection.
Covers PCB cleaning, chip settlement, drying, and temperature adjustment.
Highlights risks like PCB discoloration and parameter settings.
Explains 'Hb' as the maximum upper heating temperature, set at 230°C.
Defines parameters like r1, L1, d1, r2, L2, d2, etc., for temperature profiles.
Example temperature curve settings for lead solder rework.
Example temperature curve settings for lead-free solder rework.
Advises on checking the environment and not opening the upper fan during welding.
Provides specific temperature and time guidelines for lead and lead-free reflow.
Explains how to start the rework process using IRSOFT or the control board.
| Brand | ACHI |
|---|---|
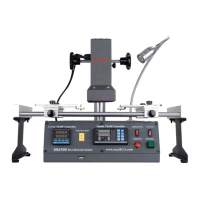
| Model | IR6500 |
| Category | Rework stations |
| Language | English |