AMC-200 Transmitter
8
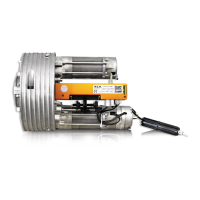
5.2.2 TRANSMITTER CALIBRATION/VERIFICATION SET-UP PROCEDURE
The calibration procedure may cause the monitoring equipment to give a false alarm, therefore
appropriate precautions should be taken. Instructions on introducing the gas sample are
included with the calibration kit manual or available separately (depending on type of gas or
application). Refer to Figure 5 for the following procedure.
1. Remove cover from transmitter housing
2. Connect “Remote Calibration Lead” to multimeter. BLACK lead to negative or common
(–). RED lead to positive (+).
3. Switch ON multimeter and select the 200 mA DC milliamp range to allow readings
greater than 20 mA full scale.
4. Insert plug end of “Remote Calibration Lead” fully into CAL jack on transmitter cover
plate. This will block the outgoing signal, causing a “fail” at the monitor.
5. Apply a Zero gas sample or fill a garbage bag with clean outdoor air and apply to sensor.
Check for a stabilized zero signal of approximately 4 mA. Set “zero” trimmer to 4.0mA.
6. Apply a Span gas sample. Since the transmitter output range is 4 to 20 mA, a full-scale
concentration should register 20 mA after a few moments exposure. Proportionately, a
half-scale concentration of gas should register 12 mA, and so on.
 Loading...