Reinstall the operating head cover. Do one last freeze test with the oper-
ating head cover reinstalled; the freeze pulse characteristics are slightly
different with it in place.
If the freeze vibration is still not enough, do not proceed further without
obtaining Hot-Line
®
service as recommended in Chapter 5, “Obtaining
Service”.
If you succeed in obtaining enough freeze vibration, the stir vibration
amplitude must be readjusted as follows:
1. Press the SETUP soft key. If the Supervisor/operator keyswitch is in
the Supervisor position, the display will change to “Select Setup
Item”.
2. At “Select Setup Item”, press the START soft key. The display will
change to “Setup Menu #: 0”.
3. At “Setup Menu #: 0”, press the 4 soft key, then press ENTER.
The display will change to “Set Stir Amplitude”.
4. At “Set Stir Amplitude”, press the START soft key. The display
will change to “Amplitude = xxx”, with “xxx” being a value of
approximately 140.
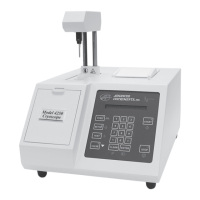
Looking from the side of the instrument, you should be able to see a stir
vibration blur at the tip of the stir/freeze wire. For 2-mL to 2.5-mL
cryoscope operation, the stir vibration blur at the very tip of the stir/
freeze wire should be between 1/8” and 1/4” or 3 and 6 mm. A small
amount of stirring is necessary to minimize temperature gradients in
viscous samples but more than 1/4” or 6 mm can cause poor repeatabili-
ty or frothing which may make it impossible to reliably determine the
freezing point.
If the stir vibration amplitude is not correct, press > to increase the stir
amplitude and the “xxx” value or press < to decrease the stir amplitude
and the “xxx” value. Continue to increase or decrease the “xxx” value as
necessary, until the stir vibration blur at the very tip of the stir/freeze
wire is between 1/8” and 1/4” or between 3 and 6 mm.
64
Advanced
®
Cryoscope Model 4250 User’s Guide
 Loading...