Do you have a question about the Advent MP51 and is the answer not in the manual?
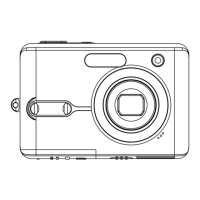
Identifies components on the front of the camera, including the pilot timer, flash, microphone, and lens.
Details the controls and display on the rear of the camera, such as the LCD, buttons, and zoom functions.
Explains the function and layout of the 4-way control pad for navigation.
Describes external features like the support belt, shutter, power buttons, speaker, USB/AV port, and tripod socket.
Step-by-step guide for opening the battery cover, inserting AA batteries correctly, and closing the cover.
Details the low battery indicator on the LCD and when to replace batteries.
Important precautions for using alkaline or Ni-MH batteries, replacement advice, and storage.
Procedure for opening the battery compartment, inserting the memory card, and closing the compartment.
Steps to turn on the camera and navigate the menu to select the preferred language setting.
Instructions on selecting and adjusting the date and time settings using the camera's controls.
Details on how to change date and time values by moving the cursor and applying settings.
Information regarding the loss of date and time settings if batteries are removed for extended periods.
Explanation of various icons displayed on the LCD screen during recording mode, such as flash, zoom, and battery status.
Details on information displayed on the LCD, including focus area, shutter speed, aperture, ISO, and white balance.
Overview of icons visible in playback mode, indicating play status, protection, sound recording, file count, and memory status.
Details on information displayed during playback, including recording details, battery status, date, sound control, and resolution.
Instructions on how to turn the camera on in recording or playback mode and how to turn it off.
Method to turn the camera on or off without startup sound and operation by holding the power button.
Explanation of the automatic LCD monitor turn-off and camera power-off to save battery life.
Instructions on how to switch between recording mode and playback mode using specific buttons.
Guide on how to use the zoom button for wide-angle and telephoto shots, including optical and digital zoom.
Details on the zoom bar appearance and temporary stops during optical zoom before switching to digital zoom.
How to change flash modes (Auto, Red Eye Reduction, Always, Slow Sync, Off) using the flash button.
Explanation of each flash mode and its behavior during shooting.
Steps to enter macro mode and activate the macro icon on the LCD screen.
Information on the focus distance for macro mode relative to the lens surface and object.
Guide on selecting drive modes: Off, 2 sec., 10 sec., Double, and Burst.
Explanation of each mode: single shot, delayed shots, double shots, and continuous shooting.
Advice on using a tripod or stable surface when utilizing the timer function.
| Optical Zoom | 3x |
|---|---|
| Sensor Type | CCD |
| Optical Sensor Resolution | 5.0 Megapixels |
| Storage | SD Card |
| Battery Type | 2 x AA |