32
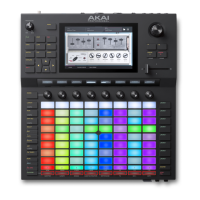
Cueing Tracks
In addition to using the Solo button to isolate a track, you can use it to cue tracks. This allows you to preview the sound
of a track using the Phones output or Outputs 3/4 before sending it to the main mix for your audience to hear.
To cue tracks:
1. Connect headphones to the Phones output, or connect Outputs
3/4 to your monitors, mixer, etc.
2. Open the Mixer Config window, either by pressing Settings while
viewing the Mixer, or by holding Shift and pressing Solo or Mute.
3. Set the Solo Button Behavior to Cue Tracks.
4. Adjust the Cue Mix knob so that it is between 3/4 and Master.
You can adjust the exact mix to your preference. Turn the Cue
Mix knob toward 3/4 for more of the cued track audio, or more
toward Master for more of the master mix audio.
5. Press the Solo button.
6. Press the Track Assign button for the track you would like to
assign to the cue mix.
When viewing certain pages of the Mixer, the S icon in the
channel strip will become a Headphones icon that is highlighted
when enabled.
When viewing the Matrix, a Headphones icon will be added to the
track heading.
7. Launch a clip in the track you have cued. You should hear both
the master mix and the audio of the cued track.
8. Using headphones attached to the Phones Output on Force's
front panel, and/or speakers connected to Outputs 3/4, listen to
the cued audio to make sure it is in sync with your main mix.
9. When you are ready to send the track audio to the main mix,
press the Solo butt
on and the Track Assign button for the track
to disable cueing.