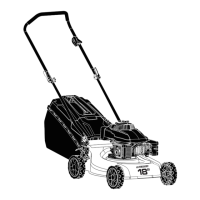
Adjusting the cutting height (Fig. 1)
The lawn mower has one lever to easily adjust the cutting height. There are 10 height
settings.
NOTE: Always try to adjust the cutting height of the lawn mower while positioned on
the area of grass you plan to mow.
It is recommended to start on a higher setting and mow a trial area of lawn before
deciding on the nal cutting height position. Then readjust if necessary.
1. To increase the cutting height pull the cutting height adjustment (9) outward to-
wards the wheel, and move it up a notch, towards the rear of the lawn mower.
2. To decrease the cutting height pull the cutting height adjustment (9) outward to-
wards the wheel, and move it down a notch, towards the engine.
3. After adjustment, ensure the cutting height adjustment (9) is fully located in the
selected notch.
IX. Operation
Caution!
The lawn mower is equipped with a safety plug (Fig. 11/Pos. 5) to prevent unauthor-
ized use. Directly before starting up the lawn mover insert the safety plug (Fig. 11/
Pos. 5) and remove the safety plug again when interrupting or terminating your work.
Caution!
To prevent the equipment switching on accidentally, the lawn mower is equipped with
a safety lock-o (Fig. 11/Pos. 4) which must be pressed before the switching bar (Fig.
1/Pos. 1) can be activated. The lawn mower switches itself o when the switching bar
(Fig. 1/Pos. 1) is released. The start time can amount a few seconds.
Before you perform any repair or maintenance work on the equipment, ensure that the
blade is not rotating, that the safety lock-o (Fig. 11/Pos. 4) is disconnected and that
the batteries have been removed.
Warning! Never open the ejector ap (Fig. 1 / Pos.13) when the grass catcher (8) has
been detached (to be emptied) and the machine is still running. A rotating blade can
cause serious injuries!
Drive unit
If you press the drive lever/clutch lever (Fig. 1/Pos. 3) the clutch for the drive will be
closed and the lawn mower will start to move with the engine running. Release the
drive lever in good time to stop the moving lawn mower. Practice starting and stopping
before you use the lawn mower for the rst time until you are familiar with controlling
the lawn mower.
Important! The drive only operates if the lawn mower is switched on. You therefore
have to start the each time rst and wait at least until the rated speed of the motor
has been reached before pressing the drive lever/clutch lever (3). It is recommended
to adjust the driving speed to the length of the grass you want to cut. The longer the
grass, the slower the speed you should select.
Always ensure that a safe distance (provided by the length of the long handles) is
maintained between the user and the lawn mower housing. Be especially careful
when mowing and changing direction on slopes and inclines. Maintain a solid footing
and wear sturdy, non-slip footwear and long trousers.
Always mow along the incline (not up and down).
For safety reasons, the lawn mower may not be used to mow inclines whose gradient
exceeds 15 degrees.
Use special caution when backing up and pulling the lawn mower. Tripping hazard!
Tips for proper mowing
It is recommended that you overlap the mowing swaths.
Only use a sharp blade that is in good condition. This will prevent the grass blades
from fraying and the lawn from turning yellow. Try to mow in straight lines for a nice,
clean look. The swaths should overlap each other by a few centimeters in order to
avoid stripes.
How frequently you should mow your lawn is determined primarily by the speed at
which the grass grows. In the main growing season you will probably need to mow the
lawn twice a week, otherwise just once a week. The cutting height should be between
4 - 6 cm and the amount of growth before mowing again should be 4 - 5 cm. Normal
grass which has grown to a height of up to 8cm can be mown to the desired height
in one go without any problems. If the grass is allowed to grow somewhat longer for
whatever reason, do not make the mistake of cutting it back to the normal height in
AUS
FBLM-1000 E1 Operation
AUS
Preparing for operation/Operation FBLM-1000 E1
AFTER SALES SUPPORT
25
1300 855 831
support@scheppach.com.au
MODEL: FBLM-1000 E1 PRODUCT CODE: 706547 09/2021
24
AFTER SALES SUPPORT
support@scheppach.com.au
1300 855 831
MODEL: FBLM-1000 E1 PRODUCT CODE: 706547 09/2021