5
MICRO-VR Bass Guitar Amplifier
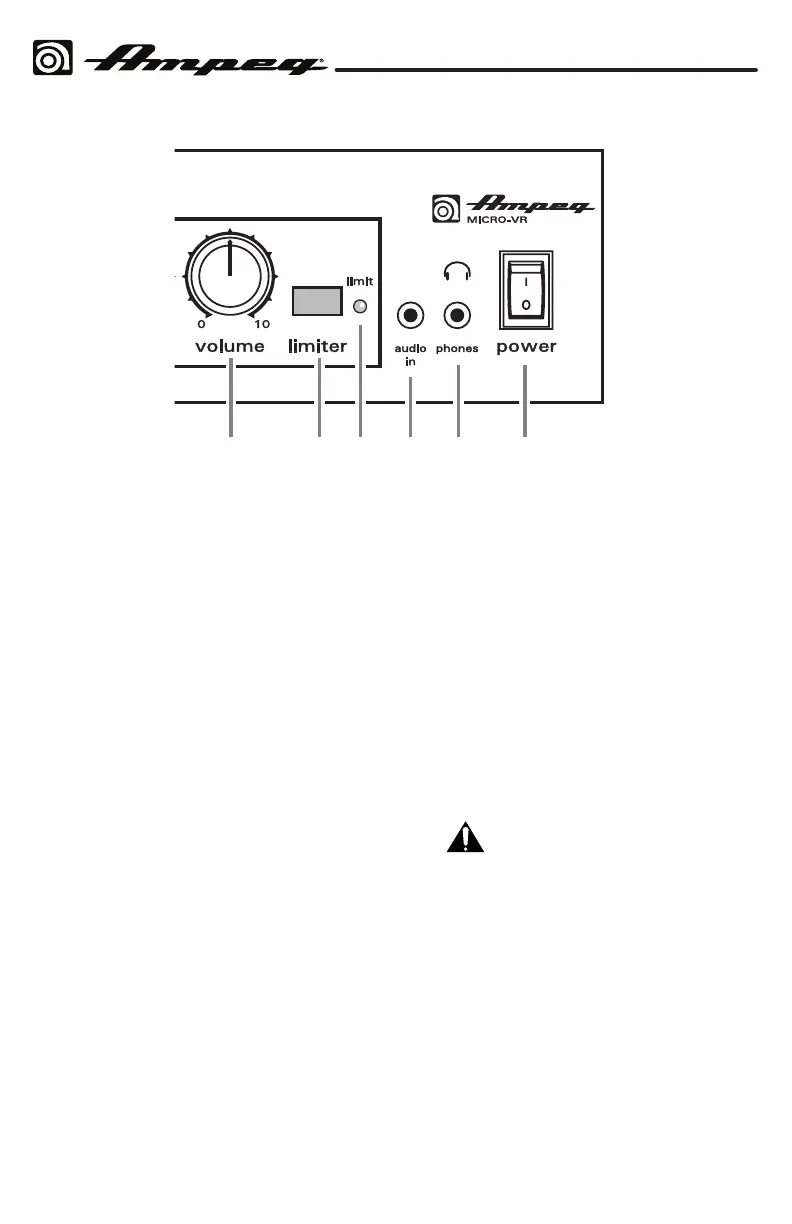
8. VOLUME: Use to control the overall
output level. It aects the Speaker
Outputs [17] and Headphones Output
[12]. Use it wisely and turn it down
when making connections, putting on
headphones, or trying something new.
9. LIMITER SWITCH: Press this switch
in to activate the Limiter circuit. If the
signals driving the amplier start to
peak, the Limiter will automatically
reduce the signals to prevent clipping,
and the LED [10] will ash. The Limiter
will help keep the amplier’s output
“clean” up to high output levels and
avoid potentially damaging distortion�
10. LIMIT LED: This LED illuminates when
the Limiter circuit is activated, indicating
that the amplier is nearing full output
and the Limiter is preventing peak
signals from clipping the output. If you
notice that the LED is lighting regularly,
reduce the Volume or the EQ levels to
prevent damage to your speakers�
11. AUDIO IN: The audio output from line
level sources such as a mobile device,
MP3, or CD player, can connect to this
1/8" TRS stereo input. The incoming
audio is mixed with the preamp signals,
so you can play along to a practice
track as you listen with headphones.
(The audio coming in here is routed
strictly to the Headphones Output, and
appears nowhere else.)
12. PHONES: Use this 1/8" TRS stereo
output to connect your headphones�
The output here is a mix of the line level
signals reaching the amplier, plus any
incoming audio from the Audio In jack
[11].
If you just want to listen and practice
through headphones, disconnect the
Speaker Outputs [17] from the speaker
cabinet. (This is a solid-state amplier,
therefore, there is no harm in playing
without speakers connected.)
Before putting on headphones,
make sure the Volume control [8]
is turned down, and that any external
audio source (if connected) has its
level turned down. This will reduce the
chance of hearing damage due to loud
volumes�
13. POWER SWITCH: Press the top of this
illuminated switch to turn the overall
system power on, and press the bottom
to turn it o.
1
14 15 16 17 18 19 20
23 4567 8910 11 12 13