The AmScope SE400 Series is a line of stereo microscopes designed for various applications, offering users the ability to observe samples with enhanced depth perception and clarity. These microscopes are suitable for educational, industrial, and hobbyist use, providing a robust platform for detailed examination of objects. The manual emphasizes careful handling and proper setup to ensure optimal performance and longevity of the instrument.
Function Description:
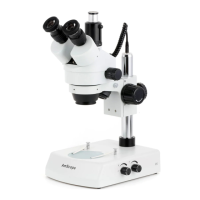
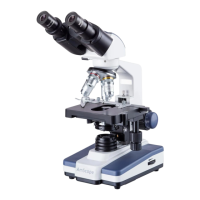
The AmScope SE400 Series microscopes are primarily used for viewing three-dimensional objects at relatively low magnifications, providing a stereo (3D) image. Unlike compound microscopes that typically view transparent samples on slides at high magnifications, stereo microscopes are ideal for examining opaque, larger specimens such as circuit boards, insects, plants, and minerals. The SE400 series features a binocular viewing head, allowing for comfortable observation with both eyes, which is crucial for perceiving depth.
Key components contributing to its function include:
- Eyepieces: These are the lenses through which the user looks, providing the initial magnification. The SE400 series offers various eyepiece options (WF5X, WF10X, WF15X, WF20X, WF25X) to achieve different total magnifications.
- Objective Lens: This is the primary lens system that collects light from the sample and forms an intermediate image. The SE400 series typically features fixed power objectives or continuous zoom capabilities, depending on the specific model.
- Focusing Knob: This control allows the user to move the microscope head vertically, bringing the sample into sharp focus.
- Illumination: The microscopes are equipped with a top light (incident illumination) for viewing opaque samples. Some models may also include a bottom light source (transmitted illumination) for translucent samples, often utilizing a frosted glass plate. Optional gooseneck illuminators or ring lights can provide additional, controlled lighting.
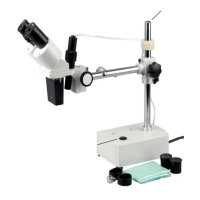
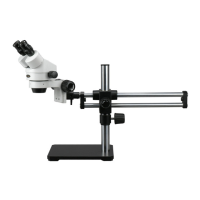
- Boom Stand: This type of stand provides flexibility, allowing the microscope head to be moved in various directions across a large working area, which is particularly useful for inspecting larger samples or performing tasks that require manipulating the sample under the microscope.
- Interpupillary Distance Adjustment: This feature allows users to adjust the distance between the eyepieces to match their individual eye spacing, ensuring a comfortable and unified field of view.
- Diopter Adjustment: This enables independent focusing for each eye, compensating for differences in vision between the user's left and right eyes.
The overall function is to provide magnified, stereoscopic views of samples, facilitating tasks such as inspection, assembly, dissection, and quality control.
Important Technical Specifications:
The manual outlines several technical specifications and concepts crucial for understanding the microscope's capabilities:
- Magnification:
- Total Magnification: Calculated by multiplying the magnification of the objective by the magnification of the eyepieces. For example, (10x Eyepieces) x (4x Objective) = 40x Total Magnification. The SE400 series offers various eyepiece options (WF5X, WF10X, WF15X, WF20X, WF25X) to achieve different total magnifications.
- Continuous Zoom: Some models feature a magnification knob that allows for a continuous change in magnification across a range, offering flexibility in viewing.
- Fixed Power: Other models have pre-set objective levels that are changed by rotating the objective.
- Field of View: This refers to the linear area visible through the eyepiece, calculated by dividing the linear field of view of the eyepiece by the magnification of the objective.
- Numerical Aperture (N.A.): A critical parameter indicating the objective's image quality and resolution. It is calculated by
n Sin α (max), where n is the refractive index of the medium (air or immersion cedar oil) between the objective lens and the specimen, and α is half the angle between the aperture on the objective and the path of light. A larger N.A. signifies higher resolution and better image quality.
- Object to Primary Image Distance: The fixed distance between the object plane and the primary image plane.
- Mechanical Tube Length: The distance between the objective shoulder and the ocular shoulder.
- Infinity Optical System: An advanced optical lens system where the entire field of view remains in focus simultaneously. This design allows for higher quality images and facilitates the insertion of filters into the system due to the parallel path of light, rather than focusing on a specific point.
- Viewing Head: The SE400 series features a 30-degree viewing head, typically binocular, with interpupillary adjustment for comfortable viewing. Some models may include an adjustable trinocular port for attaching digital or video cameras.
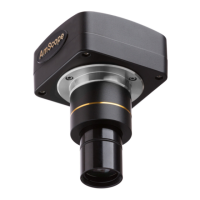
- Optional Accessories: The manual lists various optional accessories, including additional eyepieces (20x, 25x, 10x with pointer, 10x with reticle) and CMOS digital cameras (ranging from 0.35MP to 10MP) for capturing images and video, or live display on a computer. A calibration micrometer (MR400) is also available for on-screen measurements with camera software.
Usage Features:
The SE400 Series is designed for user-friendly operation, with several features enhancing the viewing experience:
- Easy Assembly: The manual provides clear, step-by-step instructions for assembling the microscope, including inserting the vertical pillar, attaching the boom, securing the light, and installing eyepieces.
- Simple Setup:
- Sample Placement: Place the sample on the base below the objective, centering it as much as possible. Stage clips can be used for slides, though not always required for stereo microscopes.
- Magnification Selection: Choose the desired magnification by selecting appropriate eyepieces (e.g., 10x eyepieces for 10x setting).
- Interpupillary Distance Adjustment: Adjust the distance between the eyepiece tubes until a single circle of light is seen with both eyes open.
- Focusing: Use the focusing knob on the microscope arm to bring the sample into sharp focus.
- Centering: Center the object in the field of view after achieving focus.
- Camera Attachment: The microscope supports attaching a CMOS camera. This involves removing an eyepiece, sliding in a 23mm to 30.5mm adapter (included with the camera), and then inserting the camera into the adapter. Some models may feature a "Simul-Focal Microscope Head" with a focus adjustment for the trinocular port camera, allowing simultaneous focus with the eyepieces.
- Boom Stand Flexibility: The boom stand allows for versatile positioning of the microscope head, making it easy to examine large or irregularly shaped objects. Locking knobs secure the boom arm and pillar boom stand in place.
- Illumination Control: The top light provides illumination for opaque samples. If present, a dimmer control allows adjustment of light intensity. Optional gooseneck illuminators offer flexible lighting angles.
- Dust Cover: A dust cover is included to protect the microscope when not in use, helping to maintain optical clarity.
Maintenance Features:
Proper maintenance is crucial for preserving the performance and longevity of the AmScope SE400 Series microscope. The manual outlines several key maintenance and precaution guidelines:
- Gentle Handling: The microscope is a precision instrument and should be handled with care, avoiding impacts or abrupt movements during transportation.
- Environmental Control:
- Avoid direct sunlight or high heat.
- Store indoors in a dry, clean place.
- Maintain temperatures between 32-100 degrees F (0-40 degrees C).
- Keep relative humidity below 85%.
- Store in a dry, clean location to prevent rust and other damages.
- Lens Cleaning:
- Dust Removal: Blow off fine dust from optical surfaces using a hand blower or gently wipe with a soft lens paper tissue/non-abrasive, lint-free cloth.
- Oil/Fingerprint Removal: Carefully wipe oil or fingerprints from lens surfaces using tissue moistened with a small amount of lens cleaner (Sparkle brand optical cleaner is recommended).
- General Cleaning: Do not use Sparkle cleaner on other microscope elements; use a neutral detergent for plastic or painted surfaces.
- Avoid Touching Lenses: Prevent oil and dirt from fingerprints from obstructing the view.
- Power Supply Check: Before turning on the power (for units with built-in illumination), ensure the power supply voltage matches the microscope's voltage.
- Unauthorized Disassembly: Do not assemble or disassemble the microscope's electrical components without advisement from a technician, as this will void the warranty.
- Dust Cover Usage: Always cover the microscope with the provided dust cover after use to protect it from dust and debris.
Troubleshooting:
The manual includes a troubleshooting section to address common optical and mechanical issues:
-
Optical Issues:
- Obstructions in Field of View: Caused by stains, dust, or dirt on the specimen or lenses. Remedy: Clean the slide/specimen or objective/eyepiece lenses.
- Unclear Image: Can be due to dust on the head's inlet lens or the microscope head not being in the correct focus position. Remedy: Clean the lens with cleaner/compressed air, or adjust the microscope height with the focusing knob. Higher magnification requires the head to be closer, lower magnification requires more distance.
- Dark Field of View / Moving Image: If one side is dark or the image moves while focusing, the specimen might not be fixed. Remedy: Secure the slide to the stage with clips.
- Not Bright Enough Field of View: The light source may be absent or too dim. Remedy: Ensure a light source (ring light, built-in illuminator, or gooseneck) is used, or adjust its intensity to a higher setting.
- Stains/Dust on Lenses: If stains, dust, or dirt accumulate on the condenser, objective, eyepieces, or base lens, the image will be affected. Remedy: Thoroughly clean all lenses with lens cleaner or a lint-free non-abrasive cloth.
-
Mechanical Issues:
- Focus Knob Does Not Turn: The tension knob is too tight. Remedy: Loosen it by grabbing both knobs on the focusing rack and twisting them in opposite directions.
- Stage Declines by Itself: The tension knob is too loose. Remedy: Tighten it by grabbing both knobs on the focusing rack and twisting them in opposite directions.
- Focusing Knob Won't Raise/Lower Head: The focusing rack has reached its maximum travel distance in either direction. Remedy: Move the focusing rack higher or lower on the pillar if using a stand with a pillar.
This comprehensive approach to description, specifications, usage, and maintenance ensures that users can effectively operate and care for their AmScope SE400 Series microscope, maximizing its performance and lifespan.