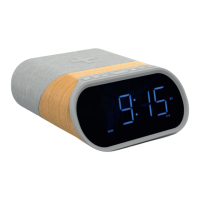
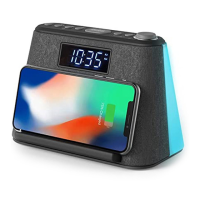
This document describes the Anko Clock Radio, models 42570417, 42570394, and 42570400. It serves as a user manual, providing instructions for operation, maintenance, and safety.
Function Description:
The Anko Clock Radio is a versatile device designed for household use, combining the functionalities of a clock, alarm, and radio. Its core features include:
- Clock: Displays time in either 12-hour or 24-hour format. A 12H system indicator lights up during PM hours.
- Two Alarms: The unit supports two independent alarms, Alarm 1 and Alarm 2. Each alarm can be set to trigger either a buzzer sound ("buzz") or a radio station ("rAd"). Indicators for Buzzer ringing and Radio ringing are present for both alarms.
- Snooze Function: Allows users to temporarily silence a ringing alarm for 9 minutes, after which the alarm will ring again.
- Sleep Function: A programmable sleep timer enables the unit to play radio for a set duration (decreased in 10-minute increments) before automatically turning off.
- Radio: Features both FM and AM bands.
- FM Radio: Frequency range of 87.5-108.0 MHz. Includes an FM Station searching indicator and an FM frequency indicator. For optimal reception, the FM antenna (located at the rear) should be fully extended and relocated if necessary.
- AM Radio: Frequency range of 531-1602 KHz. For optimal reception, the unit should be relocated if necessary.
- 20 Preset Stations: Users can store up to 20 favorite FM or AM radio stations for quick access.
- Dimmer Function: Allows adjustment of the LED display brightness to a high or low level when the unit is in standby mode.
Important Safeguards:
Users are advised to read the instruction manual thoroughly before operation to prevent damage and ensure proper use. Key safety points include:
- Indoor Use Only: The appliance is strictly for indoor use.
- Electroshock Danger: Do not immerse the appliance, power cord, or power plug in water or other liquids. Avoid placing it near liquids (e.g., bathtubs, sinks, swimming pools) or operating it with damp hands.
- Handling: Never grasp the power plug with damp or wet hands.
- Manufacturer Liability: The manufacturer is not liable for damages caused by incorrect usage or mishandling.
- Child Safety: Not intended for use by young children or infirm persons without adequate supervision. Children should be supervised to prevent them from playing with the appliance.
- Heat and Flames: Keep the appliance away from hot surfaces and naked flames. Do not place objects with naked flames (like candles) on or next to the appliance.
- Liquid Exposure: The appliance should not be exposed to dripping or splashing, and no objects filled with liquids (like vases) should be placed on it.
- Sunlight Exposure: Avoid direct sunlight.
- Damage: Do not use if damaged. Defective components must only be replaced by the manufacturer, customer service, or qualified persons. Do not dismantle or repair the appliance yourself.
- Foreign Objects: Do not insert foreign objects into the housing.
- Ventilation: Do not cover the appliance while in use.
- Power Source: Operate only with the power source indicated on the marking label (DC 5V).
- Power Cord: Always turn off power before plugging/unplugging. Prevent damage to the power cord by avoiding squeezing, bending, or rubbing on sharp edges. Keep it away from hot surfaces and open flames. Always pull the plug, not the cord, when disconnecting.
- Socket Accessibility: Plug into an easily accessible socket for quick disconnection in emergencies. The mains plug serves as a disconnecting appliance.
- Malfunctions: If the appliance malfunctions due to electrostatic discharge or short-term overvoltage, disconnect it from the power supply and reconnect it.
- Lightning Storms/Long Periods of Disuse: Unplug the appliance during lightning storms or when unused for extended periods.
Battery Safety (for Memory Backup):
- Battery Type: Use only Alkaline or rechargeable AAA batteries (2x1.5V, not included).
- Leakage: If batteries leak, remove them with a cloth and dispose of them. Avoid contact with skin and eyes. If contact occurs, flush thoroughly with water and seek medical attention.
- Explosion Danger: Do not charge, reactivate, take apart, throw in fire, or short-circuit batteries.
- Temperature: Do not expose batteries to extreme temperatures (direct sunlight, fire, heaters).
- Correct Insertion: Insert batteries according to the correct polarity (+ and -).
- Mixing Batteries: Do not mix old and new batteries, different types, or different manufacturers.
- Swallowing Hazard: Batteries are life-threatening if swallowed. Keep out of reach of children and pets. Seek immediate medical help if swallowed.
- Child Supervision: Do not allow children to change batteries without adult supervision.
- Battery Compartment: If the battery compartment door does not secure closely, stop using the appliance and keep it away from children.
- Long-term Storage: Remove batteries if the device is not used for an extended period to prevent damage from leakage.
- Disposal: Remove batteries before disposing of the device. Expired batteries must be disposed of environmentally friendly and according to legal regulations.
Usage Features:
- Power On/Off: Press the Power button (1) to turn the Radio on or put it into standby mode.
- Setting the Clock:
- Enter standby mode.
- Press and hold SET (6) to select 12H or 24H system using the Tune down/Previous (3) or Tune up/Next (4) buttons, then confirm with SET (6).
- Set hour digits using (3) or (4) when flashing, confirm with SET (6).
- Set minute digits using (3) or (4) when flashing, confirm with SET (6).
- Setting Alarms:
- Enter standby mode.
- Press and hold Volume down/Alarm 1 (7) for Alarm 1 or Volume up/Alarm 2 (9) for Alarm 2 until hour digits blink.
- Adjust hour digits using (3) or (4), save with (7) or (9).
- Adjust minute digits using (3) or (4), save with (7) or (9).
- Select wakeup mode (buzzer or radio) using (3) or (4), save with (7) or (9).
- Select wakeup volume using (3) or (4), save with (7) or (9).
- Stopping Alarm: Press the Power button (1) when the alarm rings.
- Turning Alarm On/Off:
- Enter standby mode.
- Press (7) or (9) to deactivate the alarm. Previous presets will be cancelled.
- Snooze Function: Press SNOOZE (8) once when the alarm rings to pause it for 9 minutes.
- Sleep Timer:
- Select desired radio station and volume.
- Repeatedly press SNOOZE (8) to select a sleep time (decreases in 10-minute increments). The unit will play for the selected time then turn off.
- Press SNOOZE (8) repeatedly until "OFF" appears to cancel.
- Radio Operation (FM/AM):
- Turn on the Radio using Power (1).
- Press AM/FM (2) repeatedly to select FM or AM mode.
- Automatic Search: Press and hold (3) or (4) to automatically search for a station.
- Manual Tuning: Press (3) or (4) repeatedly to fine-tune.
- Storing Presets: Press and hold MEMORY (5), "P01" will blink. Select storage location with (3) or (4), confirm with MEMORY (5). Repeat for up to 20 stations.
- Auto Scan and Store: Press and hold SET (6) to scan and store available stations automatically.
- Recalling Presets: Press MEMORY (5), then use (3) or (4) to select the desired station.
- Volume Adjustment: Adjust sound level using Volume down/Alarm 1 (7) or Volume up/Alarm 2 (9).
- Dimmer Function: In standby mode, press SNOOZE (8) to adjust LED display brightness (high or low).
Maintenance Features:
- Cleaning:
- Wipe the housing with a dry, soft cloth.
- Do not use petrol, alcohol, or other abrasive cleaners.
- Always pull the plug and remove batteries before storage.
- Battery Replacement: When the device functions weaken, replace all batteries.
Technical Specifications:
- Power Source: DC 5V 1A (via AC adapter).
- Backup Battery: DC3V, 2x1.5V AAA batteries (not included). These batteries prevent loss of time and settings during power failures but do not power the display. Clock accuracy may decrease with battery-only operation.
- Frequency Range:
- FM: 87.5-108.0 MHz
- AM: 531-1602 KHz
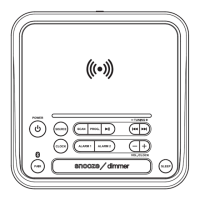
Parts Overview:
- Front View:
- 12H System indicator (PM time)
- Buzzer ringing of Alarm 1 & 2
- Radio ringing of Alarm 1 & 2
- Clock indicator
- FM Station searching indicator
- FM frequency indicator
- Top View (Buttons):
- Power Button
- AM/FM Button
- Tune down/ Previous Button
- Tune up/ Next Button
- MEMORY Button
- SET Button
- Volume down/ Alarm 1 Button
- SNOOZE/ Sleep/ Dimmer Button
- Volume up/ Alarm 2 Button
- Rear View:
10. DC IN Jack
11. FM Antenna
12. Speaker
- Bottom View:
13. Backup Battery Compartment (for 2x AAA batteries)
The manual emphasizes the importance of retaining the receipt for warranty claims and provides contact information for customer service in Australia and New Zealand. The product comes with guarantees that cannot be excluded under Australian Consumer Law and New Zealand legislation.