16
XTX Second Stage Regulator Maintenance Manual
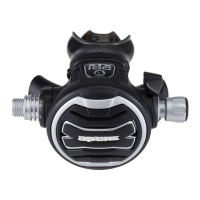
8. Rotate the Venturi Ring (13) on the Venturi Lever Body
(14). Grease the Venturi Lever body as shown. Align
the Arrow on the Venturi Ring with the line on the
Venturi Lever Body above the LEFT text. Press the
Venturi Ring rmly onto the end of the Venturi Lever
Body, until it clicks into place.
9. Install a lubricated ‘O’ Ring (9) onto the Venturi Lever
(13 + 14). Point the Venturi Lever upward and insert
it into the side of the Case marked ‘Left’ . Press it
against the Case so the ‘O’ Ring is captured.
NOTE: The Arrow and line must be aligned to ensure
that the two parts fasten together correctly. Ensure that
the correct conguration of regulator is selected. I.e.
if the Regulator is to be congured as Left Handed,
then the arrow must be aligned to the line with LEFT
underneath.
CAUTION: Ensure that the parts of the
Venturi Lever are rmly pressed together.
There should be a step as shown in the
photo on the right above. An audible click
should be heard when pressing together.
10. Install lubricated ‘O’ Ring (9) onto the Blanking Piece
(10). Point the Blanking Piece upward and insert it into
the Case. Press it against the Case so the ‘O’ Ring is
captured.
11. Rotate the Spindle Collar (17) on the Valve Spindle
(18) until it clicks into position. The Valve Spindle
should look like the photo on the right.
WARNING: Ensure that the spindle collar is
set in the correct position. Failure to do so
will result in a substantial loss of breathing
performance. The photo below shows the
Valve Spindle in both the Left and Right hand
congurations.
CAUTION: Ensure that the Spindle Collar
clicks rmly into position and that the entire
Valve Spindle Hole is visable.