5
English
movie 5.1
solo
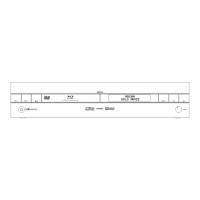
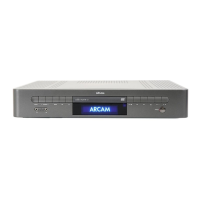
front panel controls
Power
Note that the primary power-switch for Solo Movie
5.1 is on the rear of the unit. If the power light is not
illuminated at all, check that the unit is receiving mains
power and the rear power switch is ‘on’.
Press the POWER button to switch Solo Movie 5.1
between ‘on’ and ‘stand-by’.
When Solo Movie 5.1 is in stand-by, the light next
to the power button on the front-panel glows red,
and the front-panel display shows the current time.
Pressing POWER when the unit is in stand-by will
cause the unit to switch on and the power button
light turns blue.
You can also press and hold the POWER button to
put the unit into ‘hard stand-by’ – a very low-power
option that retains clock settings (see page 21).
Menu
In power stand-by mode,
press the MENU button to
switch between the clock and
the alarm display.
In power-on mode, press
MENU to access the Amplifier
menu. Press and hold MENU
to access the Advanced
Set-up (On-Screen Display)
menus.
Source –/+
Press the SOURCE+ or
SOURCE– button to cycle
through the available signal
sources. If the Amplifier
menu is active, these buttons
navigate through the menu
items (see page 14).
Info
Press the INFO button to
cycle through the available
information screens on the
front panel display for the
current source.
OK
Press the OK button to
confirm a selection (a DVD
menu choice, for example).
<
/
1
(Stop/Eject)
Press the
<
/
1
button once to stop a
disc playing: this is a ‘resume stop’. Pressing
the button twice is a ‘complete stop’ (see
page 21).
Press and hold the button (for more than
one second) to open the disc tray.
Headphone output
This 3.5mm stereo jack
socket is for attaching a set
of headphones. Sound to
the speakers is muted when
headphones are used.
Tape input
This is a stereo analogue
input, suitable for audio
sources such as a portable
tape player, MP3 player or
games console.
Play/Pause
Press the
4
/
;
button to start
playing a disc, pause a playing
disc, or resume playing a
paused disc.
Skip back/forward
To skip ‘chapters’ on a DVD
(or ‘tracks’ on a CD), press
/
or
0
. The buttons are also
used to step through option
settings when the Amplifier
menu is active (see page 14).
When skipping back, the first
button press takes you to
the beginning of the current
chapter. Pressing the button
again takes you to the start of
the previous chapter.
Mute
Use this button to mute the
volume. If Solo Movie 5.1 is
muted, pressing the MUTE
button for a second time
or changing the volume will
unmute it.
Volume –/+
Use these buttons to
decrease (–) or increase (+)
the volume. If Solo Movie 5.1
is muted, changing the volume
will unmute it. The current
volume setting is shown on
the front panel display.
Front panel display
This is a vacuum fluorescent
display with variable brightness.
 Loading...