– 4 –
CX
-
3
Flight Computer
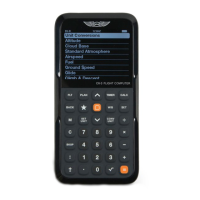
PRESS THE ORANGE POWER button located in
the middle of the CX-3 to turn the ight computer on.
Hold the orange power button for 3 seconds to turn
the ight computer off. The CX-3 keypad backlighting
will automatically turn off after 3 minutes of inactivity;
backlighting can be turned back on by pressing any
key. If left inactive for 10 minutes, the CX-3 will turn
off; information will be saved and you can resume
by pressing the power button. This feature prevents
battery exhaustion if the computer is inadvertently left
on. When rst turned on, the CX-3 will return to the
most recent menu used before the device was last
turned off.
◗ SETTING PREFERENCES
Press the button, scroll to the item you want to
set, and tap enter.
Theme
Choose from three options for maximum visibility while
in use.
— Standard: Black background, white lettering
— Night: Black background, green and white lettering
— Daylight: White background, black lettering
Backlighting
Choose from four options to improve visibility given the
ambient light conditions.
— Normal: Medium backlit screen; keypad not lit.
— Daylight: Maximum backlit screen; keypad not lit.
— Dusk: Medium-low backlit screen; keypad lit.
— Night: Low backlit screen; keypad lit.
*(Note: Normal backlighting will conserve battery
power for the longest period.)
Time Set
The CX-3 uses a 24-hour clock and does not account
for daylight saving time. The internal clock lets you
set both local and UTC time and will continue running
even with the calculator turned off. The CX-3 contains
a single clock representing Coordinated Universal
Time (UTC), also known as Greenwich Mean Time
(GMT) or Zulu time. There are two steps to set the
internal clock. First, set the UTC or Local time and
Destination time. Next, set the Timezone for both
local and destination.
If the time is after noon, you will need to enter the
time based on a 24-hour clock; for example, 2 p.m.
would be 14:00:00. To set the clock to 1:30 p.m. in
the Pacic Time Zone:
1. Press button, scroll to Time Set and tap
enter.
2. Scroll to Time Zone: Local and tap enter.
3. Scroll up to select the Pacic Time Zone and tap
enter.
4. Scroll to Time Set: Local.
5. Input and tap enter.
6. You will now see UTC 21:30:00 and Local
13:30:00.
7. Scroll to Time Zone: Destination and tap enter to
set a destination Time Zone
The display time on the top status bar will show
the time as displayed under Time Set: Local. If you
would like the status bar to display UTC time, select
“GMT, Western European” under Set Time Zone:
Local. Note that a Z now appears after the display
time to signify that all times shown are UTC.
Default Units
Set the device to default to U.S. or Metric units.
Unit Changes
This allows for units to be changed for a given
calculation per screen or per line item. For example,
“Individually” will modify the unit for a single line in a
given calculation while “Per Screen” will change all
instances of that unit for a given calculation.
Favorite
This allows for creating a shortcut to a specic
function. This shortcut will be saved and accessed by
pressing the button.
GETTING STARTED
SET
SET
01 : :33