Do you have a question about the Ashford INKLE LOOM and is the answer not in the manual?
Details the step-by-step process for assembling the loom, including attaching parts with screws and glue.
Instructs to wrap the warp thread around the handy warp starter.
Explains the first round of warping, guiding the thread around pegs and tension block.
Details the second round of warping, guiding the thread around pegs and tension block.
Instructs to repeat the first two rounds until the warping is complete.
Passes shuttle through space, pulls it down, and out, leaving weft thread hanging.
Passes shuttle through space, pulls it firmly, and out, tightly to close weft.
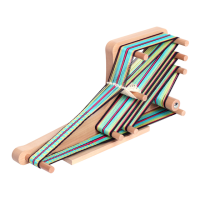
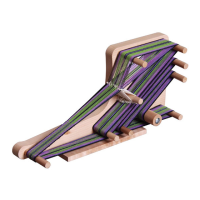
The Ashford Inkle Loom is a specialized weaving device designed for creating strong, colorful braids, often referred to as inkle bands. These braids are characterized by a dominant warp face, meaning the lengthwise threads are prominently visible, and the weft (cross-way) thread is packed so closely that it is not visible.
The primary function of the Inkle Loom is to facilitate the weaving of narrow, sturdy bands. The weaving process involves creating "sheds" – openings between warp threads – through which the weft thread is passed. The loom utilizes leashes to control the warp threads, distinguishing between "open" threads (those not going through a leash) and "leashed" threads.
Two main sheds are created during the weaving process:
The rhythm of changing sheds is crucial for efficient weaving. When weaving from left to right, open threads are pushed down with the right hand. When weaving from right to left, open threads are lifted with either the left or right hand.
The assembly process requires a screwdriver and hammer. Key steps include:
The loom supports both "Long Warp" and "Short Warp" configurations. The warping process involves wrapping the warp thread around the pegs as shown in the diagrams, starting from a handy warp starter screw and washer. The thread goes up over the top peg and around the tension block. Color changes can be introduced at the starting point. After warping, the first warp thread from the warp starter is undone and tied to the end thread. When changing colors, the last thread is tied to the next thread at the front.
Leashes are made using string or strong cotton. The string is wound around two designated leash pegs and then cut as shown. Each cut string is folded in half and a knot is tied 1cm (3/8") from the end. Leashes are then attached to all the top threads by taking the leash over the lower peg, up between the center threads, over a top thread, and down and around the same peg.
The first 2-3cm of weaving may appear poor due to incorrect tension or crossed threads; this section can be unraveled later. To maintain straight edges:
To advance the warp, release the wing nut on the tension block, move the tension block down to slacken the warp, and pull the warp forwards until the end of the woven piece is about 5cm from the front peg. Gradually move all threads around from peg to peg. It is important not to pull too tight, especially with long warps, to avoid breaking pegs. After moving, tighten the tension block and push leashes back to their correct position.
When the warp can no longer be moved or woven, and the knots are close to the leashes, the entire piece is cut off the loom a few centimeters behind the leashes. The threads are then pulled out of the leashes, leaving nothing tied to the loom. To secure the weft, it can be sewn back through three or four sheds.
The last weft thread can be darned in, leaving a fringe. Warp ends can be tied in small overhead knots. For a twisted fringe, bundles of threads are twisted to the right between thumb and finger, then these twisted threads are warped together in the opposite direction.
The loom allows for various patterns based on warping techniques, as well as pick-up and pick-down patterns, and the use of different colors and thicknesses of warp and weft.
Inkle loom products have diverse uses, including belts, ties, wall hangings, bookmarks, curtain ties, shoelaces, edging for clothes, shoulder straps, watch straps, headbands, guitar and camera straps, halter straps, and leashes. Multiple woven pieces can be sewn together to create larger items like bags, purses, cushion covers, room dividers, tea cosies, placemats, pot plant hangers, and moccasins.
Before assembly, the kiln-dried silver beech timber should be sanded smooth and sealed. This step is crucial for protecting the wood from climatic changes and staining, while also enhancing its natural character and beauty. The Ashford Wax Finish Kit is specifically recommended for this purpose, available from Ashford dealers. Proper finishing ensures the longevity and aesthetic appeal of the loom.
Ashford offers a guarantee where any fault in manufacture will result in a replacement of the item. To validate the guarantee, customers are advised to visit their website or write to Ashford.
Ashford encourages users to join the Ashford Club for access to the Wheel Magazine, competitions, and more information at www.ashfordclub.co.nz. This provides a resource for ongoing support, inspiration, and community engagement.
| Brand | Ashford |
|---|---|
| Model | INKLE LOOM |
| Category | Spinning Wheels |
| Language | English |