Quick guide
1
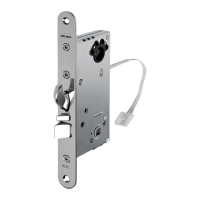
Connect the cables of the motor lock to DAC (White =
CAN H, Brown = CAN L, Green = 12 V, Yellow = 0 V).
2
Make sure that the termination jumper link in DAC
is set to ON.
3
The input “Door monitor” should be jumper linked
and the Button input open, in most cases.
4
Set all DIP switches to OFF, applies in most cases.
(For more information, see Initiation matrix).
5
Turn the power on. (Blue DWG LED starts flashing.)
Wait until blue DWG flashes fast, can take up to 3
minutes as a maximum. DO NOT TURN OFF the power
during the initiation.
6
When yellow PWR LED is lit and blue LED flashes fast
the initiation is done. (If blue LED flashes fast and yellow
PWR LED is unlit the initiation has failed.)
7
Switch off the power.
8
Set DIP 8 for stand alone mode. See also on page 12
for different running/function modes.
9
Turn the power on and control the function.
Installation and initiation/pairing of Hi-O motor lock and DAC
For further information, see the user guide.
-
Vit/White
Brun/Brown
Grön/Green
Gul/Yellow
17-24V AC/DC
Öppna/Open
Dag/Natt,
Day/Night
11
 Loading...