QUICK START GUIDE – READ ME FIRST
MDU Solutions
®
– UCrypt
®
QAM to QAM – Quick Start Guide 2-1
QUICK START GUIDE – READ ME FIRST
2. Quick Start Guide – READ ME FIRST
For detailed information on conguration, go to the ATX website (atxnetworks.com) in the Resources & Support section, User
Documents sub-section to download the Installation & Operation Manual.
This Quick Start Guide will take you through the steps required to get your UCrypt up and running if you have not done this
before. Follow the steps below:
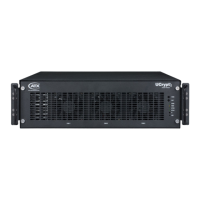
2.1 Install and Power Up
You may be doing this rst setup in your lab so detailed installation details are not provided here. See the Installation and
Operation Manual for installation details. You can get it from the ATX website (atxnetworks.com) in the Resource & Support
section, User Documents sub-section. You will rst need to get a user name and password from your ATX Networks support
or sales representative and the contact numbers are on this same web page.
Refer to “Quick Start Guide – READ ME FIRST” on page 2-1 for a brief overview of mounting and powering information.
NOTE: If the unit is to be mounted in a rack, it is essential to attach the rear mounting ears to
mounting rails to provide support or alternately install the equipment on a well supported shelf.
2.2 Plug in the CableCARD™ Modules
The CableCARD host slots are on the rear panel of the UCrypt device for some versions or behind the front fan panel in the
Version 2 model. CableCARD modules are hot swappable so they may be inserted or removed at any time. Depending on the
ordered conguration, your UCrypt device may have 1 to 10 active CableCARD slots. CableCARD modules may be inserted
in any order.
NOTE: Great care should be taken with the CableCARD modules to not forcibly insert them - the
card should slide in and seat easily. Forcing the card into the slot is likely to result in bent pins in
the PCMCIA host interface which will prevent proper operation of the UCrypt device.
Refer to “Quick Start Guide – READ ME FIRST” on page 2-1 for instructions for activating CableCARD modules.
2.3 Connect the Cables
A PC with web browser and Ethernet network port will be required to congure the UCrypt device. Establish a network
connection with the supplied crossover network cable.
Connect QAM digital input signals to the input F tting at a level of +5 to +10 dBmV per digital carrier.
Refer to “Quick Start Guide – READ ME FIRST” on page 2-1 for more details about cabling.
2.4 Start the Management Interface
The software for conguring the UCrypt Management Interface is provided by a built in secure web server which presents
conguration pages. You will connect with the secure web server at https://192.168.0.23 which is the default address, and log
in to access the Interface.
The UCrypt device will take about 90 seconds to boot up after applying power before you can begin conguration.
Refer to “Quick Start Guide – READ ME FIRST” on page 2-1 for basic setup instructions to connect to the Management
Interface
2.5 Change Network Settings
If it is necessary to change the network IP address to access this unit remotely on a network, that is done on the System
conguration tab
Refer to “Quick Start Guide – READ ME FIRST” on page 2-1 to change the IP addresses.
CHAPTER 2: