3.3 Rear Panel Description
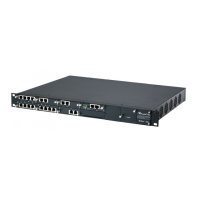
The device's rear panel is shown in the figure below and described in the subsequent table.
Figure 3-2: Rear Panel
Note: The figure above is used only as an example. The hardware configuration
depends on the ordered model.
Table 3-5: Front Panel Description
Item # Label Description
1
POWER
12V -- 3A
AC power supply plug entry for connecting the device to the
external AC power supply adapter.
2 ON / OFF Power button which powers on the device when pressed in and
powers off the device when pressed again (pressed out).
3
CONSOLE
RJ-45 port for RS-232 serial communication with the device.
4
USB 2.0 port, which can be used for external USB hard drive or
flash disk (disk on key) for USB storage capabilities (for example,
for configuration file)
5 // Reset pinhole button for resetting the device or for restoring it to
factory defaults. To restore the device to factory defaults, do the
following:
With a paper clip or any other similar pointed object, press and
hold down the pinhole button for at least 12 seconds, but no
longer than 25 seconds
6 S1 (Slot 1)
GE LAN
Up to four Gigabit Ethernet (1000Base-T) ports (RJ-45) for
connecting to LAN network such as IP phones, computers, and
switches. These ports support half- and full-duplex modes, auto-
negotiation, and straight or crossover cable detection. For a
description of the LAN LEDs, see Section 3.3.1 on page 16.
7 S1 / S2 (Slot 1 / Slot 2)
FXS / FXO / BRI
Telephony interfaces, depending on ordered configuration:
Up to four ISDN BRI port interfaces (RJ-45)
Up to four FXS port interfaces (RJ-11)
Up to four FXO port interfaces (RJ-11)

 Loading...